2025. 11. 9. 03:34ㆍCICD
Argo CD
- Git 저장소를 단일 진실 공급원으로 사용하여, Kubernetes 클러스터에 애플리케이션을 배포하고 그 상태를 관리하는 도구
- 개발자 Git저장소(Push)하고 Argo CD가 감지후 자동으로 쿠버네티스 클러스터에 배포(CD - Continious Deploy)
Argo CD를 이해하기 위해서는 GitOps 개념이 필요하다.
Gitops(깃옵스)
- 소스 코드뿐만 아니라 Kubernetes 배포에 필요한 모든 설정(yaml 파일, helm차트 등)을 Git 저장소에 관리
- 동기화(Syncronize) : Argo CD와 같은 도구가 현재 클러스터의 '실제 상태(Actual State)'와 Git의 '원하는 상태(Desired State)'를 비교하여, 차이가 나면 자동으로 원하는 상태로 맞춘다.
Argo CD 구성 요소
1. API 서버
gRPC/REST 서버로 구현되어 있으며, Argo CD Web UI 및 argocd CLI의 요청을 처리하는 인터페이스 역할을 수행한다.
[ 주요 기능 ]
- 외부 인터페이스 제공 : Web UI를 제공하고 CLI의 모든 API 요청을 수신하고 처리한다.
- 인증 및 인가 : 사용자 로그인(OIDC, OAUTH2 등) 및 RBAC(Role-Based Access Control) 정책을 적용하여 접근 제어 가능
- 애플리케이션 관리 : 애플리케이션 생성, 삭제, 수정, 동기화 요청을 확인하고 상태 정보 제공
- 상태 취합 : 다른 컴포넌트(Argo CD Controller, Repository 등)의 정보를 취합하여 사용자에게 일관된 뷰를 제공
결론적으로, API 서버는 Argo CD의 관리 및 모니터링을 위한 통신 허브 역할 담당
2. Application Controller
Argo CD의 핵심 엔진이다. 해당 컴포넌트는 쿠버네티스 컨트롤러 패턴을 기반으로 작동하며, 배포된 애플리케이션의 상태를 지속적을 모니터링하고 관리
[ 주요 기능 ]
- 조정 루프(Reconciliation Loop) : CRD에 정의된 내용을 기반을 주기적으로 조정 루프를 실행
- 상태 비교 : Git 저장소에 원하는 상태와 클러스터의 현재 상태를 지속적으로 비교
- 상태 감지 : Git저장소와 클러스터 간 차이가 발생하는 경우 OutOfSync 상태로 식별
- 동기화 : OutOfSync 상태의 애플리케이션을 원하는 상태가 되도록 클러스터에 변경 사항 적용
- Self-Healing(자가 치유) : 자동 동기화 및 selfHeal 옵션이 활성화된 경우, Git을 통하지 않은 임의의 클러스터를 원하는 상태로 복구
3. 리포지토리 서버(Repository Server)
Git 저장소와의 통신 및 Manifest 생성을 전담하는 컴포넌트입니다. 이는 보안 및 역할 분리 원칙에 따라 설계되었습니다.
[ 주요 기능 ]
- Git 저장소 접근 : git 저장소 복제 및 캐시 역할
- Manifest 생성 : git 저장소에 저장된 다양한 형태의 설정파일을 해석
- 최종 Manifest 제공 : 해석 과정을 거쳐 생성된 순수한(Plain) Kubernetes YAML Manifest를 API 서버나 애플리케이션 컨트롤러의 요청에 따라 제공
Argo CD 동작 방식 - Gemini
1.애플리케이션 리소스 정의(Application Resource Definition)
ArgoCD Application은 매니페스트가 저장된 Git 또는 Helm 차트와 동기화시킬 쿠버네티스 클러스터 정보를 저장하는 Custom Resource Definition(CRD)를 통해 구성된다.
해당 Application은 아래 정보를 가지고 있습니다.
- source: 배포할 Git 저장소 주소, 브랜치(또는 태그/커밋), Manifest가 있는 경로.
- destination: 배포할 Kubernetes 클러스터 주소와 네임스페이스.
- syncPolicy: 동기화 정책
2.Git 저장소 모니터링(Pull 방식)
Application Controller는 Application 리소스가 생성된 것을 감지합니다.
Application Controller는 Repository Server에게 해당 애플리케이션이 사용 중인 Git 저장소(source)를 확인하라는 명령을 지시합니다.
Repository Server는 해당 Git 저장소의 source.path에 있는 Manifest(Helm, Kustomize 등)를 가져와 해석하고, 최종 배포될 Kubernetes YAML 파일들을 생성하여 캐시됩니다.
3.상태 비교(Diff)
Application Controller는 Kubernetes API 서버를 통해 destination에 지정된 클러스터/네임스페이스의 '현재 상태(Live State)'를 확인합니다.
이후 컨트롤러는 Repository Server가 만들어준 '원하는 상태(Desired State)'와 방금 조회한 '현재 상태(Live State)'를 비교(Diff)합니다.
4. 동기화(Sync)
비교 결과, 두 상태가 다르면 Argo CD는 해당 애플리케이션을 OutOfSync (동기화되지 않음) 상태로 표시합니다.
- 수동 동기화 (Manual Sync): (기본값) 사용자가 Web UI나 CLI를 통해 "Sync" 버튼을 눌러야만 Application Controller가 동기화를 실행합니다.
- 자동 동기화 (Automated Sync): syncPolicy에서 automated를 설정한 경우, Application Controller는 OutOfSync를 감지하는 즉시 '실제 상태'를 '원하는 상태'로 맞추는 작업을 시작합니다.
실습 환경 구축
kind create cluster --name myk8s --image kindest/node:v1.32.8 --config - <<EOF
kind: Cluster
apiVersion: kind.x-k8s.io/v1alpha4
nodes:
- role: control-plane
extraPortMappings:
- containerPort: 30000
hostPort: 30000
- containerPort: 30001
hostPort: 30001
- containerPort: 30002
hostPort: 30002
- containerPort: 30003
hostPort: 30003
EOF
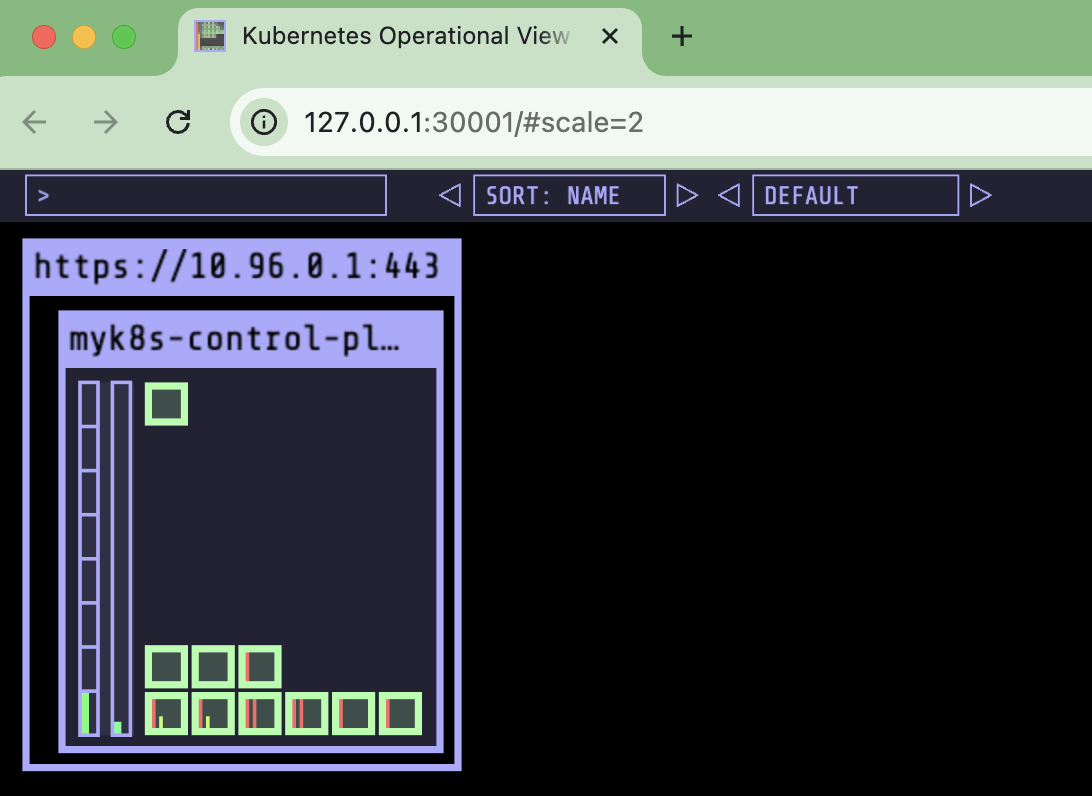
# kube-ops-view Deploy
helm repo add geek-cookbook https://geek-cookbook.github.io/charts/
helm install kube-ops-view geek-cookbook/kube-ops-view --version 1.2.2 --set service.main.type=NodePort,service.main.ports.http.nodePort=30001 --set env.TZ="Asia/Seoul" --namespace kube-system
# kube-ops-view 접속 URL 확인 (1.5 , 2 배율)
open "http://127.0.0.1:30001/#scale=1.5"
Argo CD 설치 - Helm
kubectl create ns argocd
cat <<EOF > argocd-values.yaml
server:
  service:
    type: NodePort
    nodePortHttps: 30002
  extraArgs:
    - --insecure  # HTTPS 인증 X
EOF

# 설치 : Argo CD v3.1.9
# https://github.com/argoproj/argo-helm/blob/main/charts/argo-cd/values.yaml
helm repo add argo https://argoproj.github.io/argo-helm

# Helm install (시간 소요 약 5분)
helm install argocd argo/argo-cd --version 9.0.5 -f argocd-values.yaml --namespace argocd

# Argo CD 각 구성요소 확인
kubectl get-all -n argocd
kubectl get pod,svc,ep,secret,cm -n argocd

# Argo CD crd 확인
kubectl get crd | grep argo

kubectl get appproject -n argocd -o yaml

# Service Account
kubectl get sa -n argocd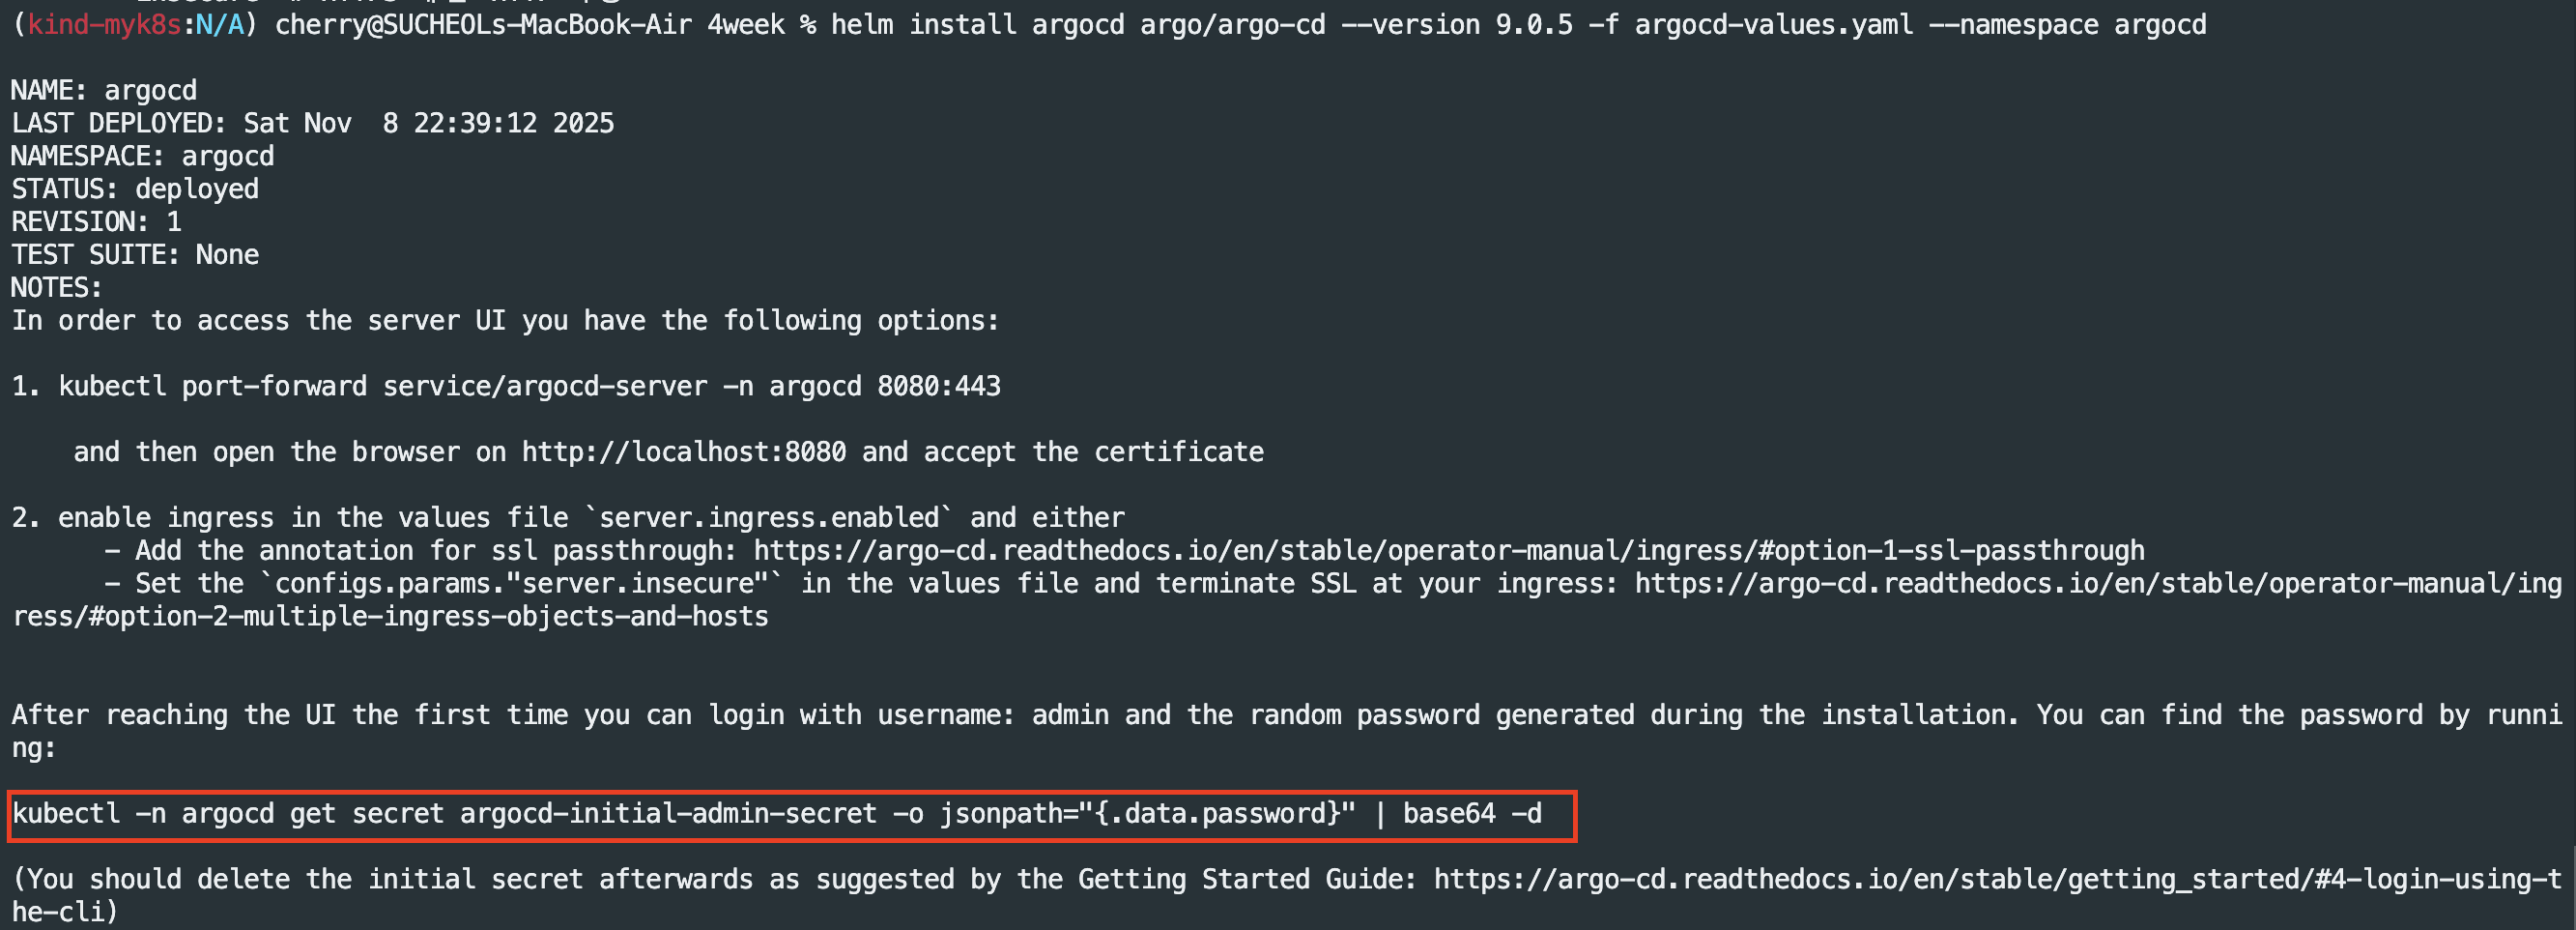
# ArgoCD 각 구성요소들 확인(주요 항목 소개) - 마이크로 서비스 아키텍처로 설계된 여러 컴포넌트의 집합체

applications.argoproj.io (Application)
- 용도: 배포할 단일 애플리케이션 정의
- 이것이 Argo CD의 가장 핵심입니다.
- Application 리소스는 Argo CD에게 "어떤 Git 저장소(Source)에 있는 코드를 / 어떤 클러스터의 네임스페이스(Destination)에 / 어떻게 배포할지"를 알려주는 **선언서(명세서)**입니다.
- Argo CD의 '애플리케이션 컨트롤러'가 이 Application 리소스를 감시하다가, Git의 '원하는 상태'와 클러스터의 '실제 상태'가 다르면 동기화(Sync)를 수행합니다.
- 사용자는 Web UI나 CLI에서 하나의 'Application' 카드로 이 리소스를 보게 됩니다.
appprojects.argoproj.io (AppProject)
- 용도: 애플리케이션 그룹화 및 권한 제어 (보안/테넌시)
- AppProject (애플리케이션 프로젝트)는 여러 Application 리소스를 논리적으로 그룹화하고 격리하는 컨테이너입니다.
- 주요 기능:
- 접근 제어 (RBAC): "A팀은 'A-Project'에만 접근 가능하고, B팀은 'B-Project'에만 접근 가능하다"처럼 Argo CD 내부의 권한을 분리합니다.
- 소스/대상 제한: "A-Project'는 특정 Git 저장소만 사용할 수 있다" 또는 "A-Project'는 'prod' 네임스페이스에는 배포할 수 없다"와 같이 Application이 사용할 수 있는 Git 소스나 배포 대상을 제한하는 보안 경계 역할을 합니다.
- 모든 Application은 반드시 하나의 AppProject에 속해야 합니다. (지정하지 않으면 default 프로젝트에 속함)
applicationsets.argoproj.io (ApplicationSet)
- 용도: 여러 Application 리소스를 자동으로 생성 및 관리
- Application이 '단일' 앱을 정의한다면, ApplicationSet은 '여러' Application을 자동으로 찍어내는 공장(Factory) 또는 템플릿입니다.
- 주요 사용 사례 (Generators):
- Git Directory Generator: Git 저장소의 특정 폴더 하위에 있는 모든 폴더를 각각 별개의 Application으로 자동 생성합니다.
- Cluster Generator: Argo CD에 등록된 모든 클러스터에 동일한 Application을 자동으로 배포합니다.
- List Generator: 목록에 정의된 변수만큼 Application을 생성합니다.
- ApplicationSet을 사용하면 수십, 수백 개의 Application YAML을 직접 관리할 필요 없이, 하나의 템플릿으로 자동화할 수 있습니다.
최초 접속 확인
# 최초 접속 암호 확인
kubectl -n argocd get secret argocd-initial-admin-secret -o jsonpath="{.data.password}" | base64 -d ;echo

# Argo CD 웹 접속 주소 확인 : 초기 암호 입력 (admin 계정)
open "http://127.0.0.1:30002" # macOS (Windows는 웹브라우저에서 집적 접속)


실습 1) 애플리케이션 실행
# finalizers.-resources... : # Argo CD가 Application을 삭제할 때, 관련된 Kubernetes 리소스를 먼저 정리 prune하도록 보장하는 설정
# targetRevision: HEAD       # 브랜치명 또는 commit , HEAD = 기본 브랜치 최신 커밋
# syncPolicy.automated.enabled: true          # 자동 동기화/배포 활성화
# syncPolicy.automated.prune: true            # Git에서 리소스가 제거되면 클러스터에서도 자동 삭제
# syncPolicy.automated.selfHeal: true         # 클러스터 리소스가 수동으로 변경되면 Git 상태로 자동 복구
# syncPolicy.syncOptions.CreateNamespace=true # 배포 대상 네임스페이스 guestbook 가 없으면 자동 생성

# guestbook helm 차트 애플리케이션 생성
cat <<EOF | kubectl apply -f -
apiVersion: argoproj.io/v1alpha1
kind: Application
metadata:
  name: guestbook
  namespace: argocd
  finalizers:
  - resources-finalizer.argocd.argoproj.io
spec:
  project: default
  source:
    helm:
      valueFiles:
      - values.yaml
    path: helm-guestbook
    repoURL: https://github.com/argoproj/argocd-example-apps
    targetRevision: HEAD
  syncPolicy:
    automated:
      enabled: true
      prune: true
      selfHeal: true
    syncOptions:
    - CreateNamespace=true
  destination:
    namespace: guestbook
    server: https://kubernetes.default.svc
EOF

#
kubectl get applications -n argocd guestbook
kubectl get applications -n argocd guestbook -o yaml | kubectl neat | yq
kubectl get pod,svc,ep -n guestbook

# nodeport 변경 시도
kubectl get svc -n guestbook
kubectl patch svc -n guestbook guestbook-helm-guestbook -p '{"spec":{"type":"NodePort","ports":[{"port":80,"targetPort":80,"nodePort":30003}]}}'

# nodeport 변경 시도 반복 : 왜 그럴까?
kubectl get svc -n guestbook
kubectl patch svc -n guestbook guestbook-helm-guestbook -p '{"spec":{"type":"NodePort","ports":[{"port":80,"targetPort":80,"nodePort":30003}]}}'
Argo CD Web UI - 명세서 확인

guestbook 애플리케이션 실행 확인 및 서비스(Cluster IP) 상태 확인

현재 배포된 guestbook 애플리케이션은 Cluster IP로 서비스가 배포된 상태로 로컬 환경에서 접속을 위해 Cluster IP > NodePort로 변경하여 접속 테스트를 진행하였다.


변경이 되지 않는다. 현재 Argo CD에서는 Self HEAL가 Enable된 상태여서 서비스가 변경되지 않는다.
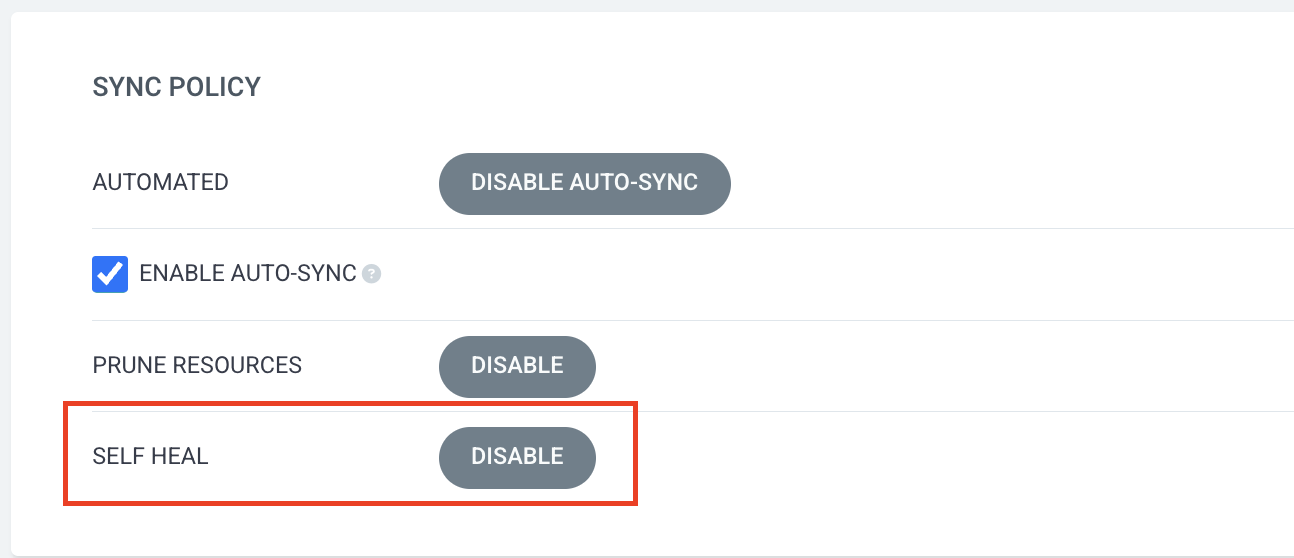
ArgoCD Web UI - Self Heal Disable 이후 NodePort 변경 재시도
Self Heal Disable이란 ? Argo CD가 관리하는 클러스터의 '실제 상태(Actual State)'가 Git에 정의된 '원하는 상태(Desired State)'와 달라졌을 때, 이를 자동으로 감지하고 '원하는 상태'(Git)로 즉시 되돌려놓는(복구하는) 기능입니다.
GitOps의 핵심 원칙인 "Git을 유일한 진실 공급원(Single Source of Truth)으로 삼는다"를 강제하는 강력한 기능입니다.
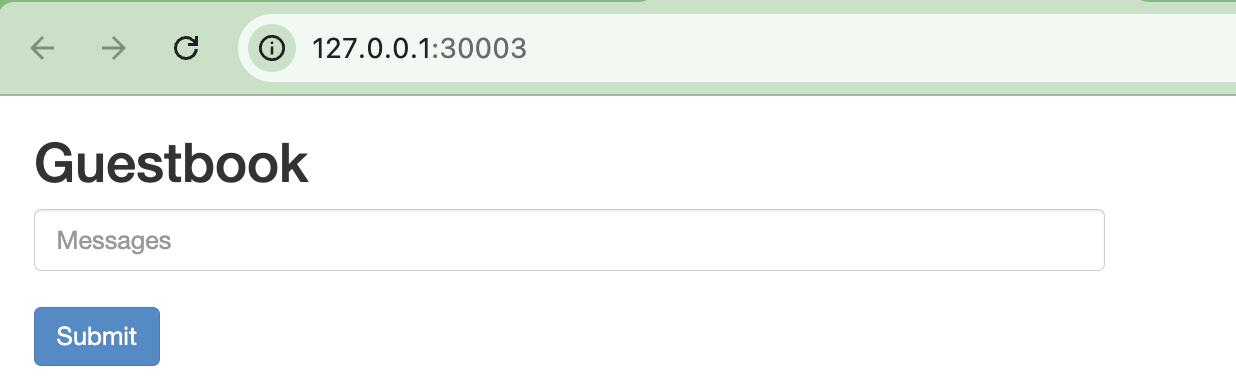
# nodeport 변경 시도
kubectl get svc -n guestbook
kubectl patch svc -n guestbook guestbook-helm-guestbook -p '{"spec":{"type":"NodePort","ports":[{"port":80,"targetPort":80,"nodePort":30003}]}}'

# 호출 확인
curl http://127.0.0.1:30003
open http://127.0.0.1:30003

# App 삭제
kubectl delete applications -n argocd guestbook

실습 정리

Argo CLI
Argo CD CLI(argocd)는 터미널 환경에서 Argo CD 서버를 제어하고 관리하기 위한 전용 도구입니다.
Web UI(웹 대시보드)에서 마우스 클릭으로 할 수 있는 거의 모든 작업을 CLI 명령어로 수행할 수 있게 해줍니다.
동작 방식
Argo CD CLI는 '클라이언트-서버' 모델로 동작합니다.
- 클라이언트(Client): 사용자의 터미널에서 실행되는 argocd CLI 명령어
- 서버(Server): 쿠버네티스 클러스터 argocd 네임스페이스에 떠 있는 argocd-server (API 서버)
순서 : 로그인 > 토큰 발급 및 저장 > 명령어 실행 > 서버 처리 및 응답 > 결과 출력 순으로 동작한다.
Argo CLI 설치
# mac
brew install argocd

# (공통) 버전 정보 확인
argocd version --client

Argo CLI - 로그인

Argo CLI - 정보 확인
# 계정 리스트 조회
argocd account list

# project 리스트 조회
argocd proj list

# 저장소 리스트 조회
argocd repo list

# 클러스터 조회
argocd cluster list

# 애플리케이션 조회
argocd app list
Argo CLI - 애플리케이션 배포
# 애플리케이션 배포
argocd app create guestbook --repo https://github.com/argoproj/argocd-example-apps.git --path helm-guestbook \
  --dest-server https://kubernetes.default.svc --dest-namespace guestbook --values values.yaml

# 애플리케이션 리스트 조회
argocd app list

# 배포 확인
argocd app get argocd/guestbook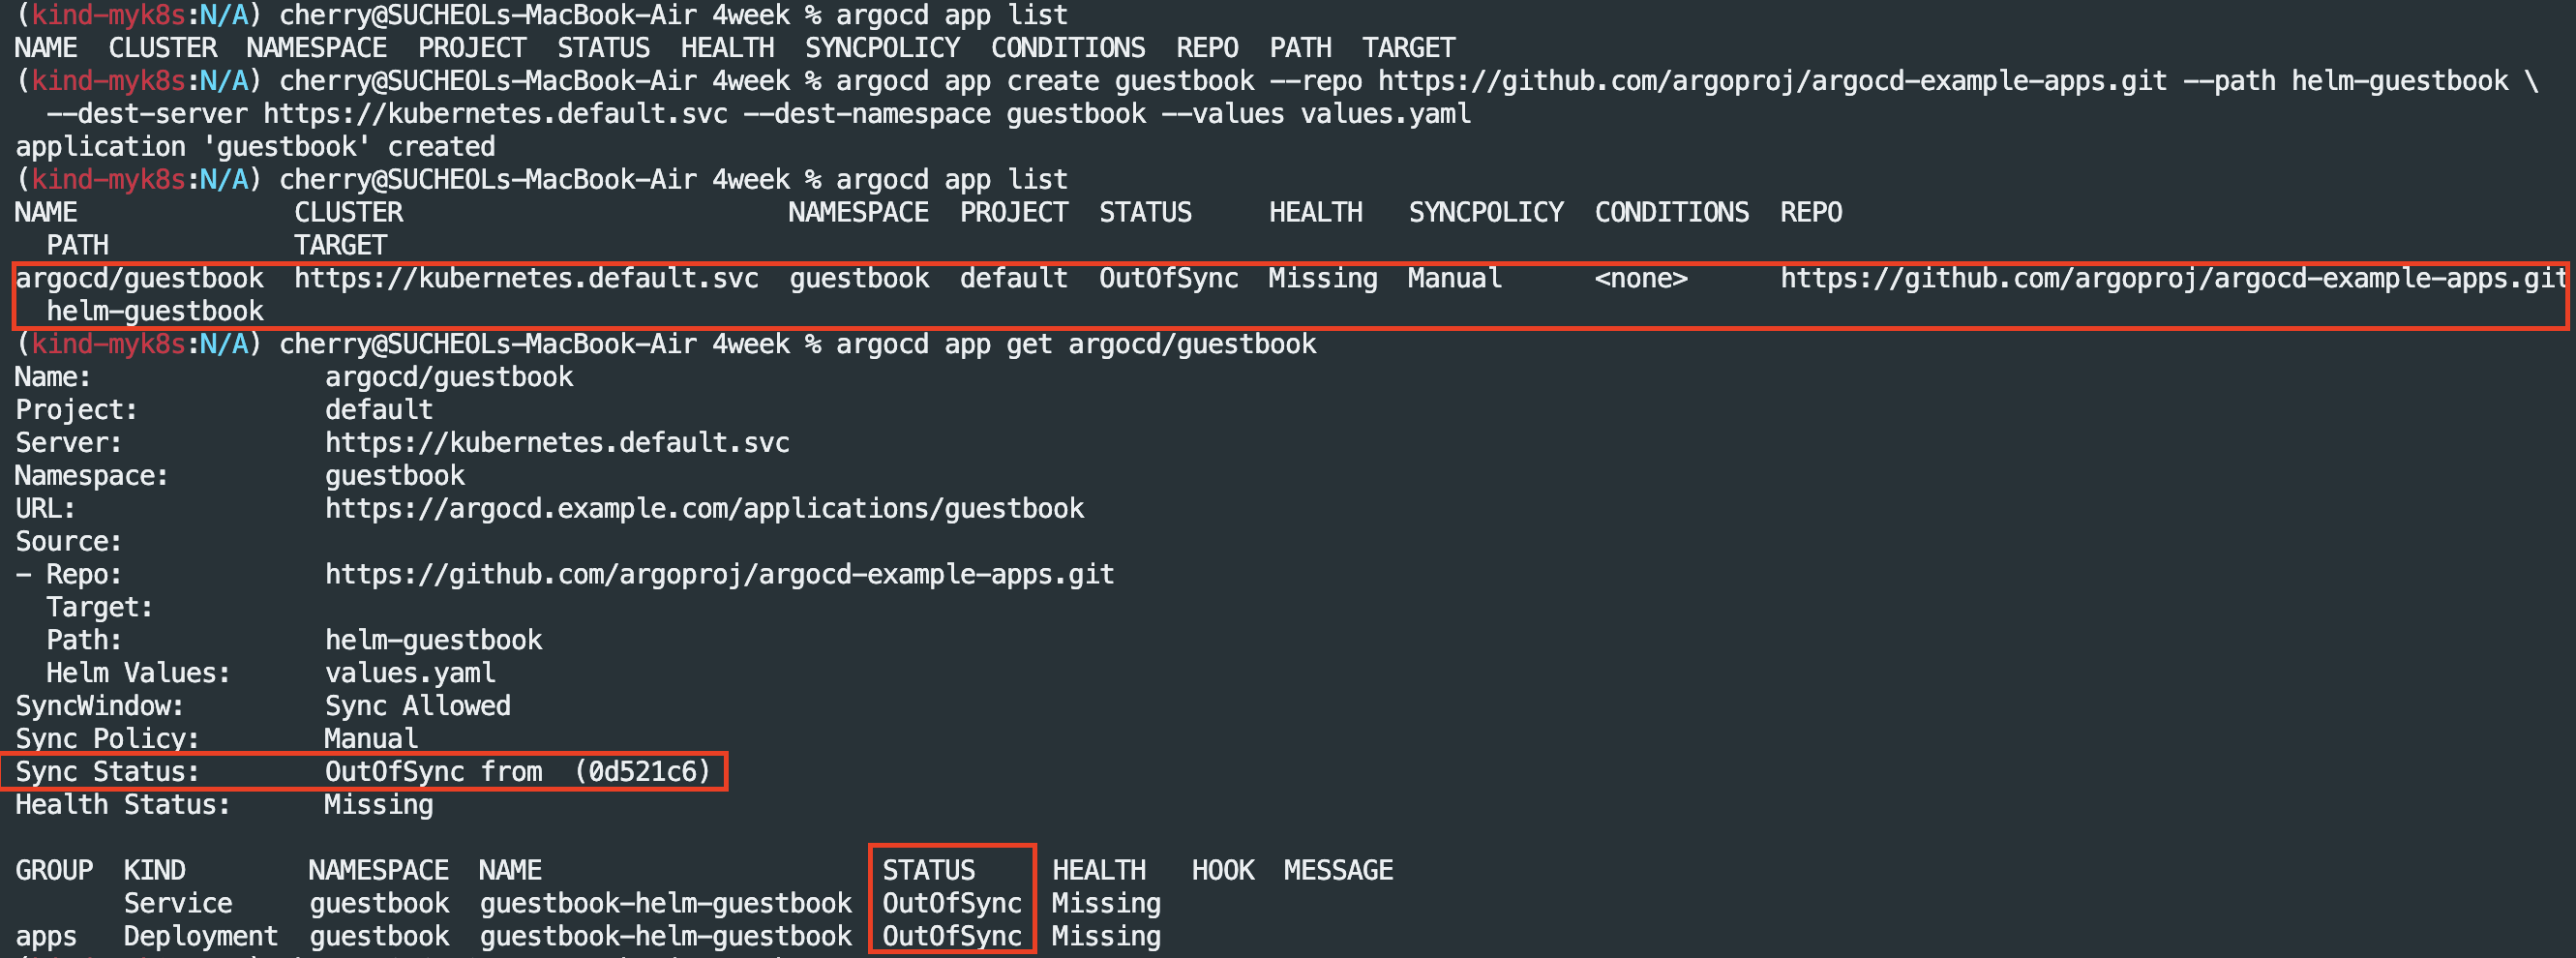
OutOfSync가 발생하는 이유
: argocd app create 명령어는 애플리케이션을 ArgoCD에 등록하는 작업은 수행되지만 배포를 자동으로 하지는 않아 OutOfSync가 발생하여 수동으로 sync 작업을 진행해줄 필요가 있다.
# 직접 sync 실행
argocd app sync argocd/guestbook
argocd app get argocd/guestbook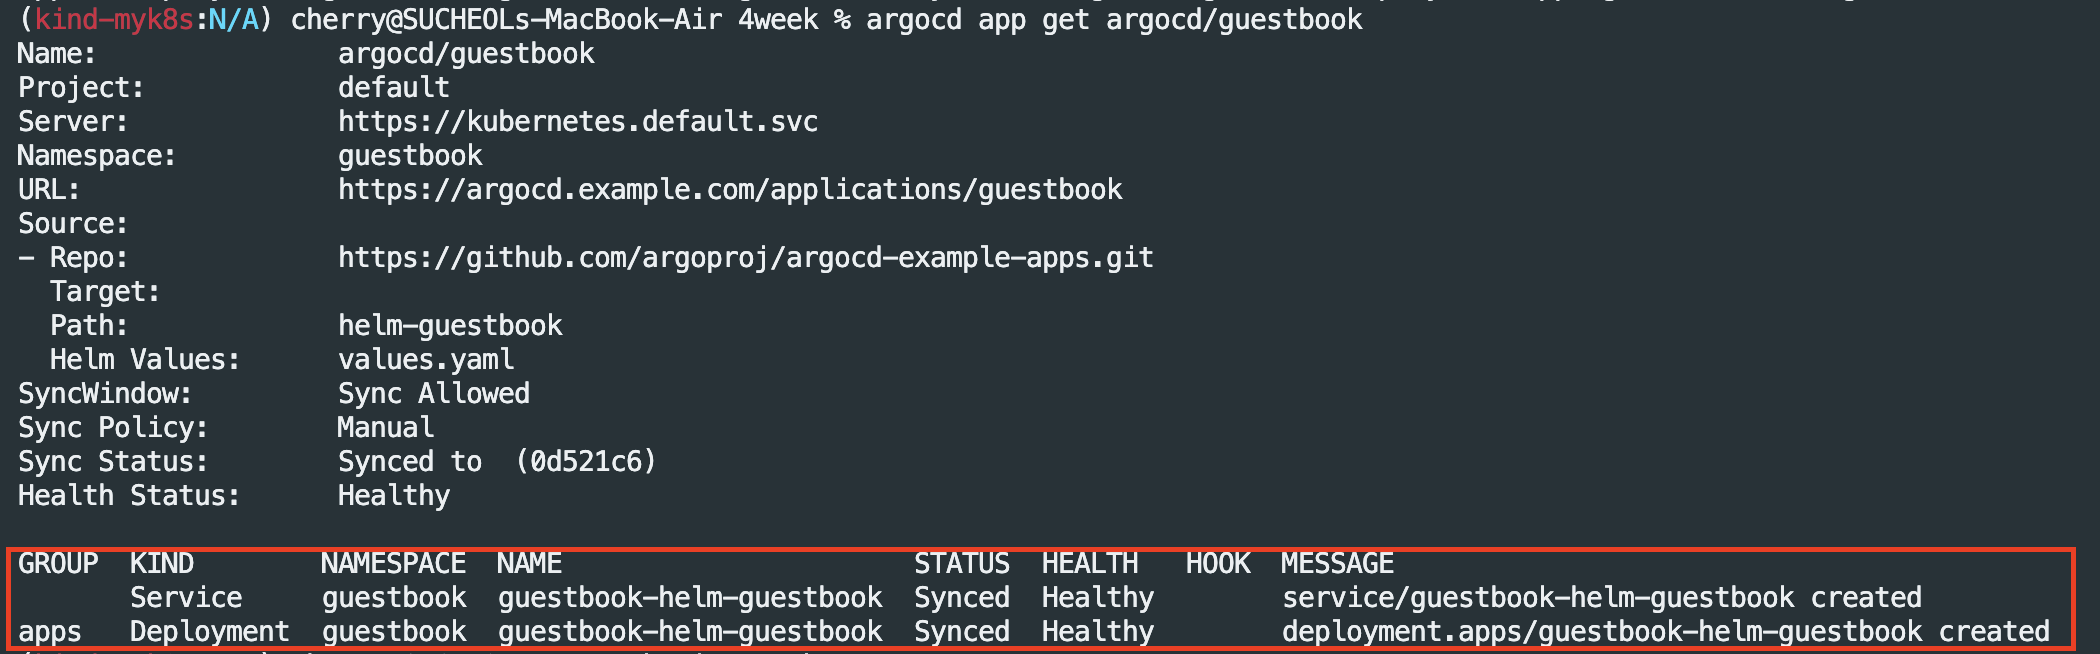
# 삭제
argocd app delete argocd/guestbook
Argo CD Web-based Terminal 기능 설정
Web-based Terminal 기능은 Argo CD의 웹 UI(대시보드)에서 실행 중인 Pod(컨테이너)의 셸(Shell)에 직접 접근할 수 있게 해주는 기능이다.
(Argo CD 웹 화면에서 바로 kubectl exec -it <pod-name> -- /bin/bash 명령어 실행하여 파드 접속 가능)
목적
Pod의 로그를 확인하는 것만으로 부족하여 컨테이너 내부에 직접 들어가 파일 시스템을 확인하거나, 네트워크 상태를 점검하거나, 프로세스를 확인해야 할 때를 위해 UI 환경에서 바로 해결 가능
클러스터 전체의 kubectl 접근 권한을 주지 않고도, 특정 애플리케이션의 Pod에만 접근할 수 있는 권한을 Argo CD RBAC을 통해 세밀하게 제어
다만, 보안상에 이유로 기본 값은 비활성화
Web-based Terminal 적용
# argocd server 에 기본 설정 configmap 확인 : 파드 접속 exec 기능 비활성화 조회
kubectl get configmap argocd-cm -n argocd -o yaml | grep exec.enabled
# argocd server 에 기본 설정 configmap 확인 : 파드 접속 exec 기능 활성화 설정
kubectl patch configmap argocd-cm -n argocd --type merge -p '{"data":{"exec.enabled":"true"}}'
kubectl get configmap argocd-cm -n argocd -o yaml | grep exec.enabled
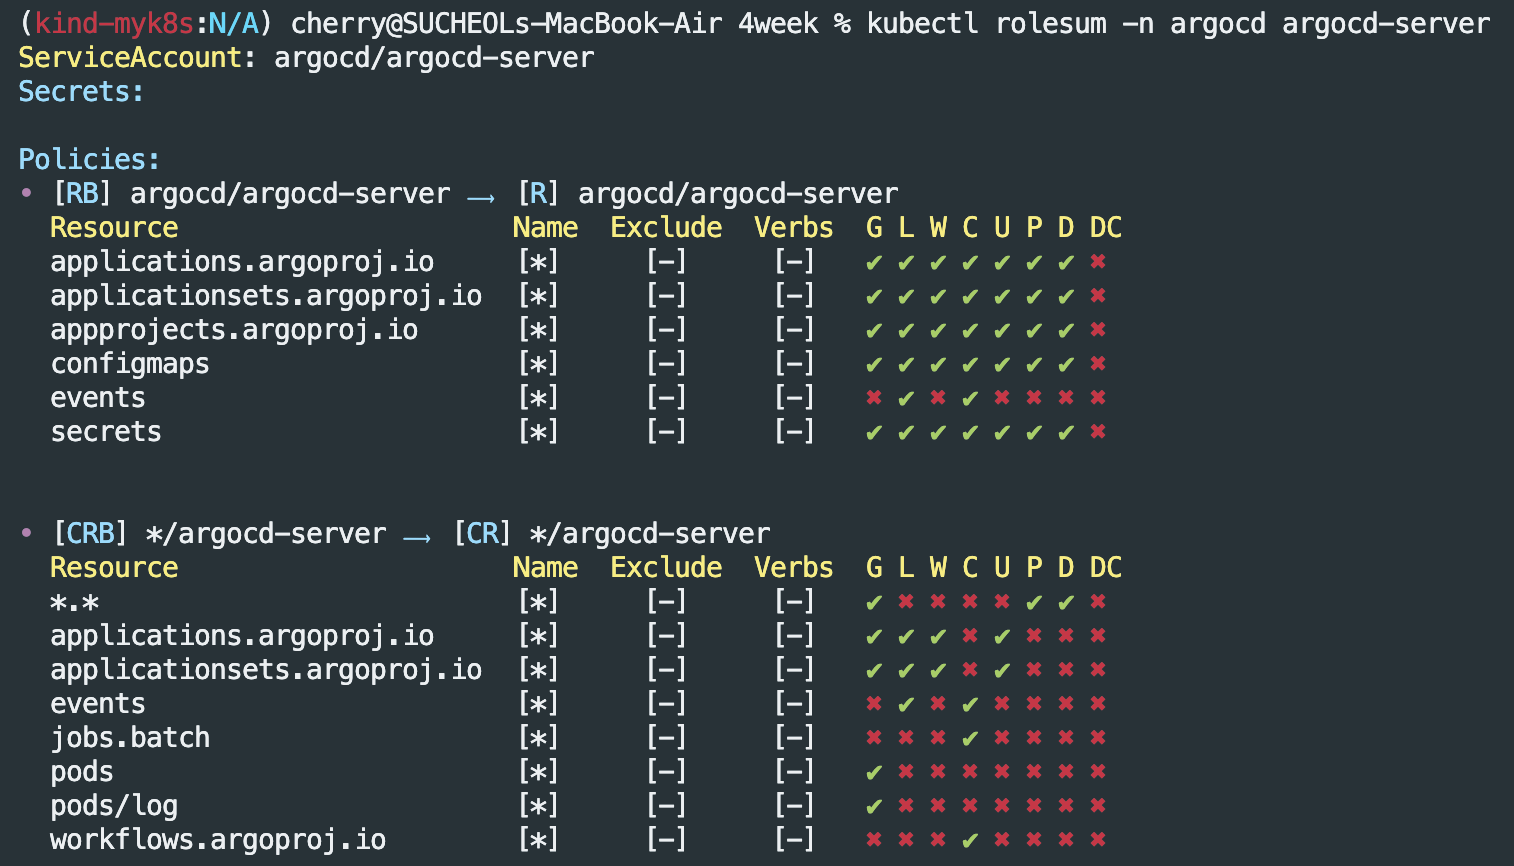
# argocd server 에 서비스어카운트에 맵핑된 롤/클러스터롤 확인
kubectl rolesum -n argocd argocd-server
ServiceAccount: argocd/argocd-server
# 해당 클러스터롤에 파드 exec 는 없음
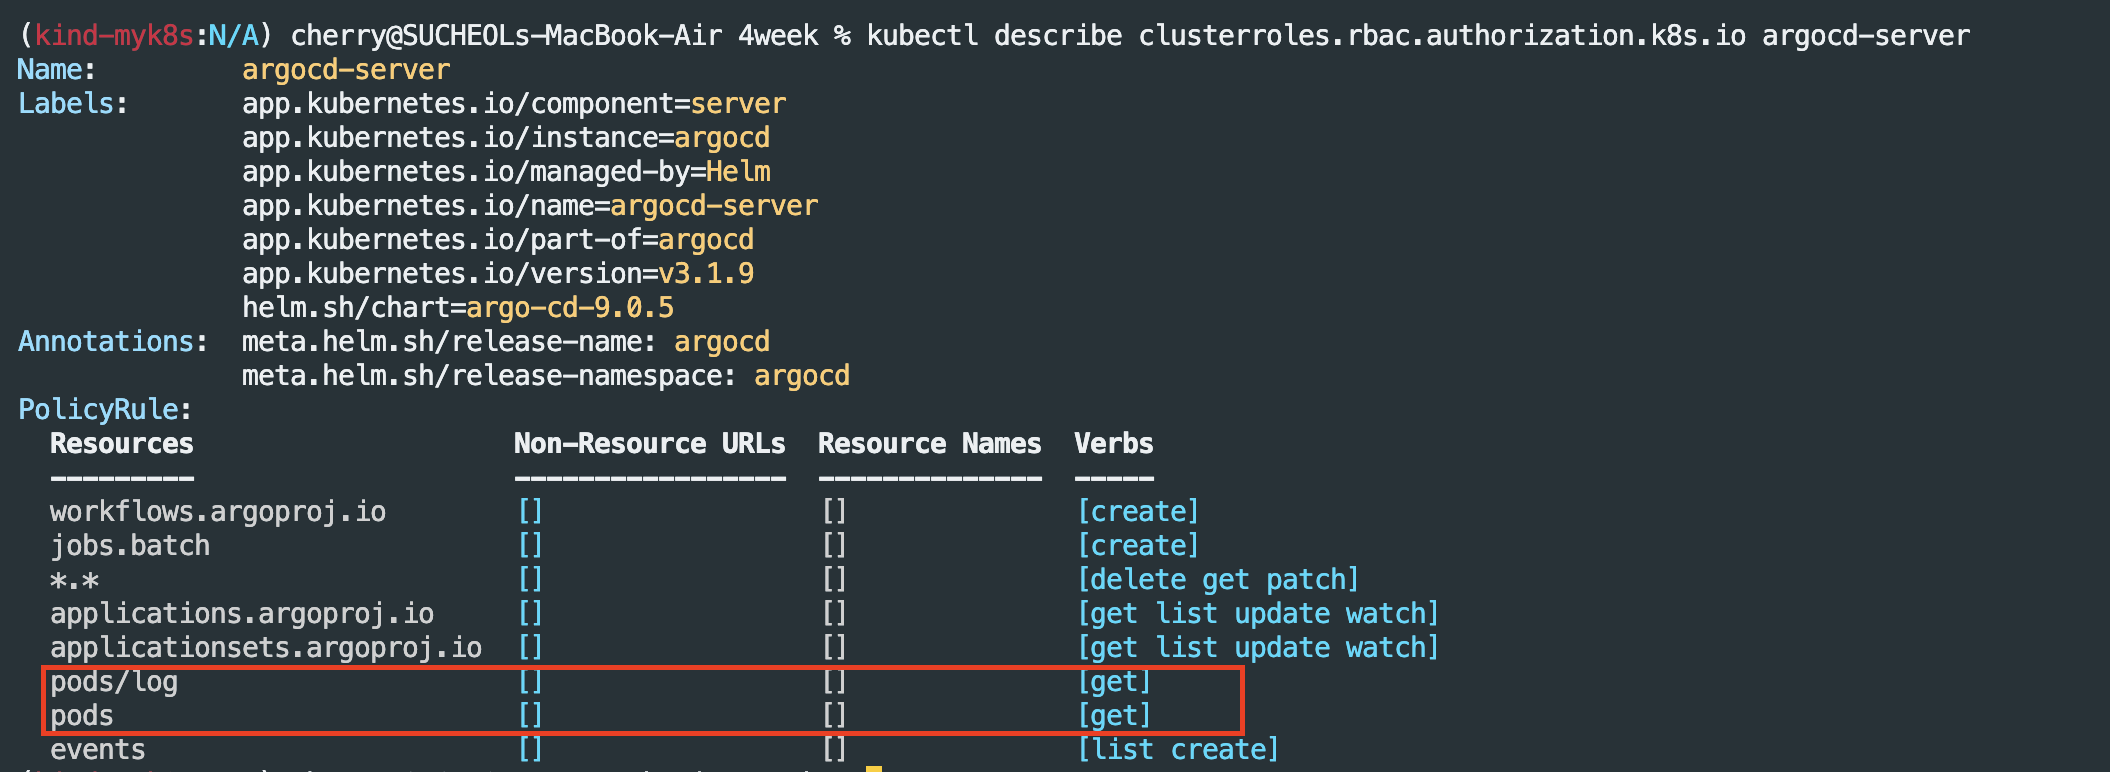
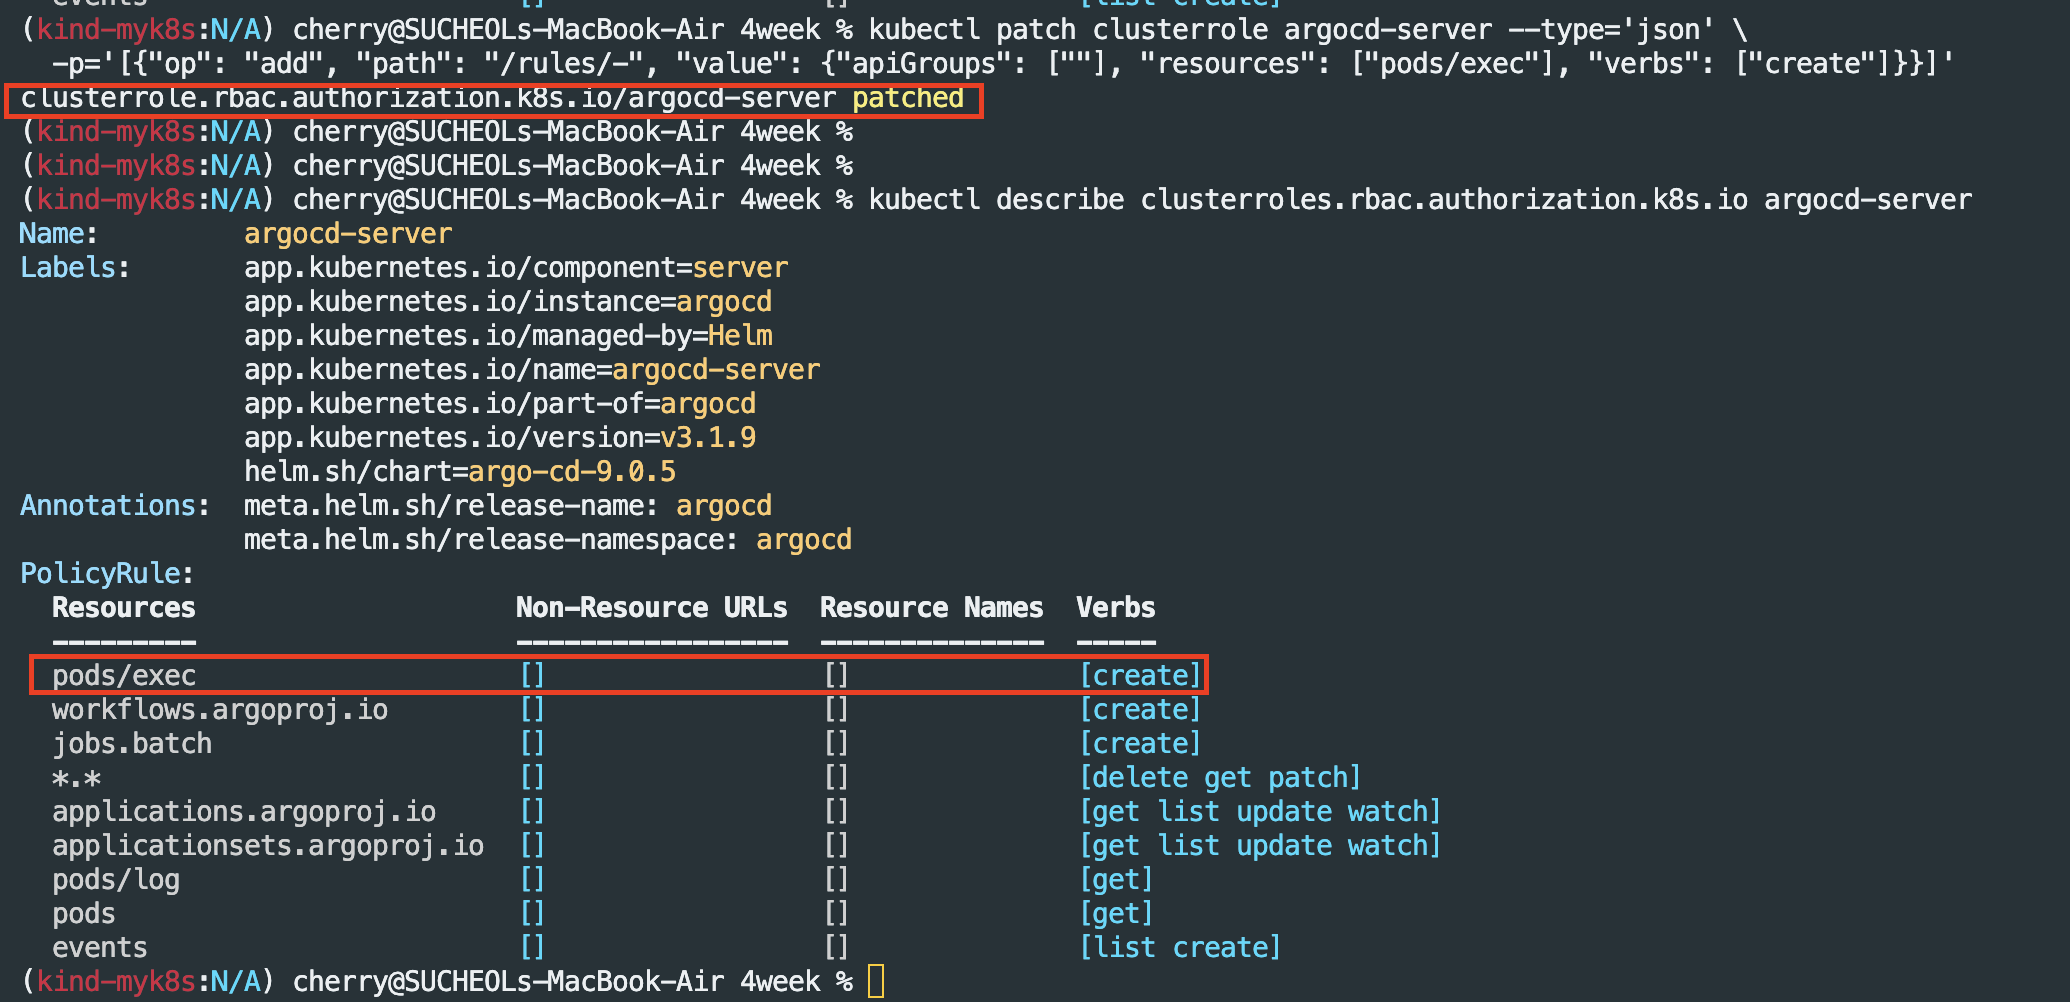
kubectl describe clusterroles.rbac.authorization.k8s.io argocd-server
# 해당 클러스터롤에 파드 exec 추가
kubectl patch clusterrole argocd-server --type='json' \
-p='[{"op": "add", "path": "/rules/-", "value": {"apiGroups": [""], "resources": ["pods/exec"], "verbs": ["create"]}}]'
# 해당 클러스터롤에 파드 exec 추가 확인
kubectl describe clusterroles.rbac.authorization.k8s.io argocd-server
애플리케이션 배포 후 WEB UI에서 터미널 접근 확인
# guestbook helm 차트 애플리케이션 생성
cat <<EOF | kubectl apply -f -
apiVersion: argoproj.io/v1alpha1
kind: Application
metadata:
  name: guestbook
  namespace: argocd
  finalizers:
  - resources-finalizer.argocd.argoproj.io
spec:
  project: default
  source:
    helm:
      valueFiles:
      - values.yaml
    path: helm-guestbook
    repoURL: https://github.com/argoproj/argocd-example-apps
    targetRevision: HEAD
  syncPolicy:
    automated:
      enabled: true
      prune: true
      selfHeal: true
    syncOptions:
    - CreateNamespace=true
  destination:
    namespace: guestbook
    server: https://kubernetes.default.svc
EOF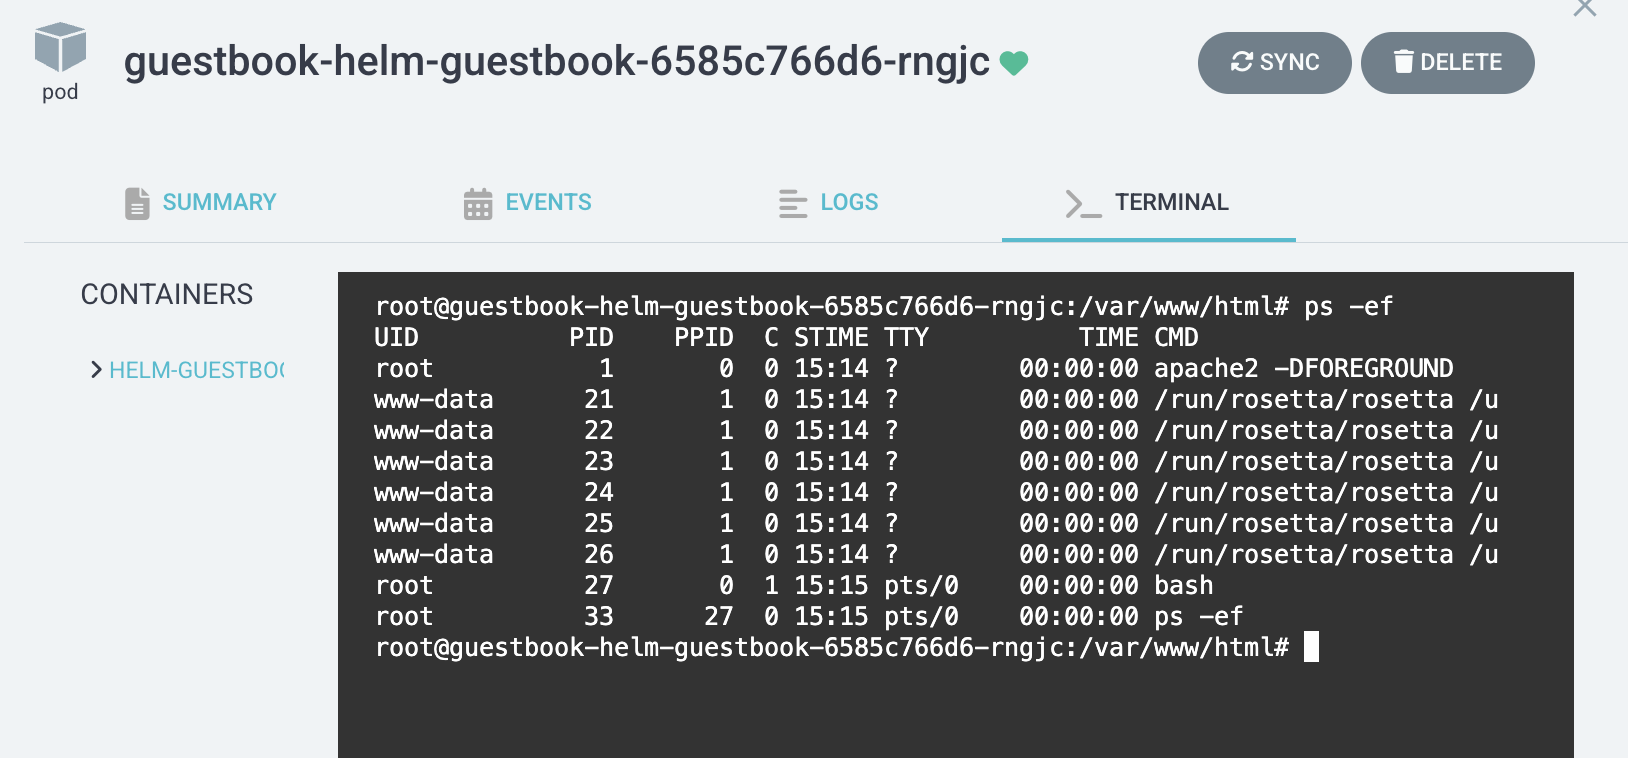
Argo CD 실습 종료
helm uninstall -n argocd argocd && kubectl delete ns argocdArgo-CD Autopilot
Argo-CD Autopilot 등장 배경
- Argo CD 자체 관리 방법에 문제
- How to Git 저장소 구조 Building
- 초기 Git, ArgoCD 설치 과정 번거로움
Argo CD Autopilot은 이 모든 복잡성을 단 하나의 CLI 명령어로 해결하고, Best Practice를 통해 GitOps 환경을 자동으로 구축하기 위해 개발되었습니다.
Argo-CD Autopilot 주요 기능
1. GitOps 저장소 자동 생성
- Bootstrap : Argo CD 설치용- Projects : AppProject용- apps : 애플리케이션 정의용표준화된 디렉터리 구조를 Git 저장소에 Auto Create 및 Commit
2. Argo CD 자동 설치 및 'Self-Management'구현
- Argo CD 설치 Manifest를 Git 저장소(bootstrap 폴더)에 Commit
- 클러스터에 최소한의 Argo CD를 설치한 뒤, 이 Argo CD가 Git에 있는 자기 자신의 설치 Manifest를 바라보도록 루트 앱을 생성합니다.
- 결과적으로, Argo CD가 Git을 통해 자기 자신을 관리하게 됩니다.
3. 새 애플리케이션 추가 간소화
- argocd-autopilot app create 등과 같이 명령어 간소화
- autopilot이 정해진 규칙에 따라 Application CRD YAML 파일을 생성하여 Git 저장소의 apps/ 폴더에 자동으로 커밋(Commit) 및 푸시(Push)
Argo-CD Autopilot 아키텍처
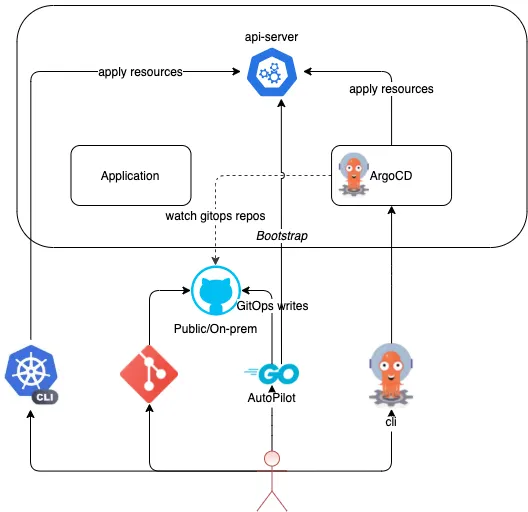
1단계: 부트스트랩 (Bootstrap)
- 사용자 (CLI 실행): 개발자가 자신의 로컬 머신에서 argocd-autopilot repo bootstrap과 같은명령을 실행합니다. (이때 비어있는 Git 저장소 주소를 전달)
- Autopilot (Git 구성):
- CLI가 이 Git 저장소를 클론(Clone)합니다.
- 정해진 폴더 구조(bootstrap, projects 등)를 생성합니다.
- bootstrap/ 폴더 안에 Argo CD 설치 Manifest와, "루트 AppProject" / "루트 Application" Manifest를 생성합니다.
- 이 모든 변경 사항을 Git 저장소에 커밋하고 푸시합니다.
- Autopilot (최소 설치):
- CLI가 kubectl을 사용하여 Git의 bootstrap/ 폴더에 있는 Manifest 중 **일부(최소한의 Argo CD)**를 클러스터에 직접 apply하여 설치합니다.
2단계: Argo CD의 Self-Management (자동화)
- Argo CD (1차 동작): 클러스터에 방금 설치된 '최소 Argo CD'가 실행됩니다.
- Argo CD (Self-Sync):
- 이 Argo CD는 3단계에서 함께 설치된 **"루트 Application"**을 즉시 인식합니다.
- "루트 Application"의 명세에는 "Git 저장소의 bootstrap/ 폴더를 바라보라"고 적혀있습니다.
- Argo CD는 Git 저장소(bootstrap/ 폴더)에 있는 자신의 '전체' 설치 Manifest를 가져와서 클러스터의 '실제 상태'와 비교합니다.
- OutOfSync 상태임을 확인하고, 즉시 동기화(Sync)를 실행하여 Argo CD의 '전체' 컴포넌트를 클러스터에 스스로 설치/업데이트합니다.
3단계: 애플리케이션 배포 (GitOps)
- 사용자 (앱 추가): 개발자가 argocd-autopilot app create와 같은 명령을 실행합니다.
- Autopilot (Git 커밋): Autopilot CLI가 apps/ 폴더에 해당 앱의 Application Manifest를 생성하여 Git에 커밋/푸시합니다.
- Argo CD (앱 배포):
- Argo CD의 "루트 Application"은 apps/ 폴더도 감시하도록 설정되어 있습니다. (App of Apps 패턴)
- 새로운 Application Manifest 커밋을 감지하고, 이 Application을 클러스터에 생성합니다.
- 새로 생성된 Application이 정의한 Git 소스(예: 실제 서비스 코드 저장소)를 바탕으로 실제 앱(Deployment, Service 등)을 클러스터에 배포합니다.
Argo-CD Autopilot CLI 설치
# install : mac
brew install argocd-autopilot
argocd-autopilot version


# install : Linux and WSL (using curl)
VERSION=$(curl --silent "https://api.github.com/repos/argoproj-labs/argocd-autopilot/releases/latest" | grep '"tag_name"' | sed -E 's/.*"([^"]+)".*/\1/')
curl -L --output - https://github.com/argoproj-labs/argocd-autopilot/releases/download/"$VERSION"/argocd-autopilot-linux-amd64.tar.gz | tar zx
mv ./argocd-autopilot-* /usr/local/bin/argocd-autopilot
argocd-autopilot version
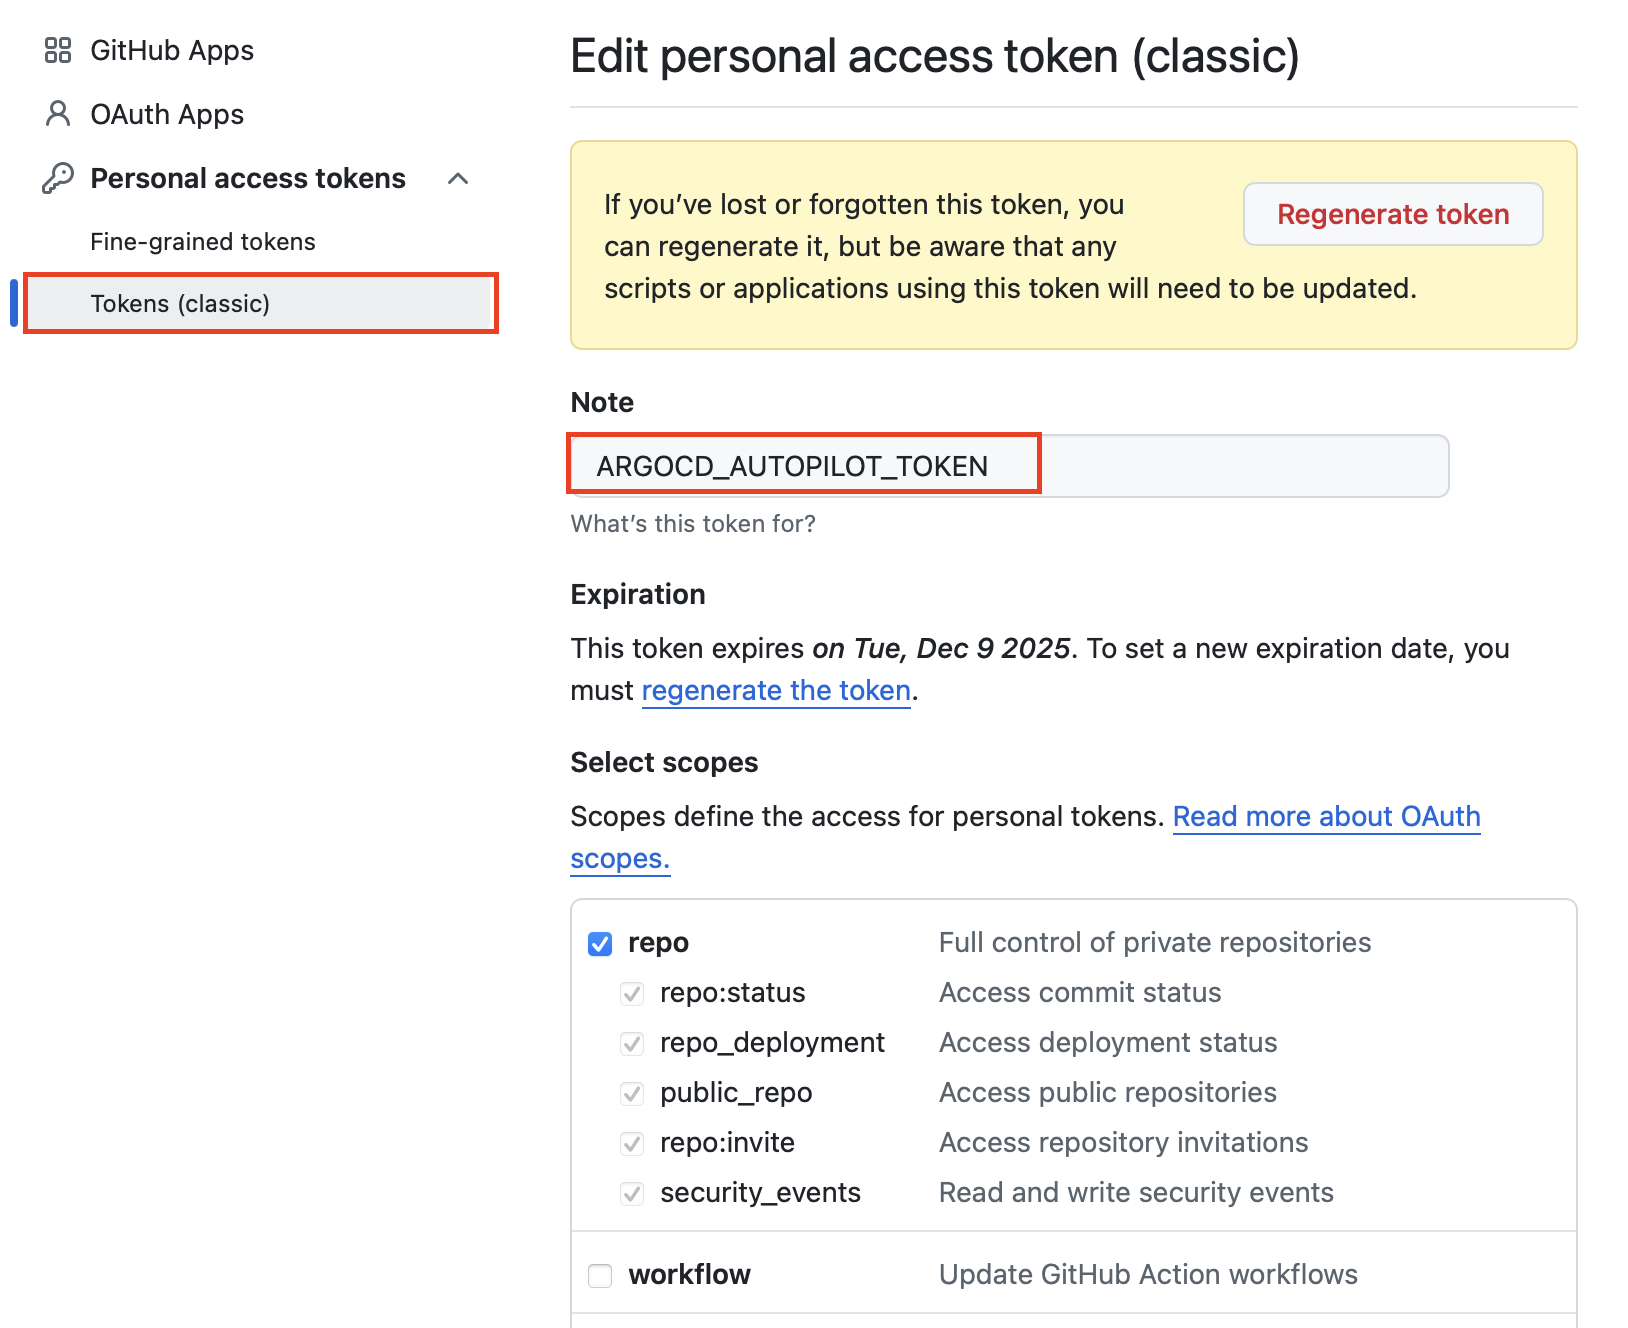
Git 레포지토리 및 Token 준비

Argo-CD Pilot 부트스트랩을 통한 ArgoCD 설치 및 접속 확인(디렉터리 구조 확인)
# (참고) HA 모드 지원
argocd-autopilot repo bootstrap --app https://github.com/argoproj-labs/argocd-autopilot/manifests/ha
# 각자 자신의 Git 정보 사용하자
export GIT_TOKEN=<자신의 Git Token>
export GIT_REPO=<자신의 Repo>
# Bootstrap Argo-CD
argocd-autopilot repo bootstrap
# 신규 터미널
kubectl port-forward -n argocd svc/argocd-server 8080:80
# 기존터미널 : 설치 확인
kubectl get pod -n argocd
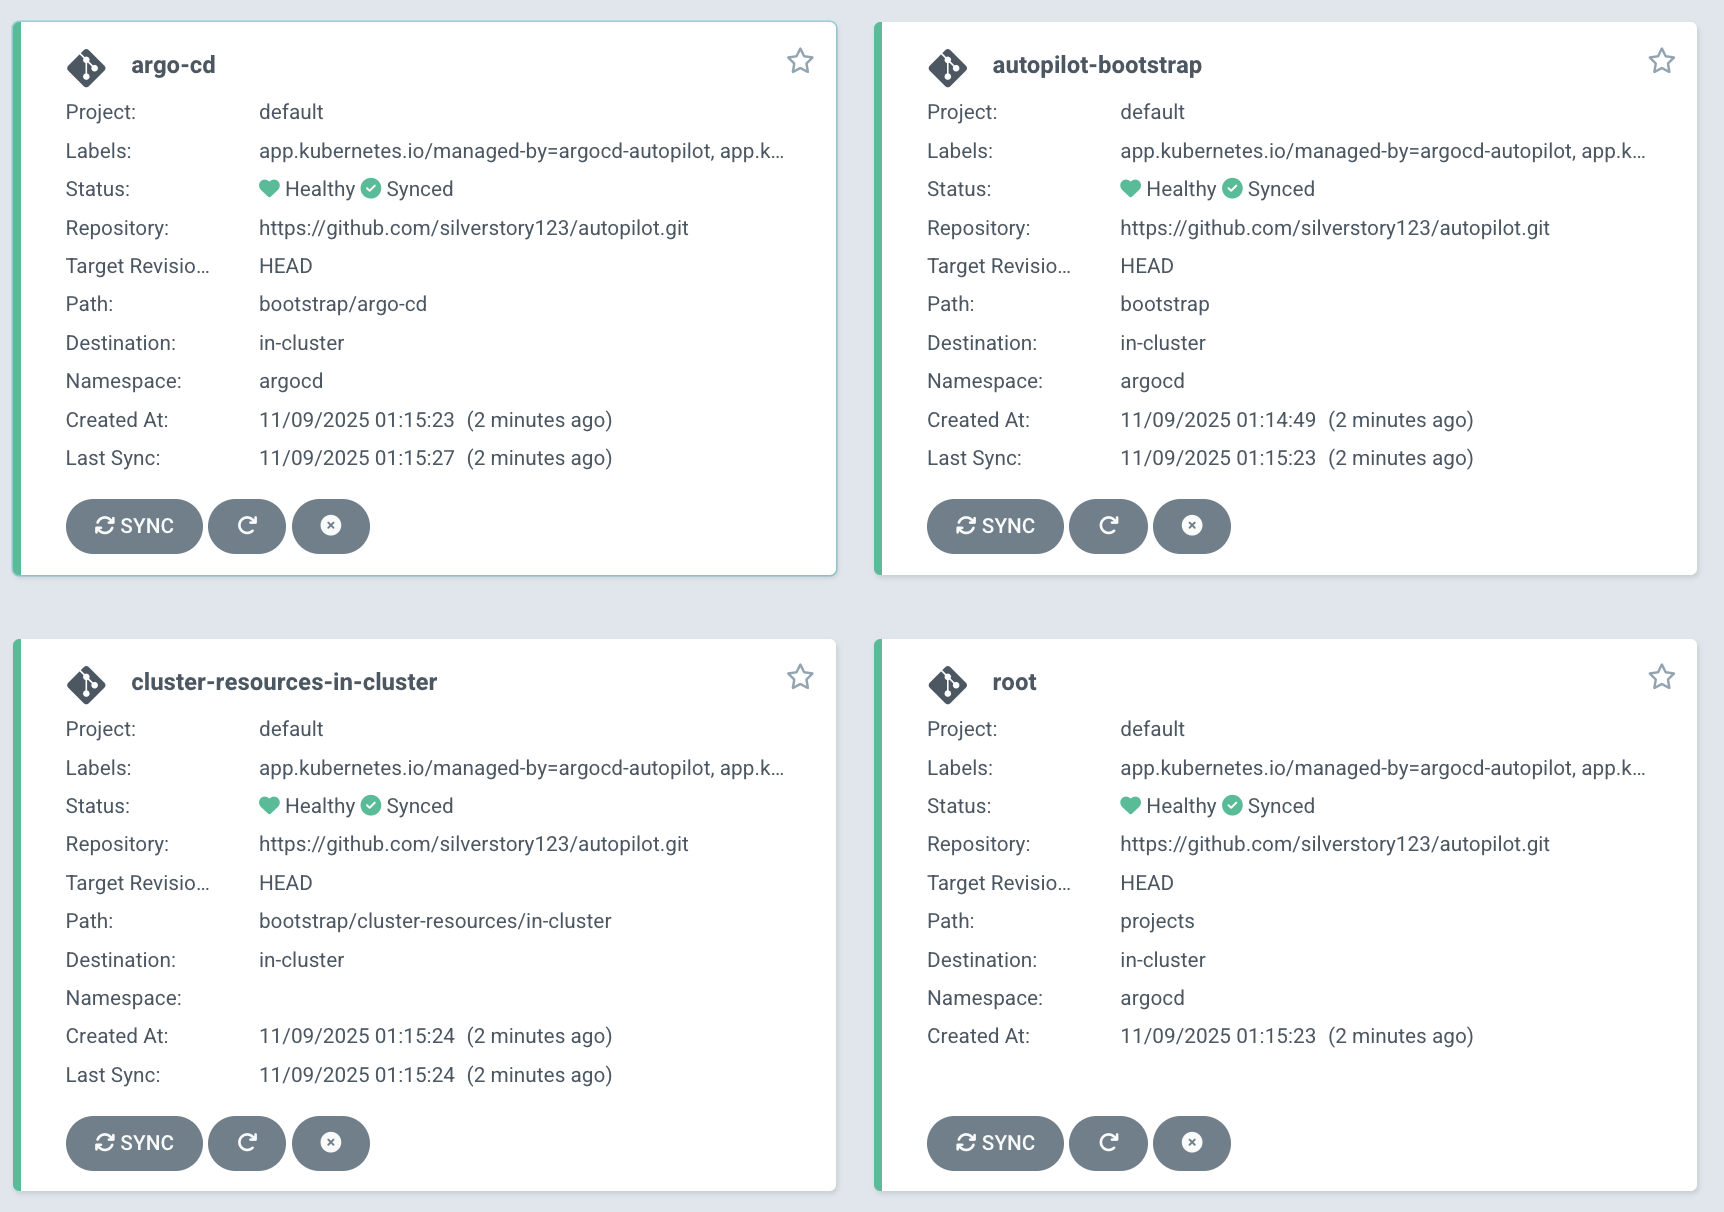
kubectl get appprojects.argoproj.io -n argocd
kubectl get applications.argoproj.io -n argocd -owide
kubectl get applications.argoproj.io -n argocd autopilot-bootstrap -o yaml | kubectl neat | yq
kubectl get applications.argoproj.io -n argocd argo-cd -o yaml | kubectl neat | yq
kubectl get applications.argoproj.io -n argocd cluster-resources-in-cluster -o yaml | kubectl neat | yq
kubectl get applications.argoproj.io -n argocd root -o yaml | kubectl neat | yq
kubectl get applicationsets.argoproj.io -n argocd
kubectl get applicationsets.argoproj.io -n argocd -o yaml | k neat | yq
# 위 초기 접속 암호 확인 후 웹 접속 후 확인
http://localhost:8080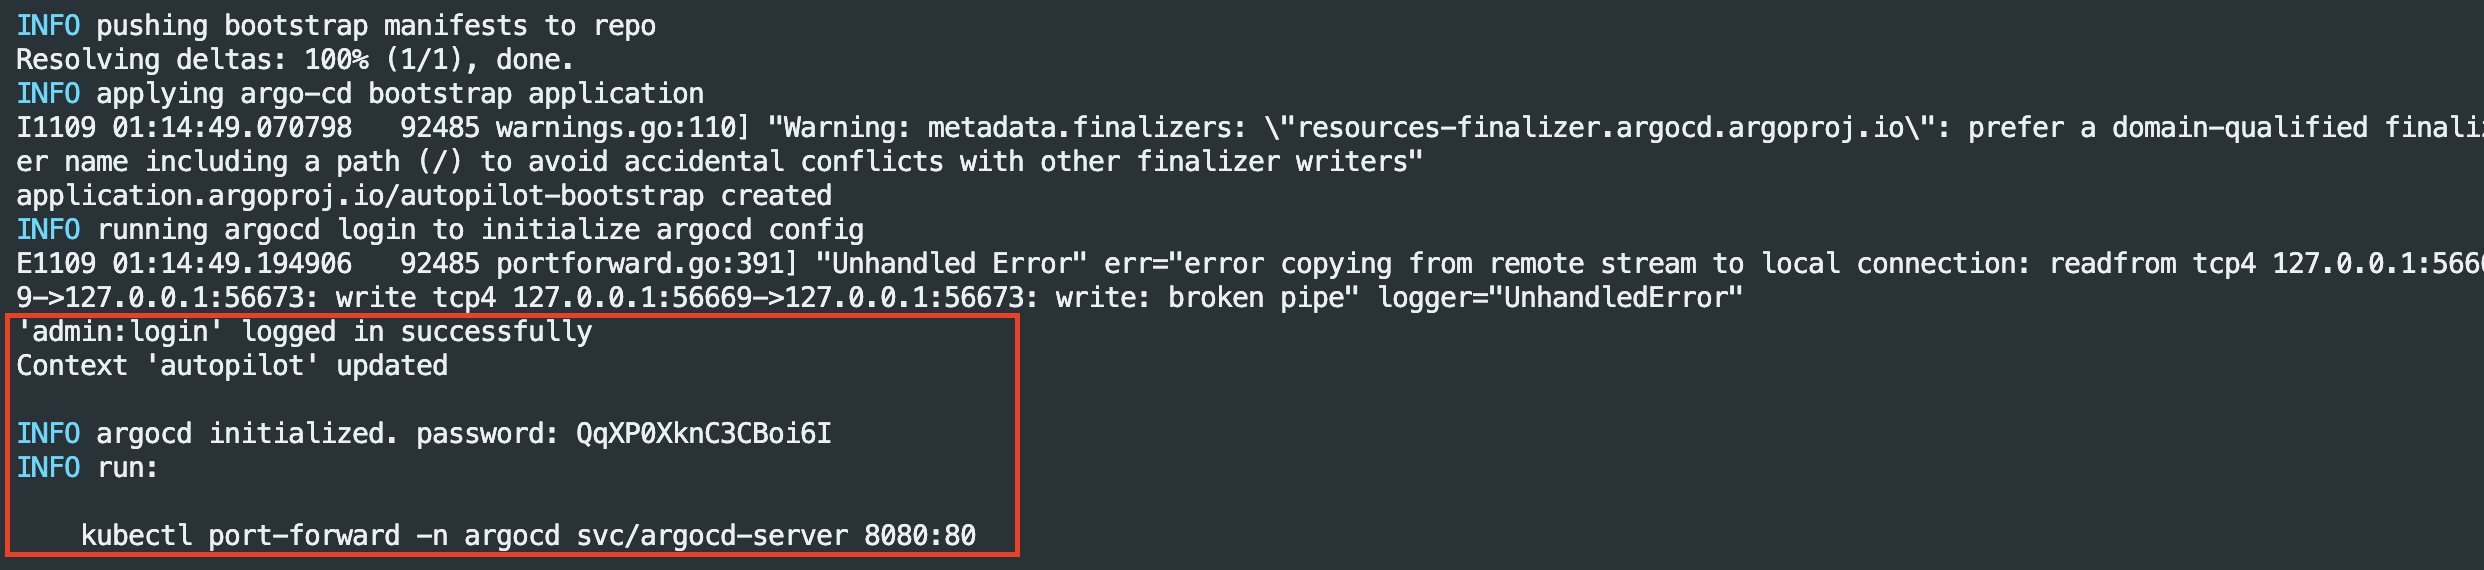


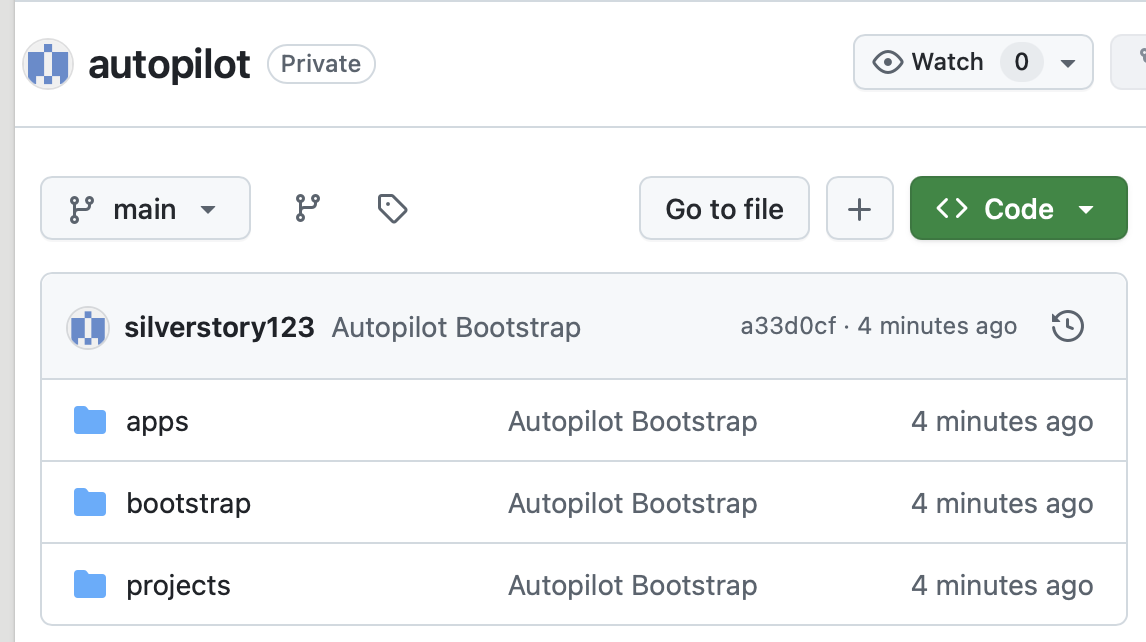
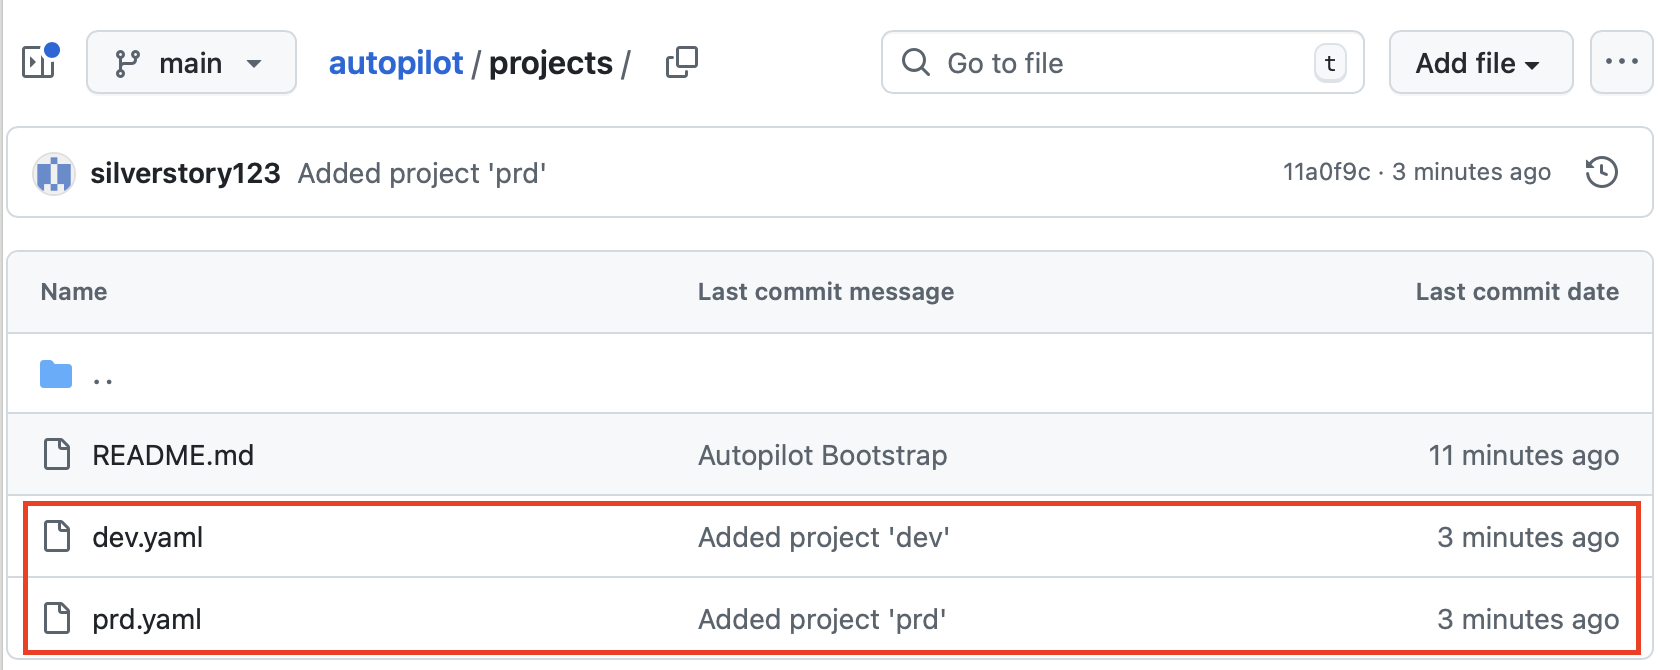
- 디렉터리 구조
- apps : 애플리케이션 디렉터리.
- bootstrap : ArgoCD 초기 설정 및 클러스터 리소스.
- projects : 환경별 프로젝트 정의.
새 프로젝트 생성
# Git 정보 입력
export GIT_TOKEN=<자신의 Git Token>
export GIT_REPO=<자신의 Repo>
# 프로젝트 생성
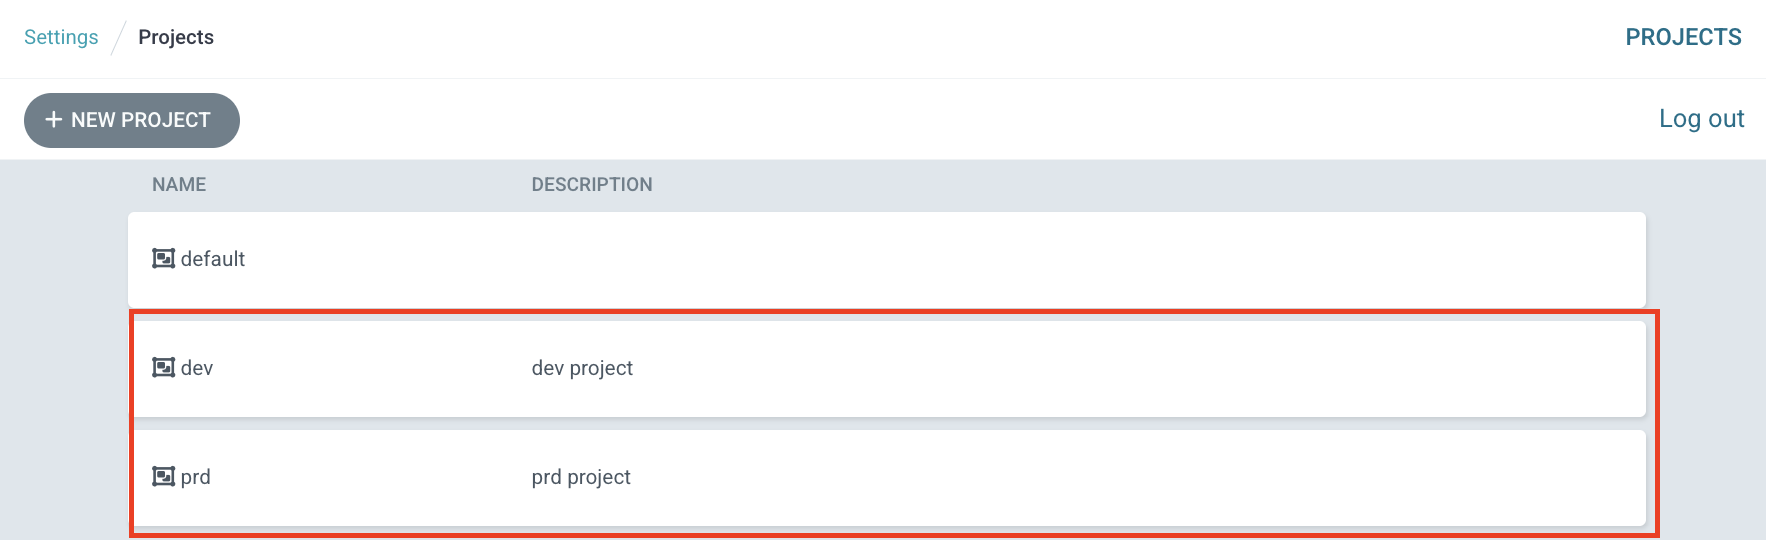
argocd-autopilot project create dev
argocd-autopilot project create prd
# 확인
kubectl get appprojects.argoproj.io -n argocd dev -o yaml | kubectl neat | yq
kubectl get appprojects.argoproj.io -n argocd prd -o yaml | kubectl neat | yq
kubectl get appprojects.argoproj.io -n argocd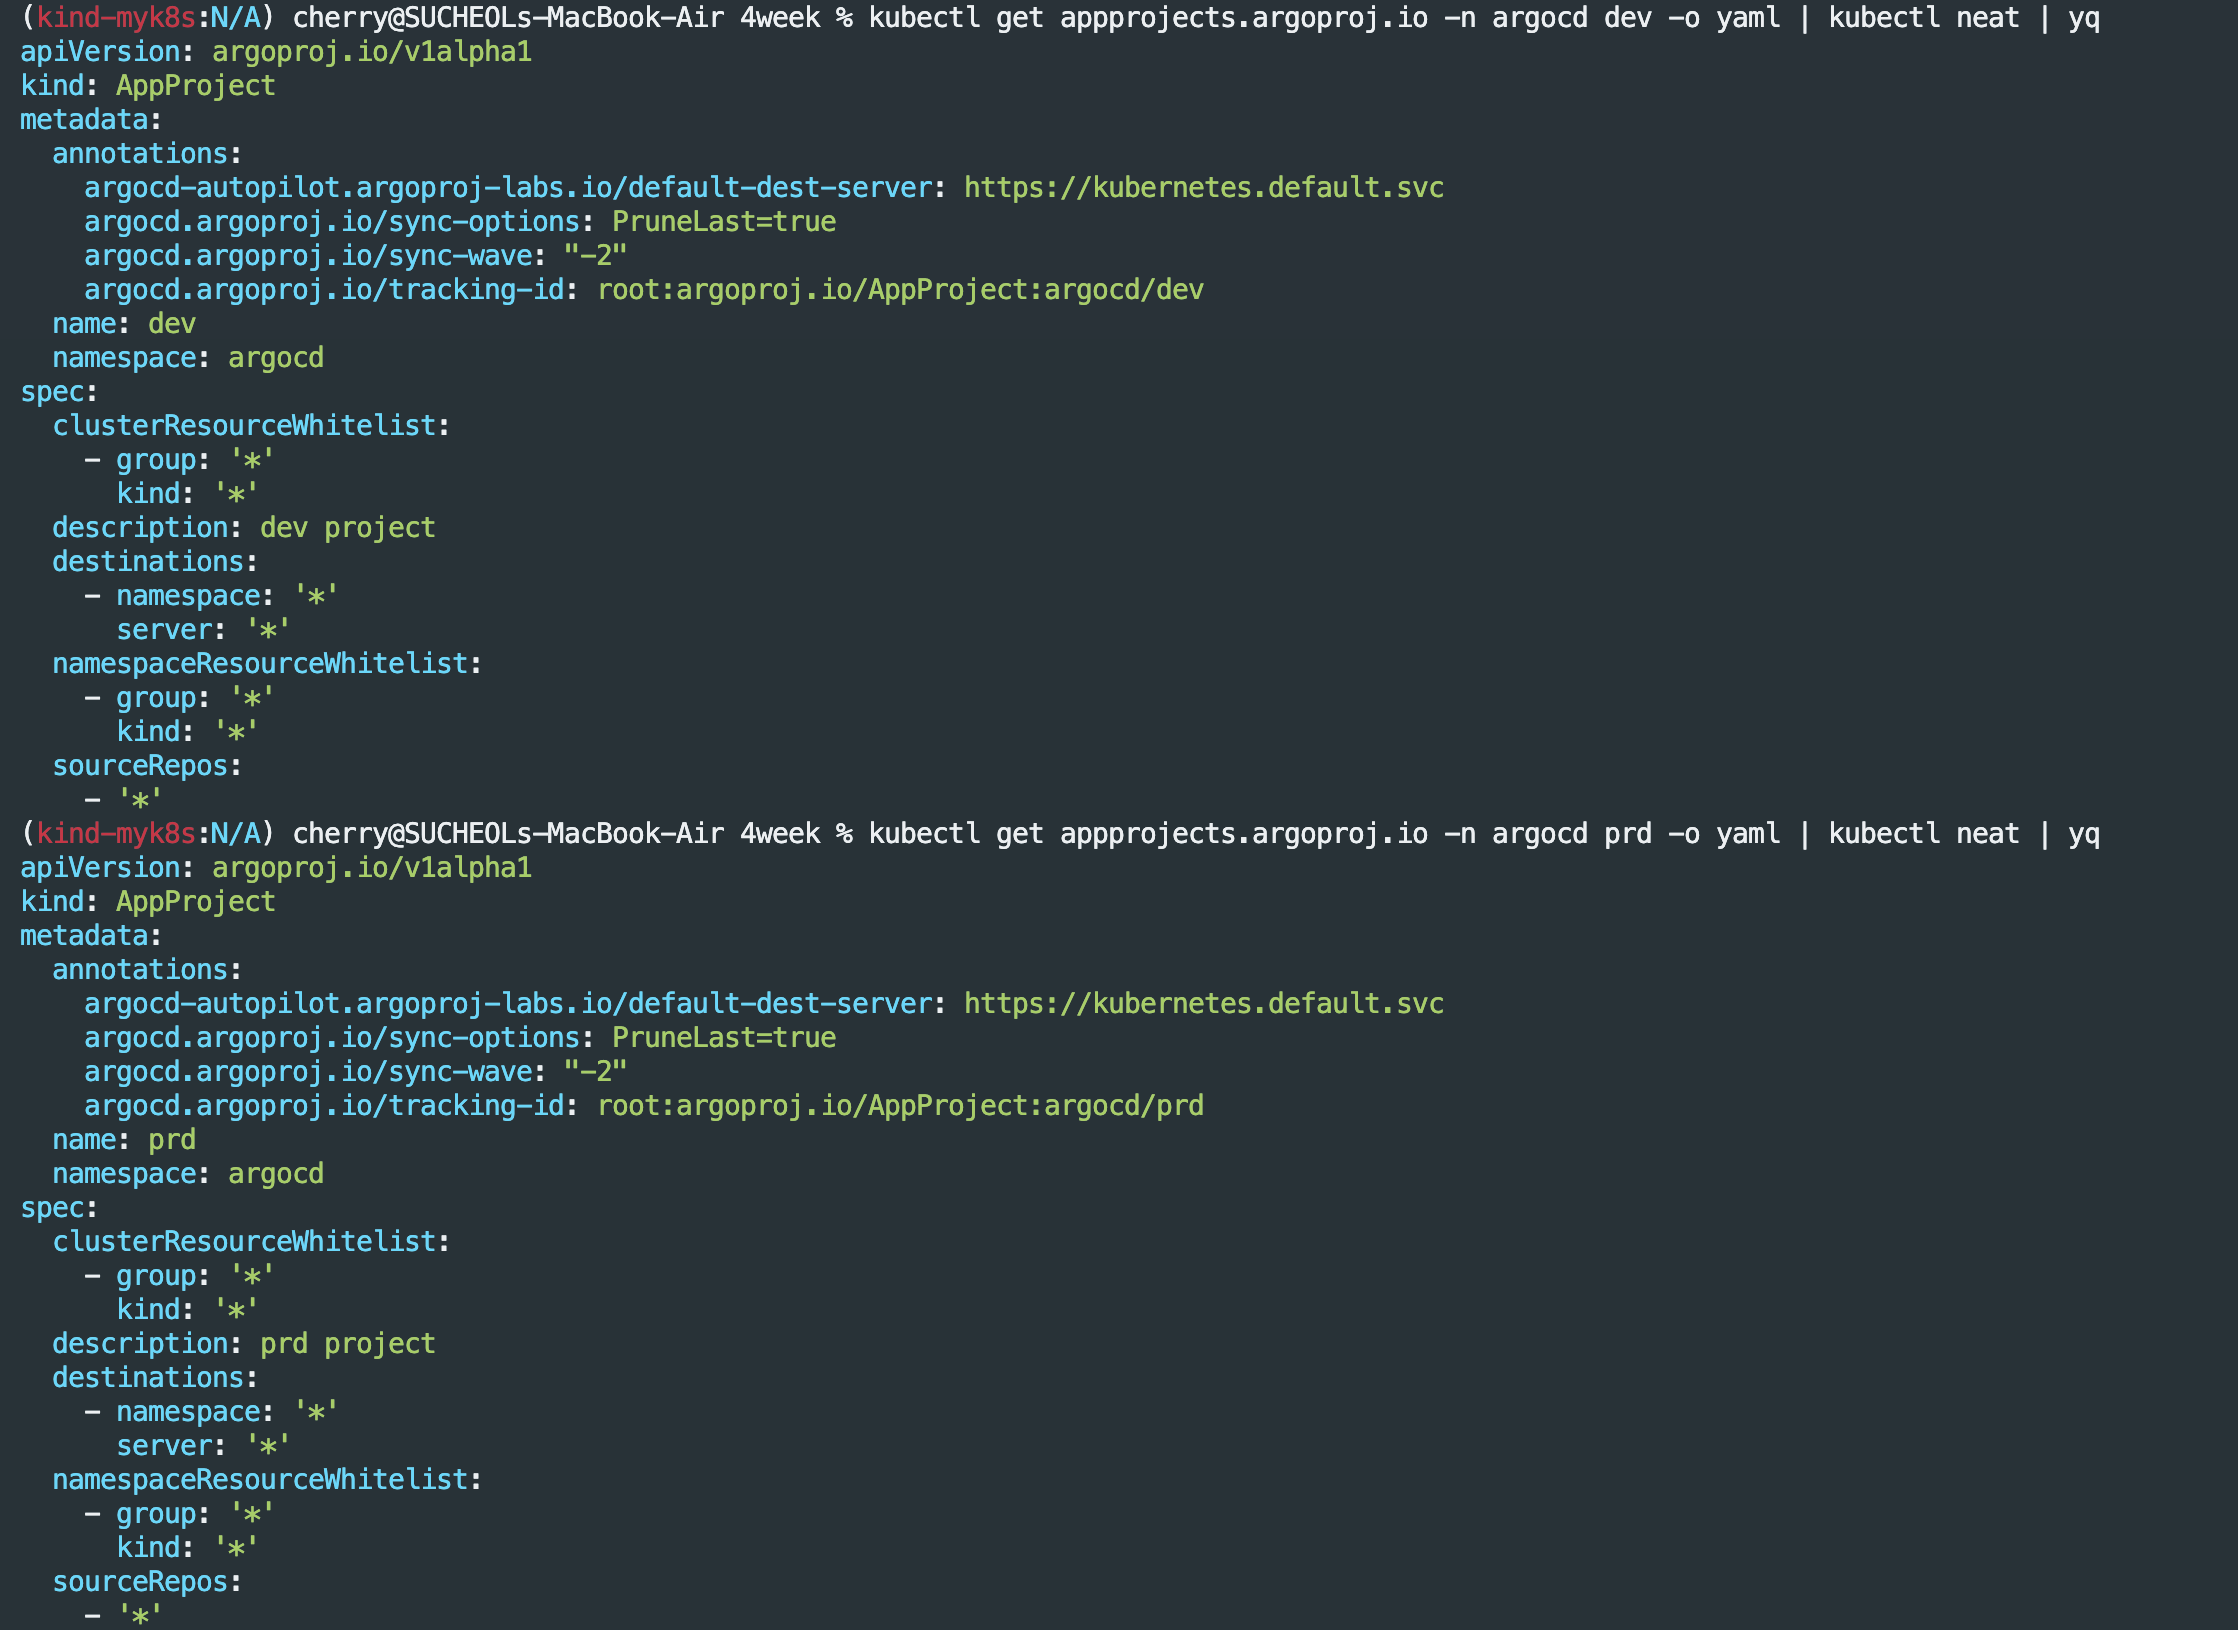


Application 추가
# 애플리케이션 생성
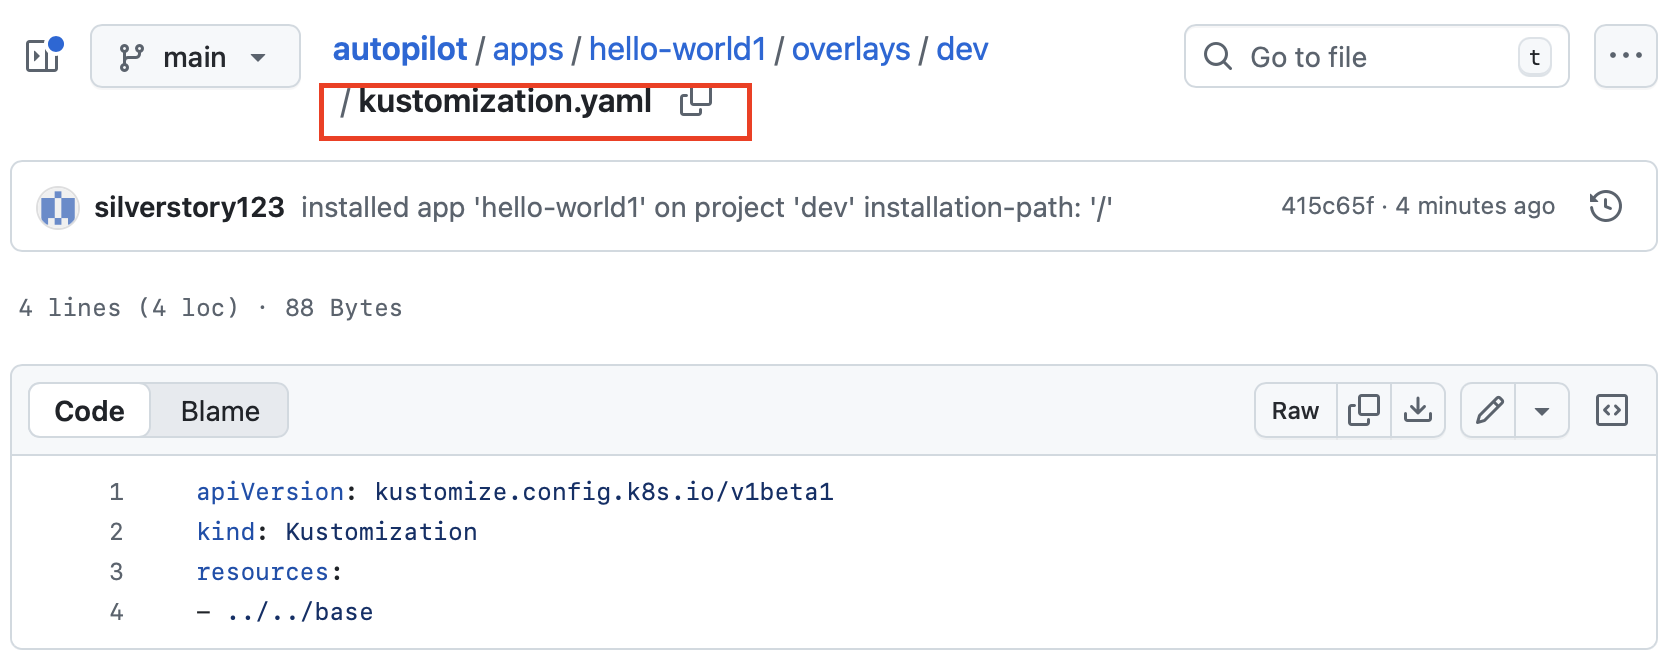
# dev 프로젝트에 hello-world1 애플리케이션 생성
argocd-autopilot app create hello-world1 --app github.com/argoproj-labs/argocd-autopilot/examples/demo-app/ -p dev --type kustomize
# prd 프로젝트에 hello-world2 애플리케이션 생성
argocd-autopilot app create hello-world2 --app github.com/argoproj-labs/argocd-autopilot/examples/demo-app/ -p prd --type kustomize
# prd 프로젝트 애플리케이션 삭제
argocd-autopilot app delete hello-world2 -p prd
#
kubectl get applications.argoproj.io -n argocd -owide
kubectl get applications.argoproj.io -n argocd dev-hello-world1 -o yaml | kubectl neat | yq
#
kubectl get deploy,pod
NAME READY UP-TO-DATE AVAILABLE AGE
deployment.apps/simple-deployment 1/1 1 1 9m17s
NAME READY STATUS RESTARTS AGE
pod/simple-deployment-7854dd65f8-8tp86 1/1 Running 0 9m17s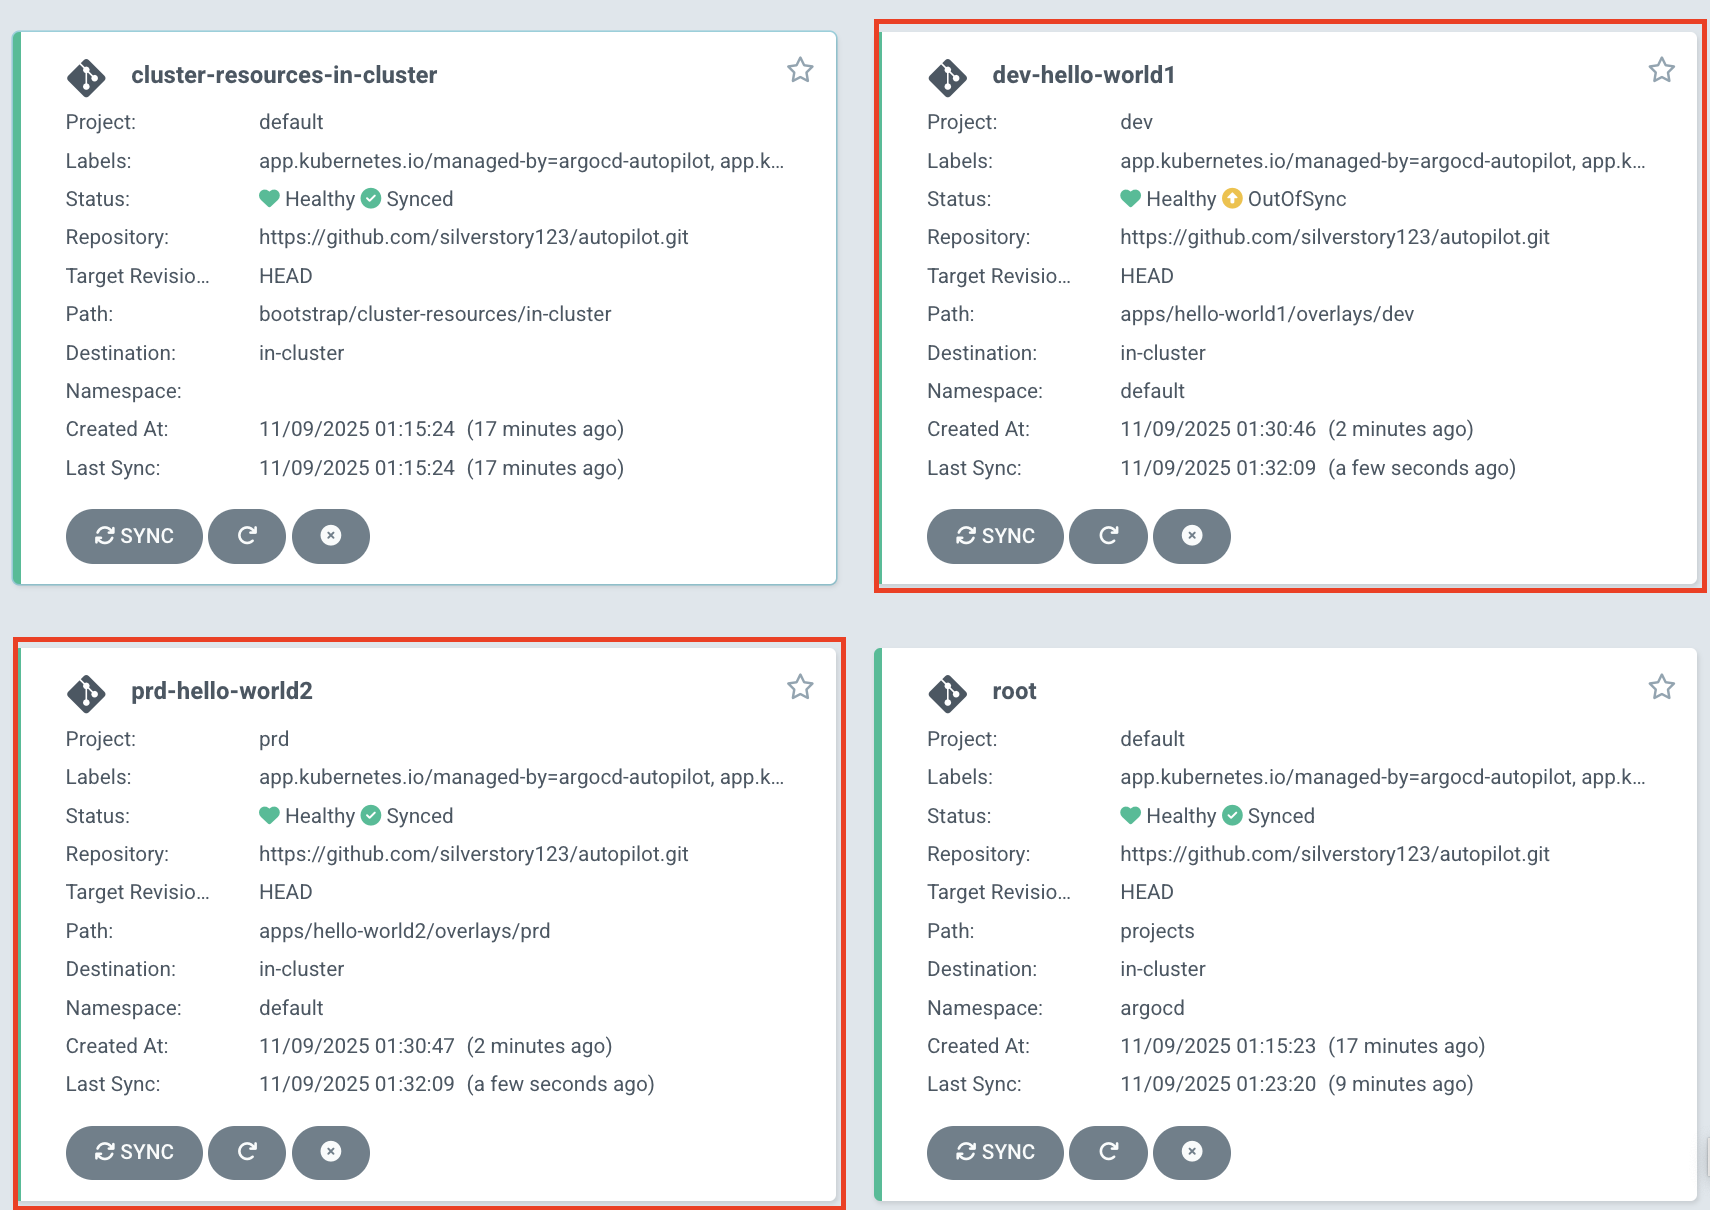

Argo CD 운영
실습 환경 구성
# kind k8s 배포
kind create cluster --name myk8s --image kindest/node:v1.32.8 --config - <<EOF
kind: Cluster
apiVersion: kind.x-k8s.io/v1alpha4
nodes:
- role: control-plane
  extraPortMappings:
  - containerPort: 30000
    hostPort: 30000
  - containerPort: 30001
    hostPort: 30001
  - containerPort: 30002
    hostPort: 30002
  - containerPort: 30003
    hostPort: 30003
- role: worker
- role: worker
- role: worker
EOF

# kube-ops-view
helm repo add geek-cookbook https://geek-cookbook.github.io/charts/
helm install kube-ops-view geek-cookbook/kube-ops-view --version 1.2.2 --set service.main.type=NodePort,service.main.ports.http.nodePort=30001 --set env.TZ="Asia/Seoul" --namespace kube-system

# kube-ops-view 접속 URL 확인 (1.5 , 2 배율)
open "http://127.0.0.1:30001/#scale=1.5"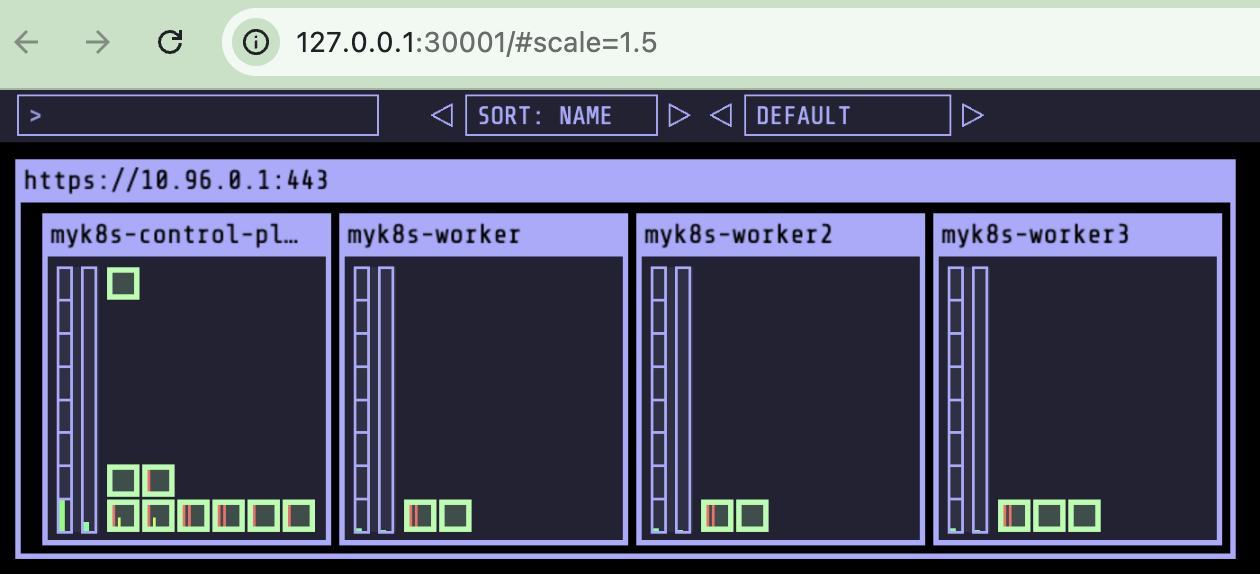
HA Mode 설치
- Argo CD HA의 핵심은 Controller, Repo-server, Server 3대 구성요소를 다중화 + Redis HA 구성
- Redis HA는 Sentinel + HAProxy 로 장애 시 자동 failover
- Controller는 Leader Election으로 1개만 active, 나머지는 standby
- Repo-server / Server는 수평 확장으로 부하 분산
- 모든 구성요소는 Argo CD CRD(Application)를 watch하여 자동 GitOps 수행
# 매니페스트 파일 작성 및 배포
cat << EOF > resources/namespace.yaml
apiVersion: v1
kind: Namespace
metadata:
  name: argocd
EOF

kubectl apply -f resources/namespace.yaml

brew install wget
wget https://raw.githubusercontent.com/argoproj/argo-cd/refs/heads/master/manifests/ha/install.yaml

mv install.yaml resources/

kubectl apply -f resources/install.yaml -n argocd

# 확인
watch -d kubectl get pod -n argocd
kubectl port-forward svc/argocd-server -n argocd 8080:80

#
kubectl get secret -n argocd argocd-initial-admin-secret -o jsonpath='{.data.password}' | base64 -d ; echo
UOn2CEkg0c4RCfQU
open https://127.0.0.1:8080 # 프로덕션의 경우 TLS인증서가 적용된 로드밸랜서 서비스로 오픈하자

# 원격 리포지터리에 커밋하고 푸시한다.
git add . && git commit -m "Deploy Argo CD " && git push -u origin main

Argo CD 자체 관리
- Repository 연결(Argo CD > Settings > Repository 새 연결)

- Argo CD 애플리케이션 생성
cat <<EOF | kubectl apply -f -
apiVersion: argoproj.io/v1alpha1
kind: Application
metadata:
  name: argocd
  namespace: argocd
spec:
  project: default
  source:
    path: resources
    repoURL: https://github.com/gasida/my-sample-app
    targetRevision: main
  syncPolicy:
    automated: {}
  destination:
    namespace: argocd
    server: https://kubernetes.default.svc
EOF

Argo CD 설정 변경
kubectl get networkpolicies.networking.k8s.io -n argocd
# 원격 리포지터리에 커밋하고 푸시한다.
git add . && git commit -m "Delete Network Policy Resource" && git push -u origin main

# 모니터링
watch -d kubectl get networkpolicies.networking.k8s.io -n argocd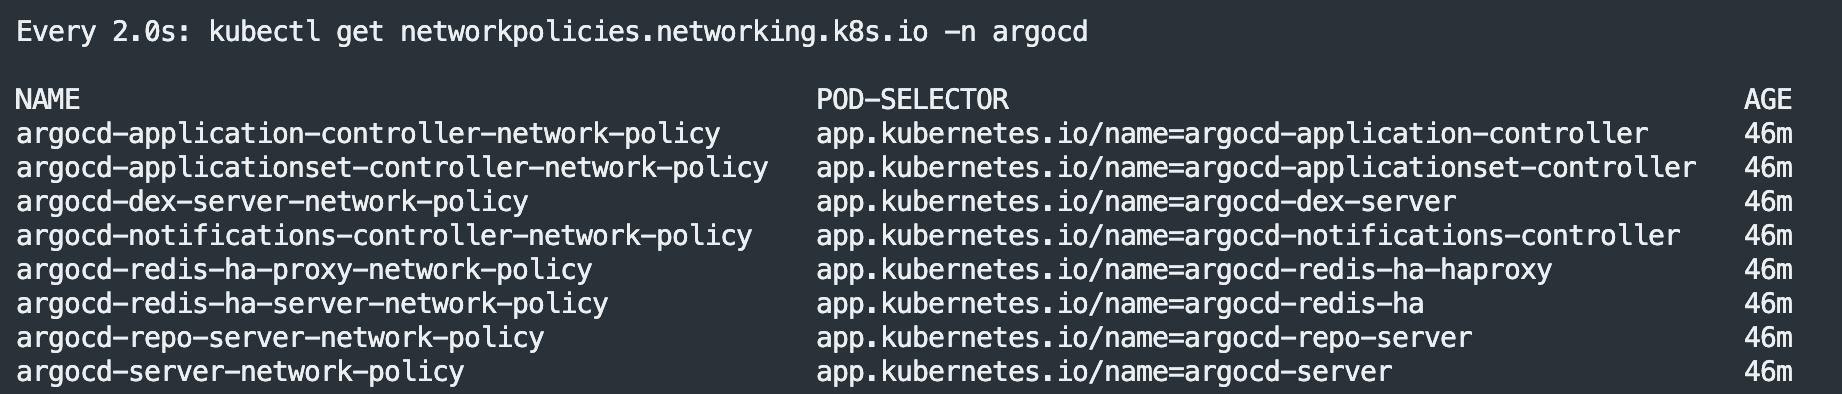
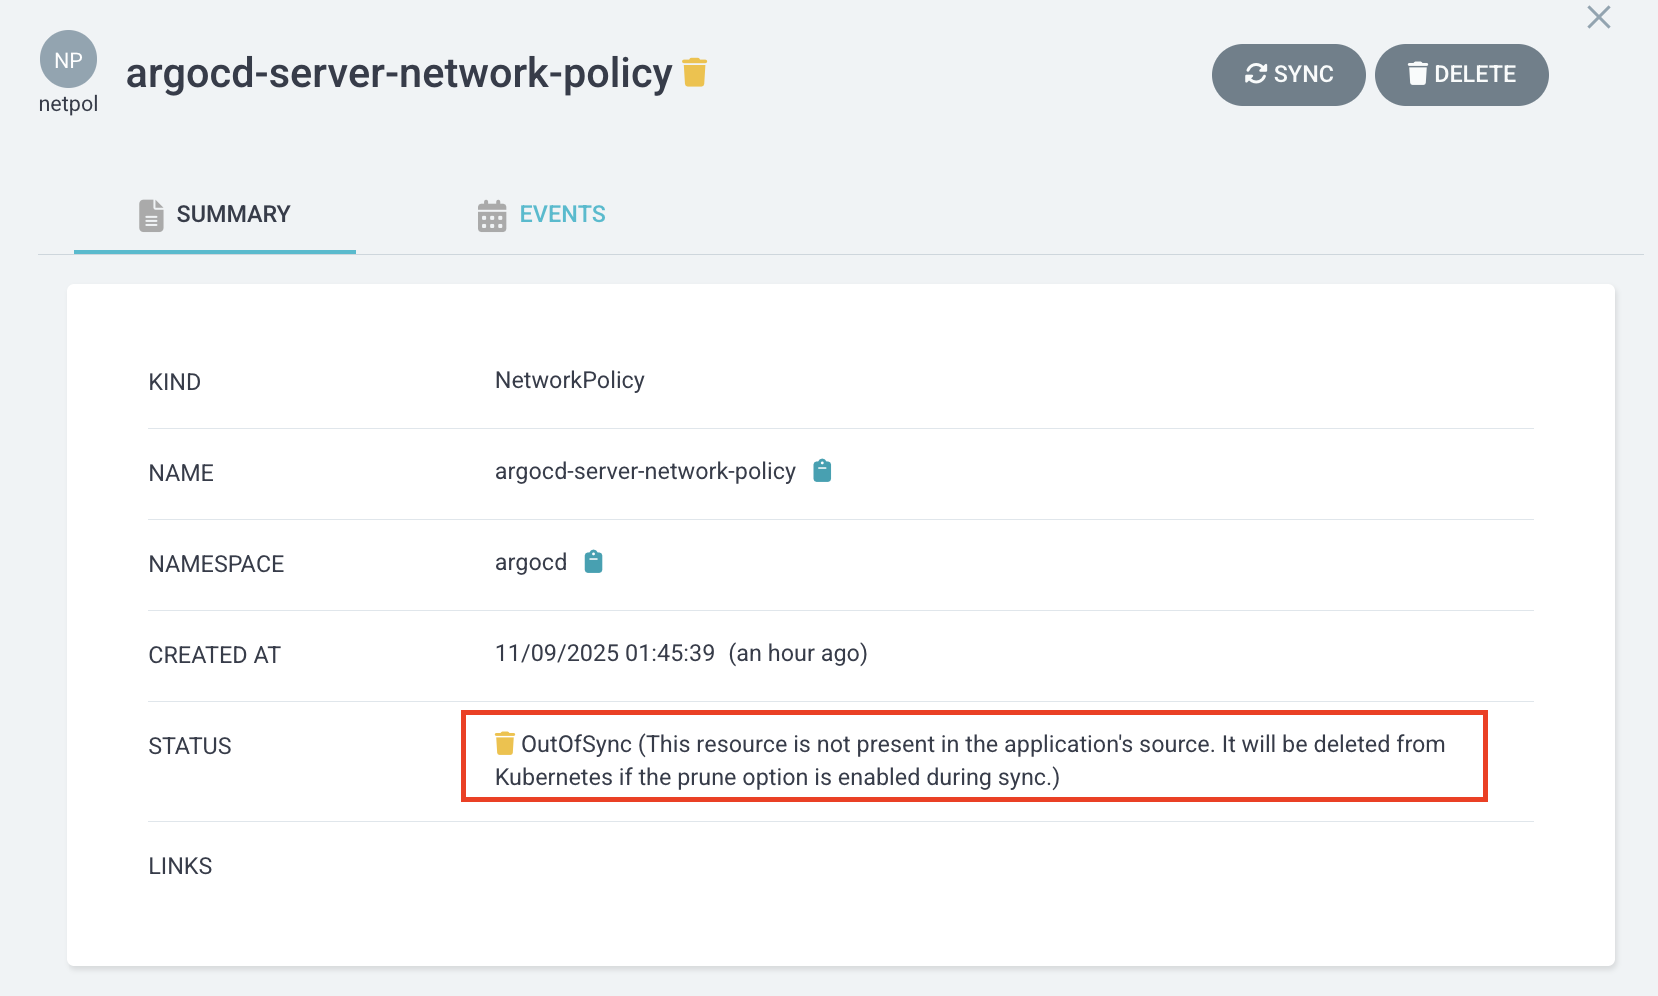
이후 해당 networkpolicy 명세서에서 SYNC 클릭 후 prunc 체크 후 Syncronize를 진행하면 git 저장소와 비교하여 해당 리소스를 삭제하는 작업이 진행된다.
kube-prometheus-stack
프로메테우스 배포(helm)
# repo 추가
helm repo add prometheus-community https://prometheus-community.github.io/helm-charts
# 파라미터 파일 생성
cat <<EOT > monitor-values.yaml
prometheus:
prometheusSpec:
scrapeInterval: "15s"
evaluationInterval: "15s"
service:
type: NodePort
nodePort: 30002
grafana:
defaultDashboardsTimezone: Asia/Seoul
adminPassword: prom-operator
service:
type: NodePort
nodePort: 30003
alertmanager:
enabled: false
defaultRules:
create: false
prometheus-windows-exporter:
prometheus:
monitor:
enabled: false
EOT
cat monitor-values.yaml
# 배포
helm install kube-prometheus-stack prometheus-community/kube-prometheus-stack --version 75.15.1 \
-f monitor-values.yaml --create-namespace --namespace monitoring
# 각각 웹 접속 실행
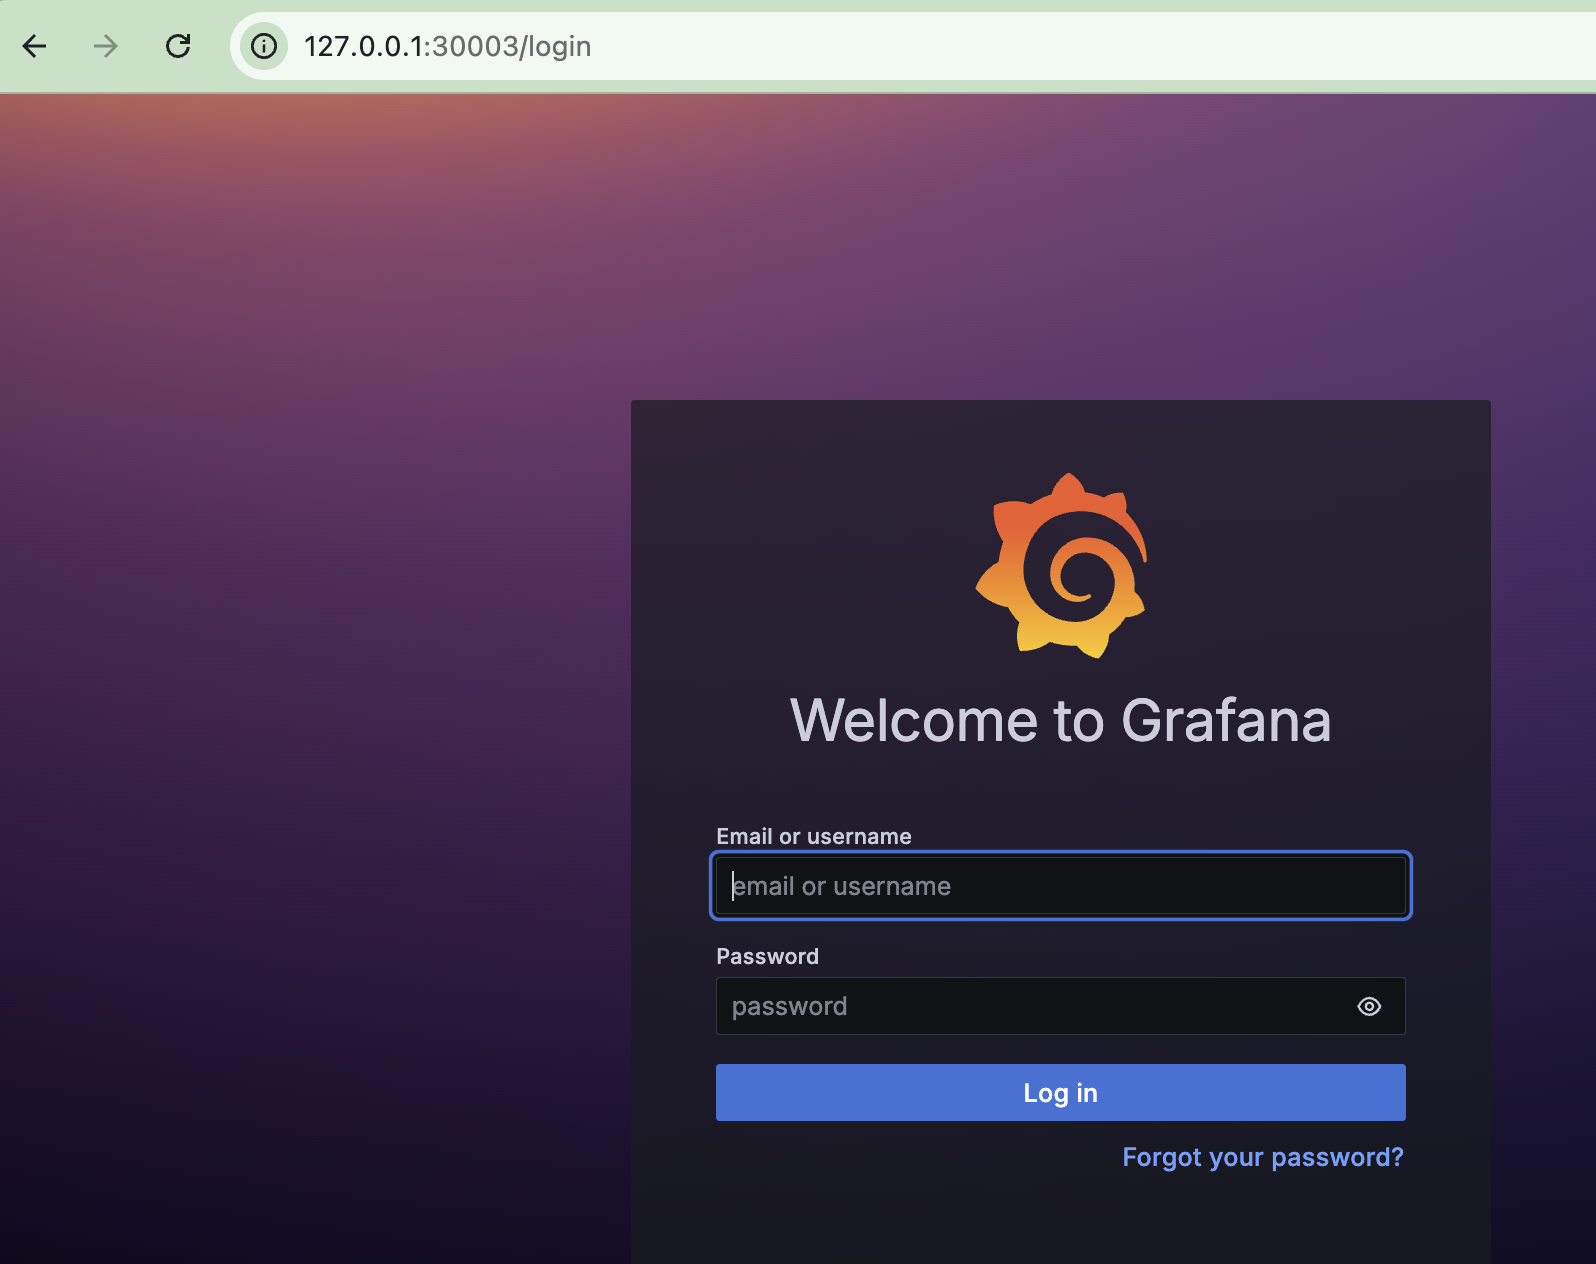
open http://127.0.0.1:30002 # macOS
open http://127.0.0.1:30003 # macOS
# 확인
## grafana : 프로메테우스는 메트릭 정보를 저장하는 용도로 사용하며, 그라파나로 시각화 처리
## prometheus-0 : 모니터링 대상이 되는 파드는 ‘exporter’라는 별도의 사이드카 형식의 파드에서 모니터링 메트릭을 노출, pull 방식으로 가져와 내부의 시계열 데이터베이스에 저장
## node-exporter : 노드익스포터는 물리 노드에 대한 자원 사용량(네트워크, 스토리지 등 전체) 정보를 메트릭 형태로 변경하여 노출
## operator : 시스템 경고 메시지 정책(prometheus rule), 애플리케이션 모니터링 대상 추가 등의 작업을 편리하게 할수 있게 CRD 지원
## kube-state-metrics : 쿠버네티스의 클러스터의 상태(kube-state)를 메트릭으로 변환하는 파드
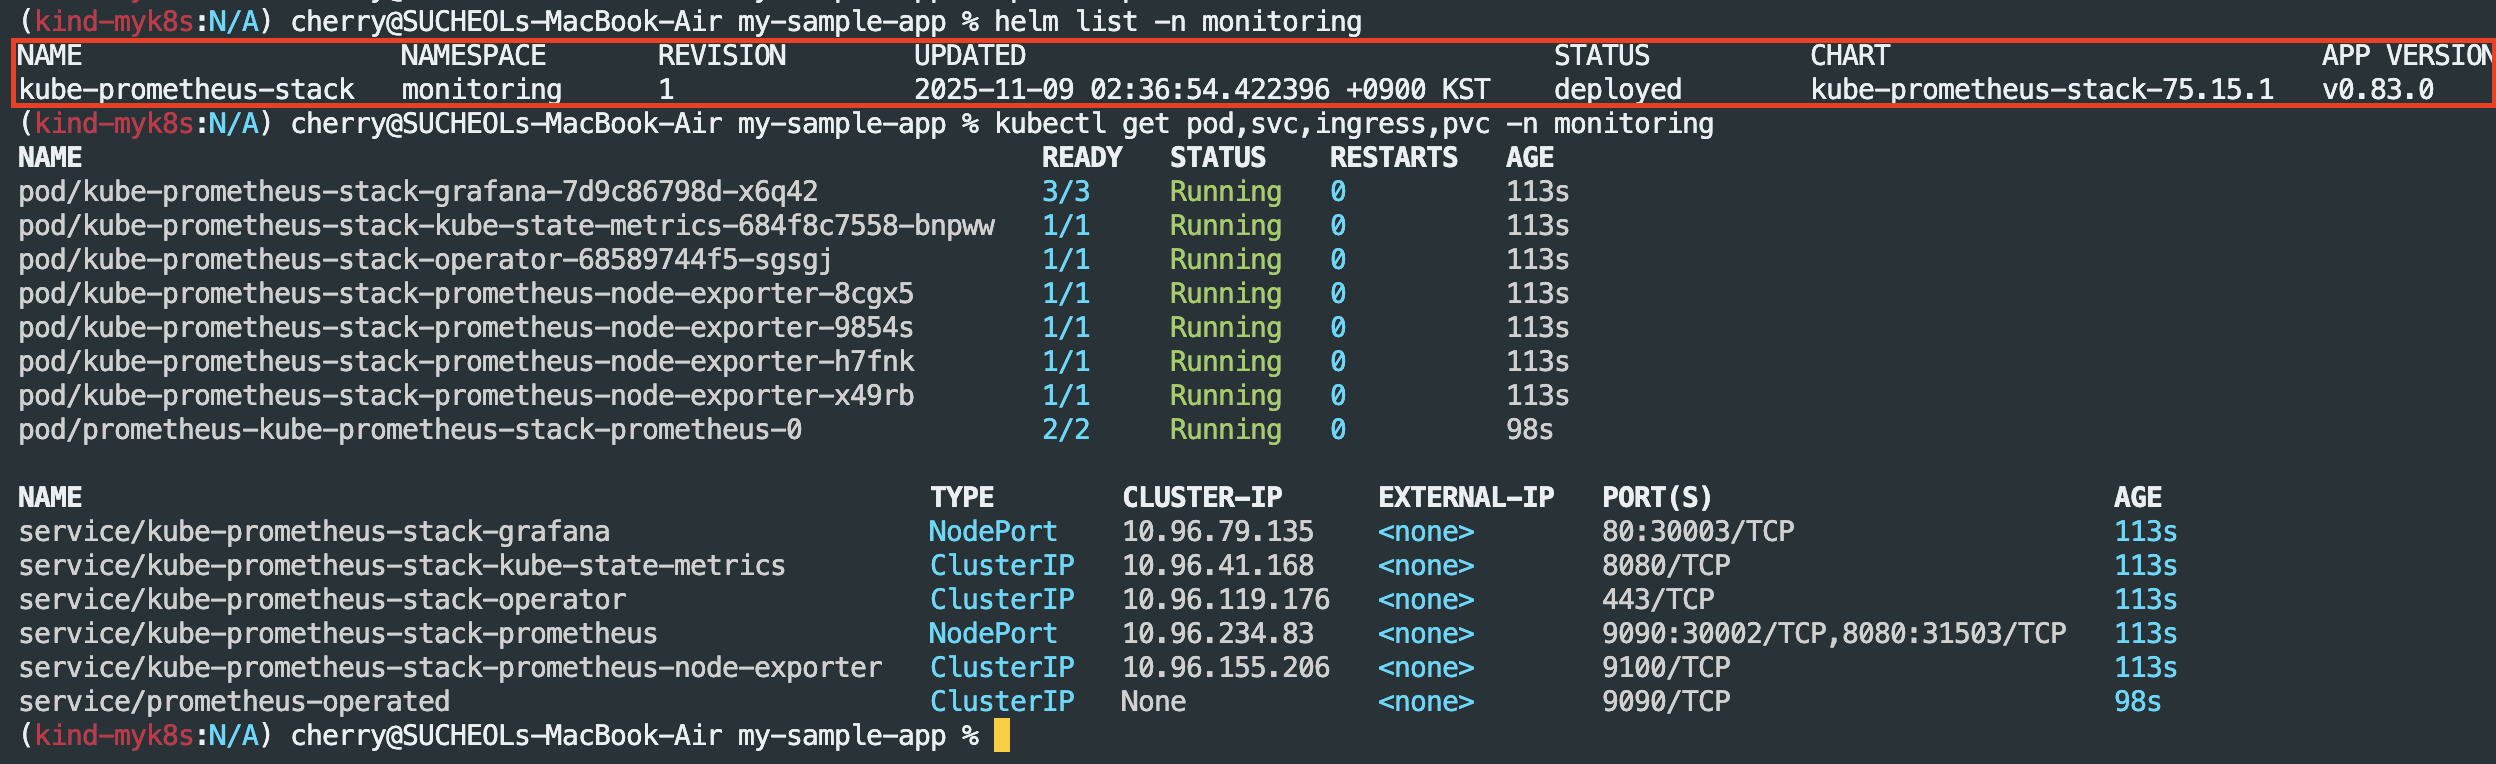
helm list -n monitoring
kubectl get pod,svc,ingress,pvc -n monitoring
kubectl get-all -n monitoring
kubectl get prometheus,servicemonitors -n monitoring
kubectl get crd | grep monitoring
# 프로메테우스 버전 확인
kubectl exec -it sts/prometheus-kube-prometheus-stack-prometheus -n monitoring -c prometheus -- prometheus --version
# 프로메테우스 리소스 정보 확인
kubectl get prometheuses.monitoring.coreos.com -n monitoring
kubectl get prometheuses.monitoring.coreos.com -n monitoring -o yaml | k neat | yq
#
kubectl get servicemonitors.monitoring.coreos.com -n monitoring
kubectl get servicemonitors.monitoring.coreos.com -n monitoring kube-prometheus-stack-apiserver -o yaml | grep labels: -A10

- 모니터링을 위한 테스트 파드 기동
cat <<EOF | kubectl apply -f -
apiVersion: v1
kind: Pod
metadata:
  name: nginx
  labels:
    app: nginx
spec:
  containers:
  - name: nginx
    image: nginx:alpine
    ports:
    - containerPort: 80
EOF
- 메트릭 호출(테스트 파드)
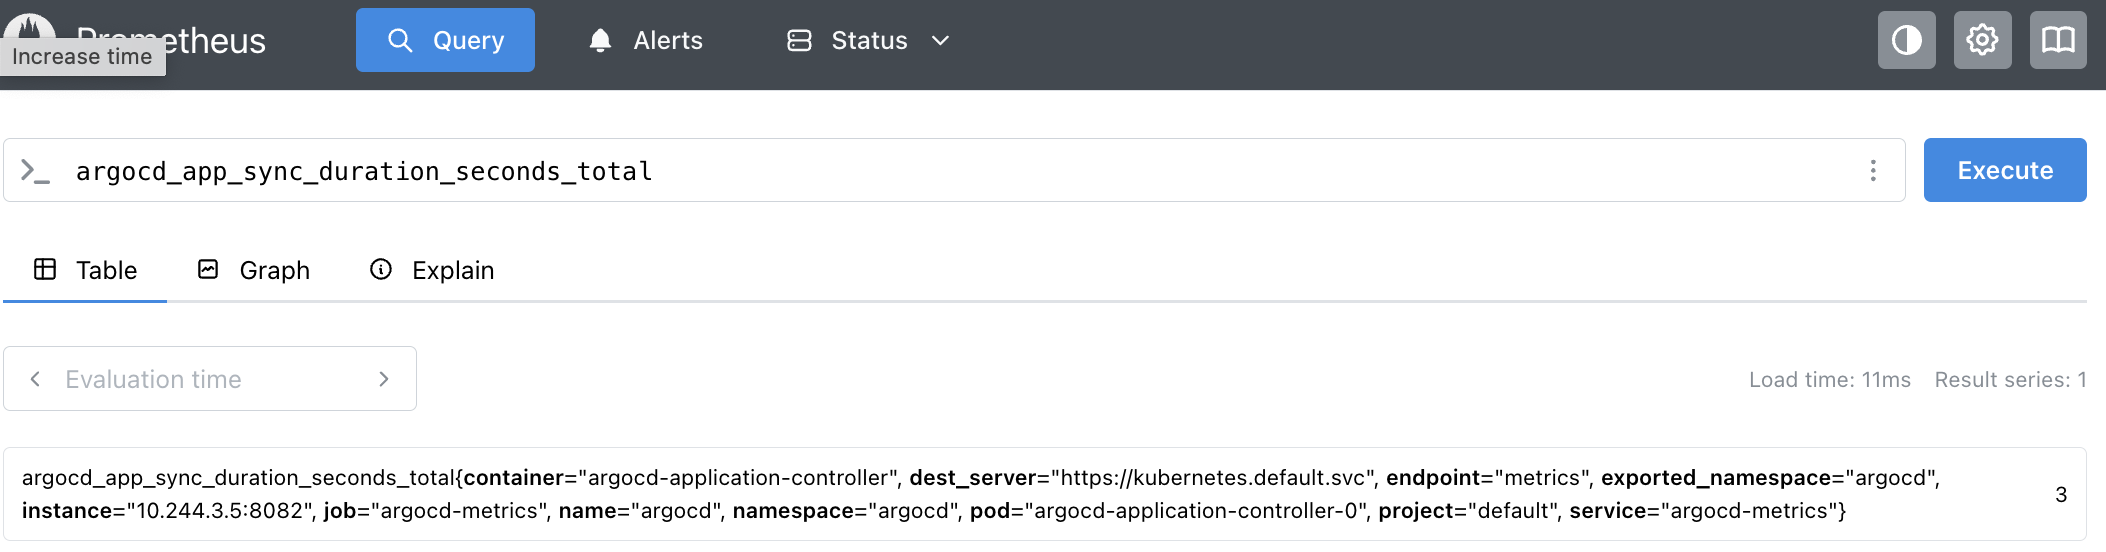
kubectl exec -it -n default nginx -- curl argocd-metrics.argocd.svc:8082/metrics
- ServiceMonitor 생성
cat <<EOF | kubectl apply -f -
apiVersion: monitoring.coreos.com/v1
kind: ServiceMonitor
metadata:
  name: argocd-metrics
  namespace: monitoring
  labels:
    release: kube-prometheus-stack
spec:
  selector:
    matchLabels:
      app.kubernetes.io/name: argocd-metrics
  endpoints:
    - port: metrics
  namespaceSelector:
    matchNames:
      - argocd
EOF
- 메트릭 호출(argocd-server)
kubectl exec -it -n default nginx -- curl argocd-server-metrics.argocd.svc:8083/metrics- 서비스 모니터 생성
cat <<EOF | kubectl apply -f -
apiVersion: monitoring.coreos.com/v1
kind: ServiceMonitor
metadata:
  name: argocd-server-metrics
  namespace: monitoring
  labels:
    release: kube-prometheus-stack
spec:
  selector:
    matchLabels:
      app.kubernetes.io/name: argocd-server-metrics
  endpoints:
    - port: metrics
  namespaceSelector:
    matchNames:
      - argocd
EOF
- 서비스 모니터 생성 확인

- 메트릭 호출(repo-server)
kubectl exec -it -n default nginx -- curl argocd-repo-server.argocd.svc:8084/metrics- 서비스 모니터 생성(repo-server)
cat <<EOF | kubectl apply -f -
apiVersion: monitoring.coreos.com/v1
kind: ServiceMonitor
metadata:
  name: argocd-repo-server-metrics
  namespace: monitoring
  labels:
    release: kube-prometheus-stack
spec:
  selector:
    matchLabels:
      app.kubernetes.io/name: argocd-repo-server
  endpoints:
    - port: metrics
  namespaceSelector:
    matchNames:
      - argocd
EOF

# 나머지 서비스 모니터 생성(애플리케인션셋,dex-server,redis,notification 등)
cat <<EOF | kubectl apply -f -
apiVersion: monitoring.coreos.com/v1
kind: ServiceMonitor
metadata:
  name: argocd-applicationset-controller-metrics
  namespace: monitoring
  labels:
    release: kube-prometheus-stack
spec:
  selector:
    matchLabels:
      app.kubernetes.io/name: argocd-applicationset-controller
  endpoints:
    - port: metrics
  namespaceSelector:
    matchNames:
      - argocd
---
apiVersion: monitoring.coreos.com/v1
kind: ServiceMonitor
metadata:
  name: argocd-dex-server
  namespace: monitoring
  labels:
    release: kube-prometheus-stack
spec:
  selector:
    matchLabels:
      app.kubernetes.io/name: argocd-dex-server
  endpoints:
    - port: metrics
  namespaceSelector:
    matchNames:
      - argocd
---
apiVersion: monitoring.coreos.com/v1
kind: ServiceMonitor
metadata:
  name: argocd-redis-haproxy-metrics
  namespace: monitoring
  labels:
    release: kube-prometheus-stack
spec:
  selector:
    matchLabels:
      app.kubernetes.io/name: argocd-redis-ha-haproxy
  endpoints:
    - port: http-exporter-port
  namespaceSelector:
    matchNames:
      - argocd
---
apiVersion: monitoring.coreos.com/v1
kind: ServiceMonitor
metadata:
  name: argocd-notifications-controller
  namespace: monitoring
  labels:
    release: kube-prometheus-stack
spec:
  selector:
    matchLabels:
      app.kubernetes.io/name: argocd-notifications-controller-metrics
  endpoints:
    - port: metrics
  namespaceSelector:
    matchNames:
      - argocd
EOF
- 전체 서비스 모니터 확인

- 프로메테우스 Target 확인

- 그라파나 대쉬보드 배포(import)
https://github.com/argoproj/argo-cd/blob/master/examples/dashboard.json
# guestbook helm 차트 애플리케이션 생성
cat <<EOF | kubectl apply -f -
apiVersion: argoproj.io/v1alpha1
kind: Application
metadata:
  name: guestbook
  namespace: argocd
  finalizers:
  - resources-finalizer.argocd.argoproj.io
spec:
  project: default
  source:
    helm:
      valueFiles:
      - values.yaml
    path: helm-guestbook
    repoURL: https://github.com/argoproj/argocd-example-apps
    targetRevision: HEAD
  syncPolicy:
    automated:
      enabled: true
      prune: true
      selfHeal: true
    syncOptions:
    - CreateNamespace=true
  destination:
    namespace: guestbook
    server: https://kubernetes.default.svc
EOF
Argo CD - 백업
- Argo CD 백업 생성
# argocd 서버 (http) 로그인
ARGOPW={ArgoCD admin 패스워드 입력}
argocd login localhost:8080  --username admin --password $ARGOPW --insecure

# 확인
argocd cluster list
argocd app list

# 백업 생성
argocd admin export -n argocd > backup.yaml
cat backup.yaml | head
cat backup.yaml | wc -l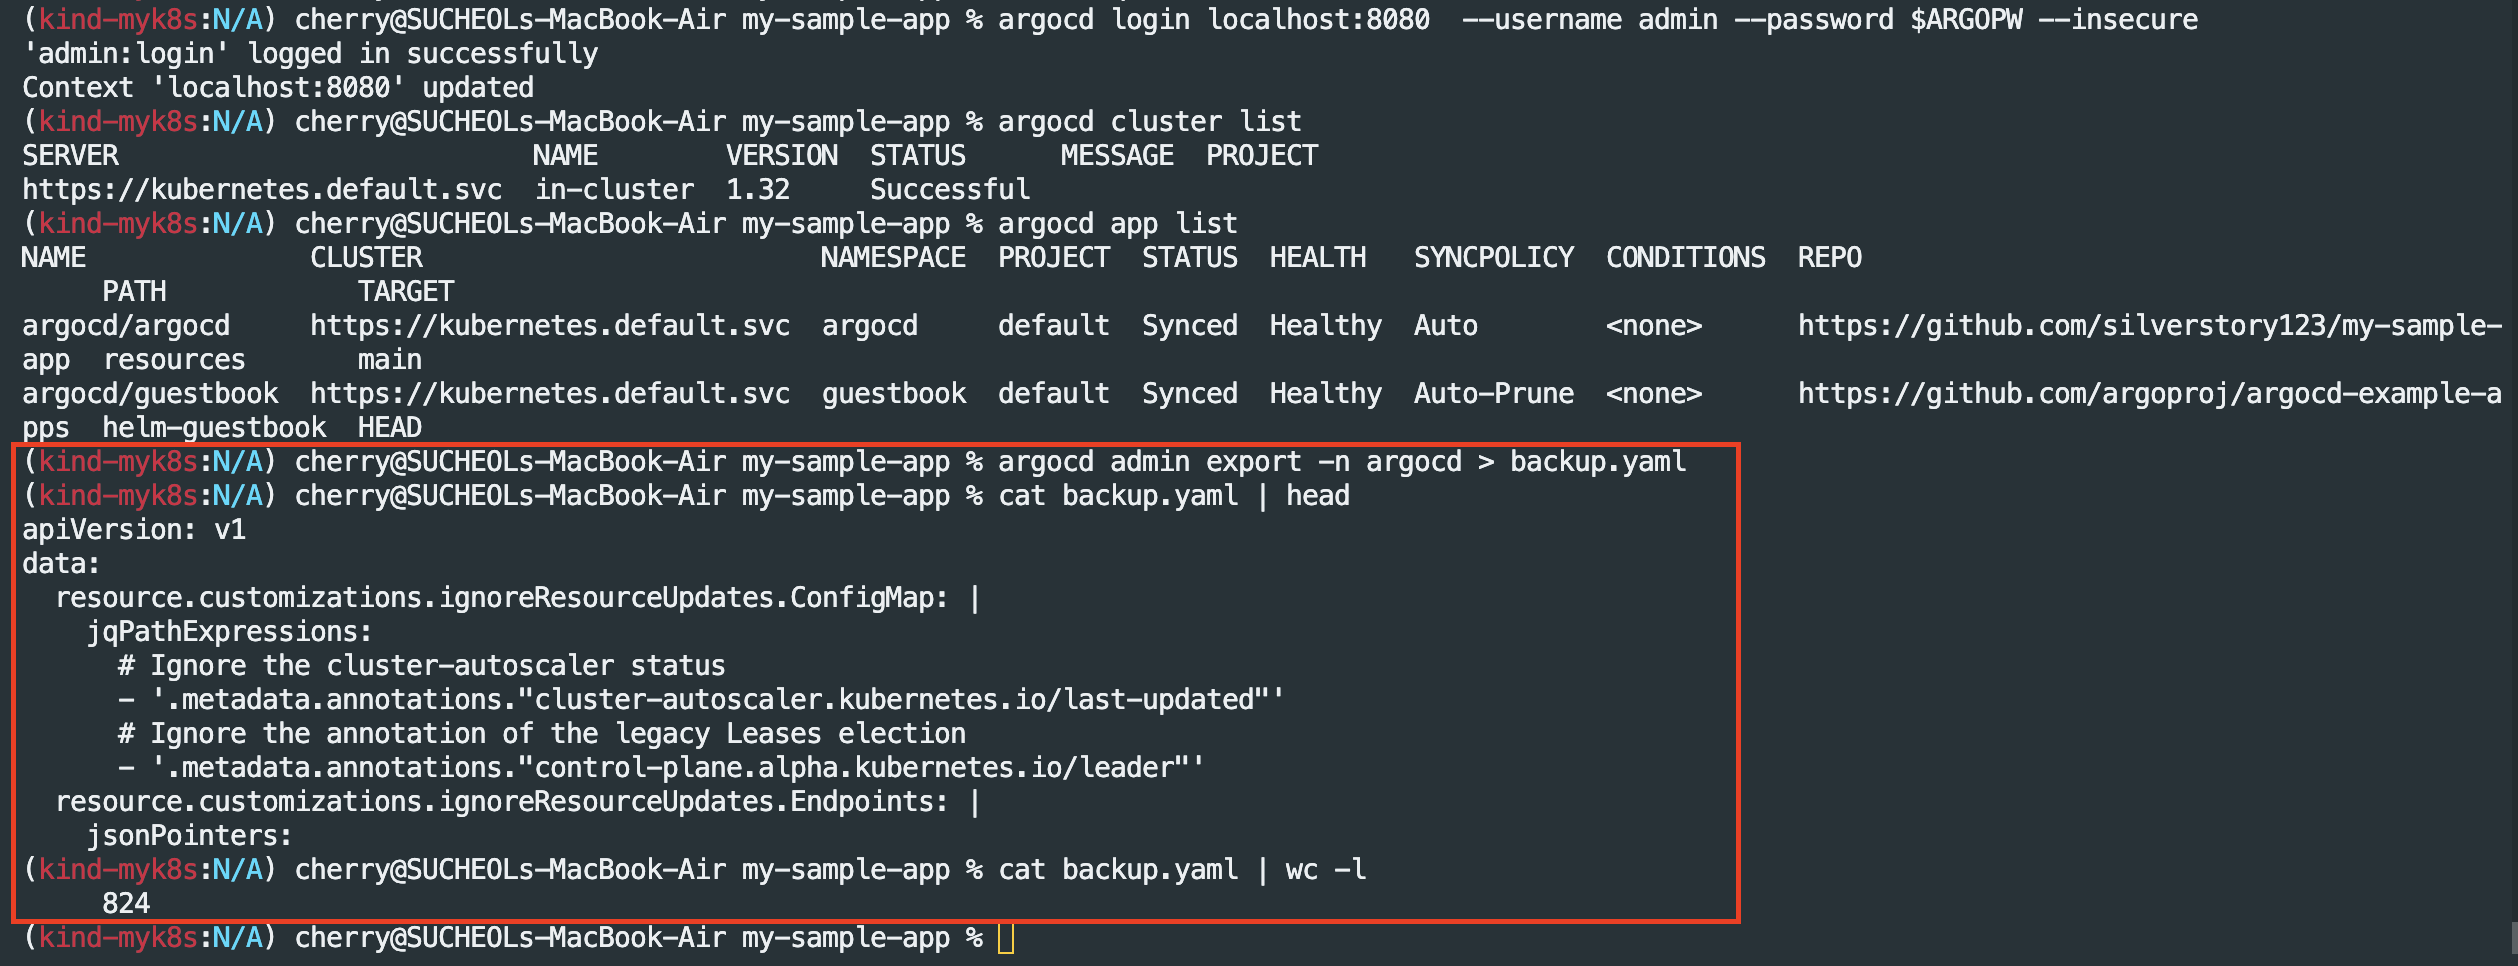
- Argo CD 백업본을 통해 다른 클러스터 생성
#
kubectl config get-contexts

#
kind create cluster --name myk8s2 --image kindest/node:v1.32.8 --config - <<EOF
kind: Cluster
apiVersion: kind.x-k8s.io/v1alpha4
nodes:
- role: control-plane
  extraPortMappings:
  - containerPort: 31000
    hostPort: 31000
  - containerPort: 31001
    hostPort: 31001
  - containerPort: 31002
    hostPort: 31002
  - containerPort: 31003
    hostPort: 31003
- role: worker
- role: worker
- role: worker
EOF

# 설치 확인
kubectl config get-contexts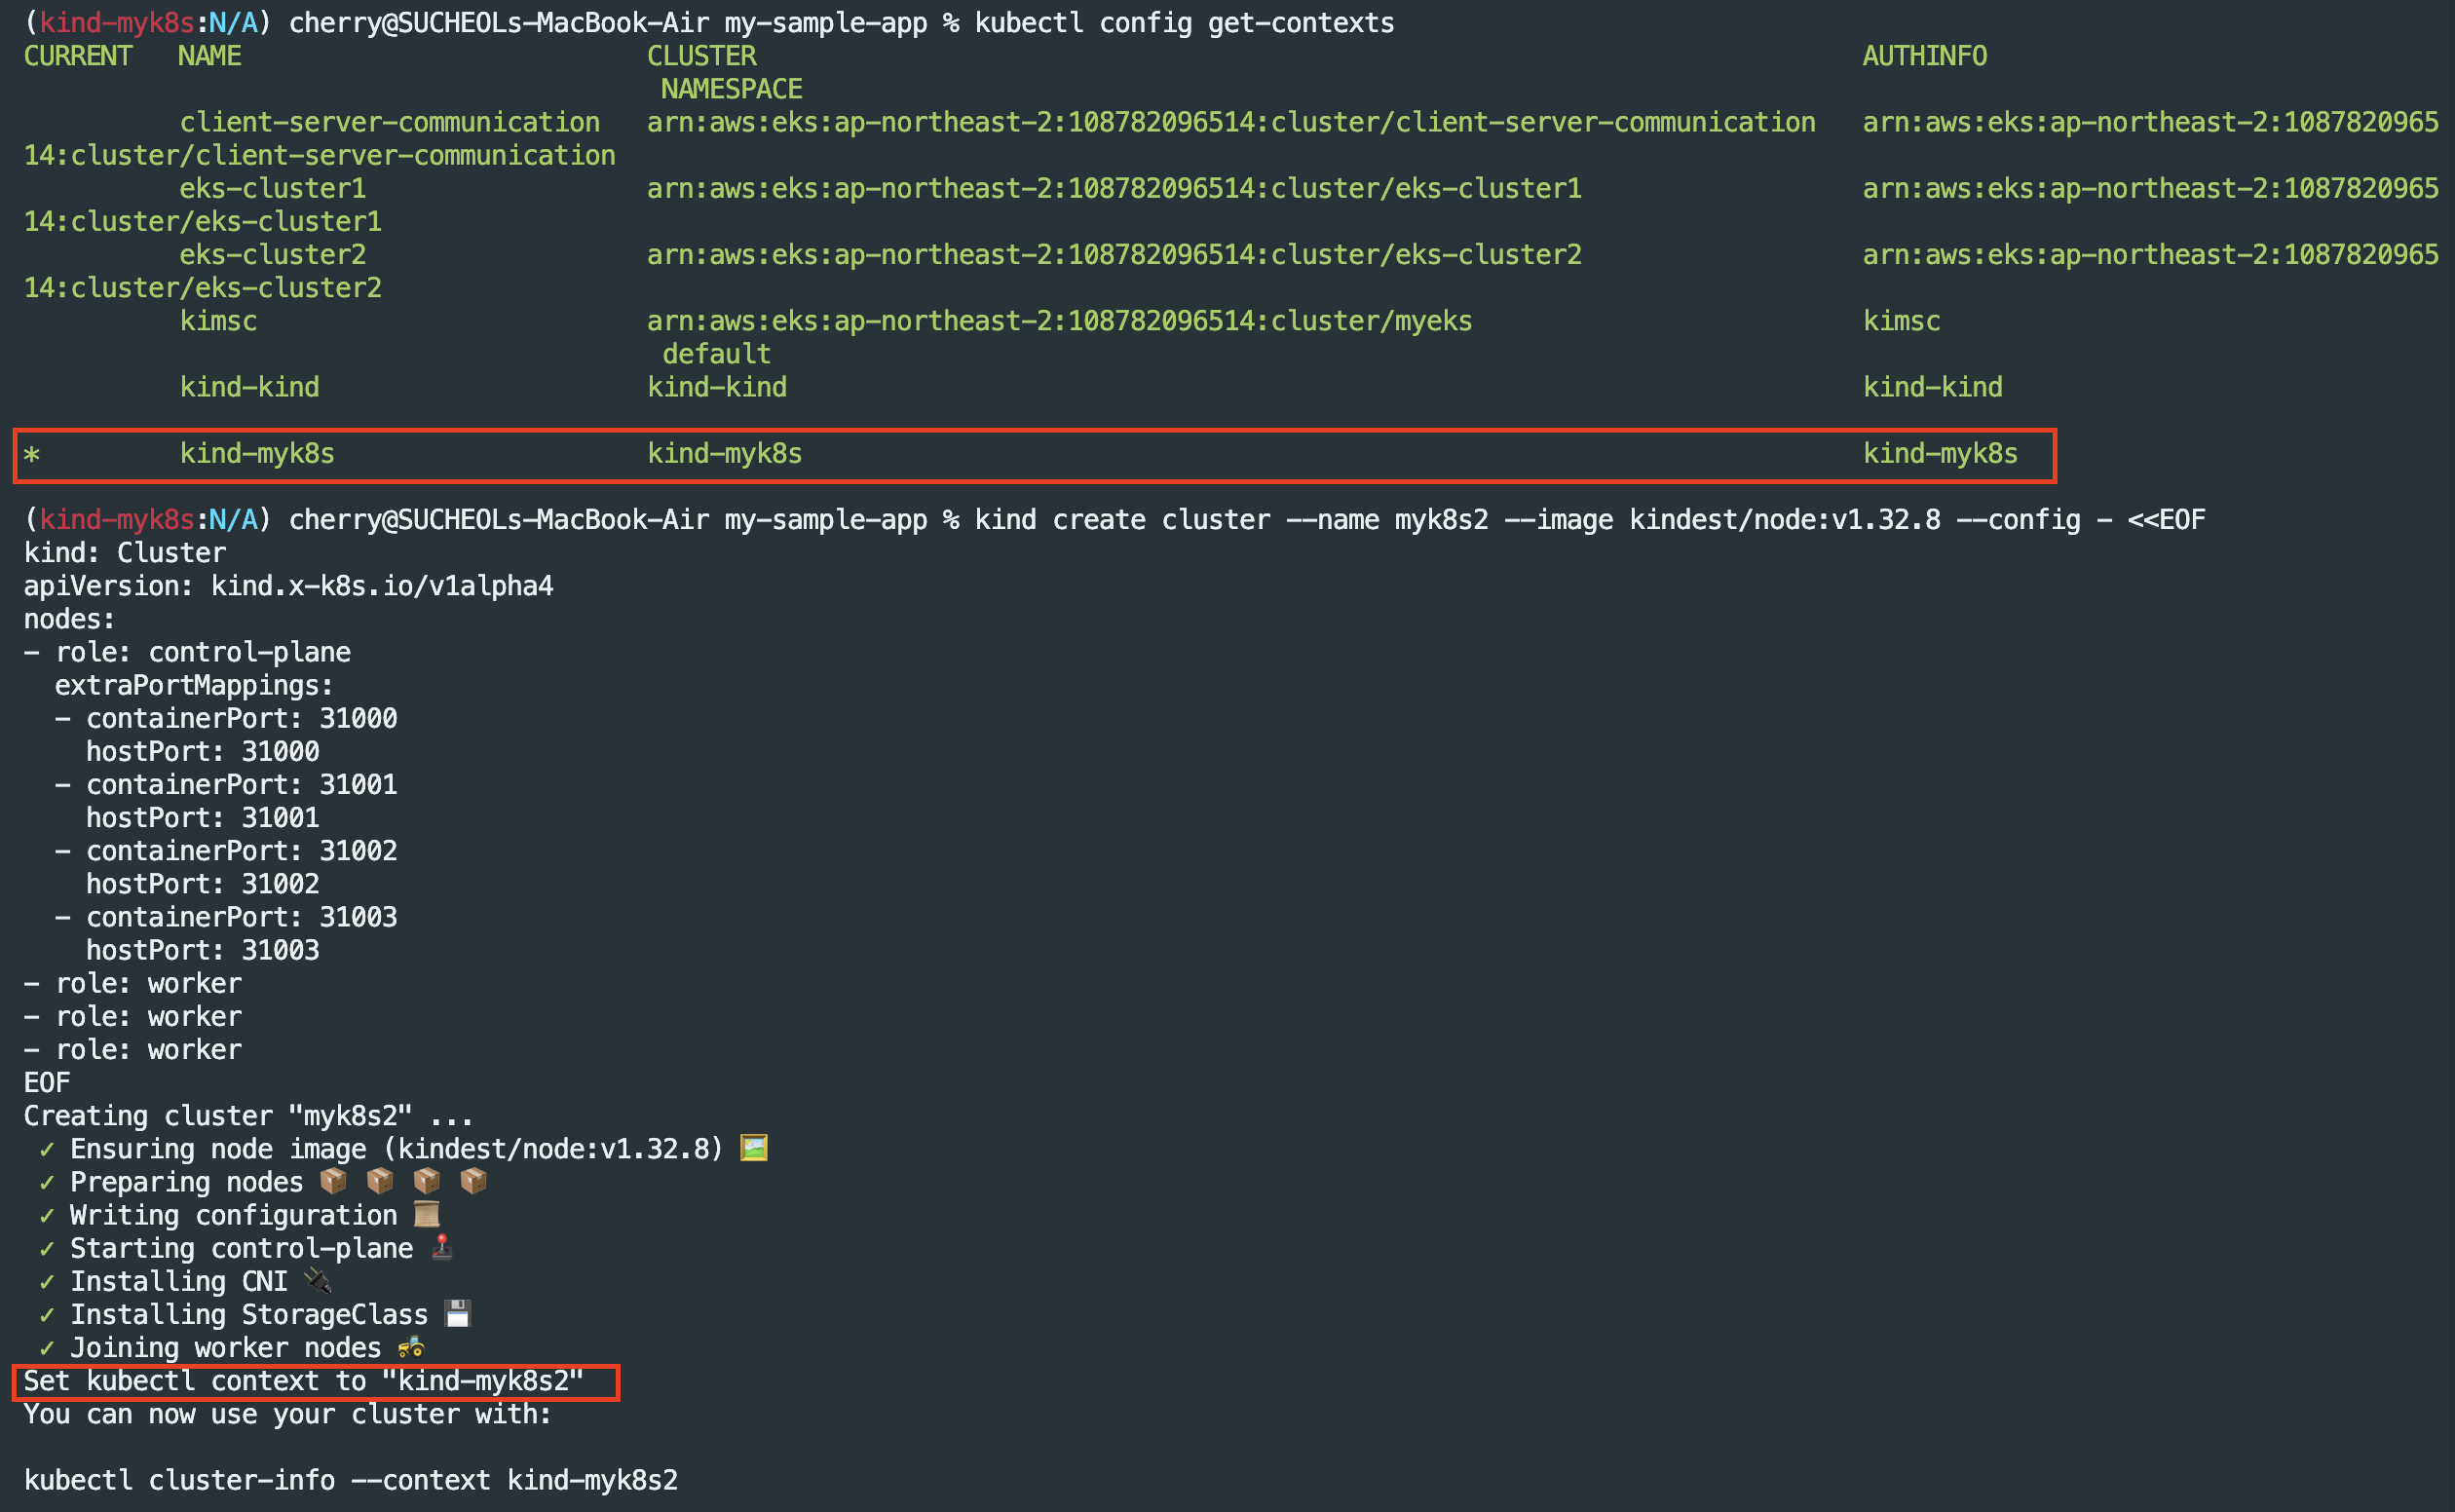

#
kubectl get node -v=6 --context kind-myk8s
kubectl get node -v=6 --context kind-myk8s2
cat ~/.kube/config

kubectl get pod -A --context kind-myk8s
kubectl get pod -A --context kind-myk8s2


# alias 설정
alias k8s1='kubectl --context kind-myk8s'
alias k8s2='kubectl --context kind-myk8s2'

# 확인
k8s1 get node -owide
k8s2 get node -owide
새 클러스터에 argo ha 설치
# alias 설정
alias k8s1='kubectl --context kind-myk8s'
alias k8s2='kubectl --context kind-myk8s2'

#
k8s2 apply -f resources/namespace.yaml
k8s2 apply -f resources/install.yaml -n argocd

# 확인
watch -d kubectl get pod -n argocd --context kind-myk8s2
kubectl port-forward svc/argocd-server -n argocd 8081:80 --context kind-myk8s2

#
k8s2 get secret -n argocd argocd-initial-admin-secret -o jsonpath='{.data.password}' | base64 -d ; echo
g8UrwxrIHs-nW4FI
open https://127.0.0.1:8081 # 프로덕션의 경우 TLS인증서가 적용된 로드밸랜서 서비스로 오픈하자

- 신규 Argo CD 기존 레포지토리 추가

- 기존 Argo CD 복원(기존 리소스 연결)
# 다른 클러스터에 argocd 서버 (http) 로그인
ARGOPW2=qwe12345
argocd login localhost:8081 --username admin --password $ARGOPW2 --insecure
# 확인
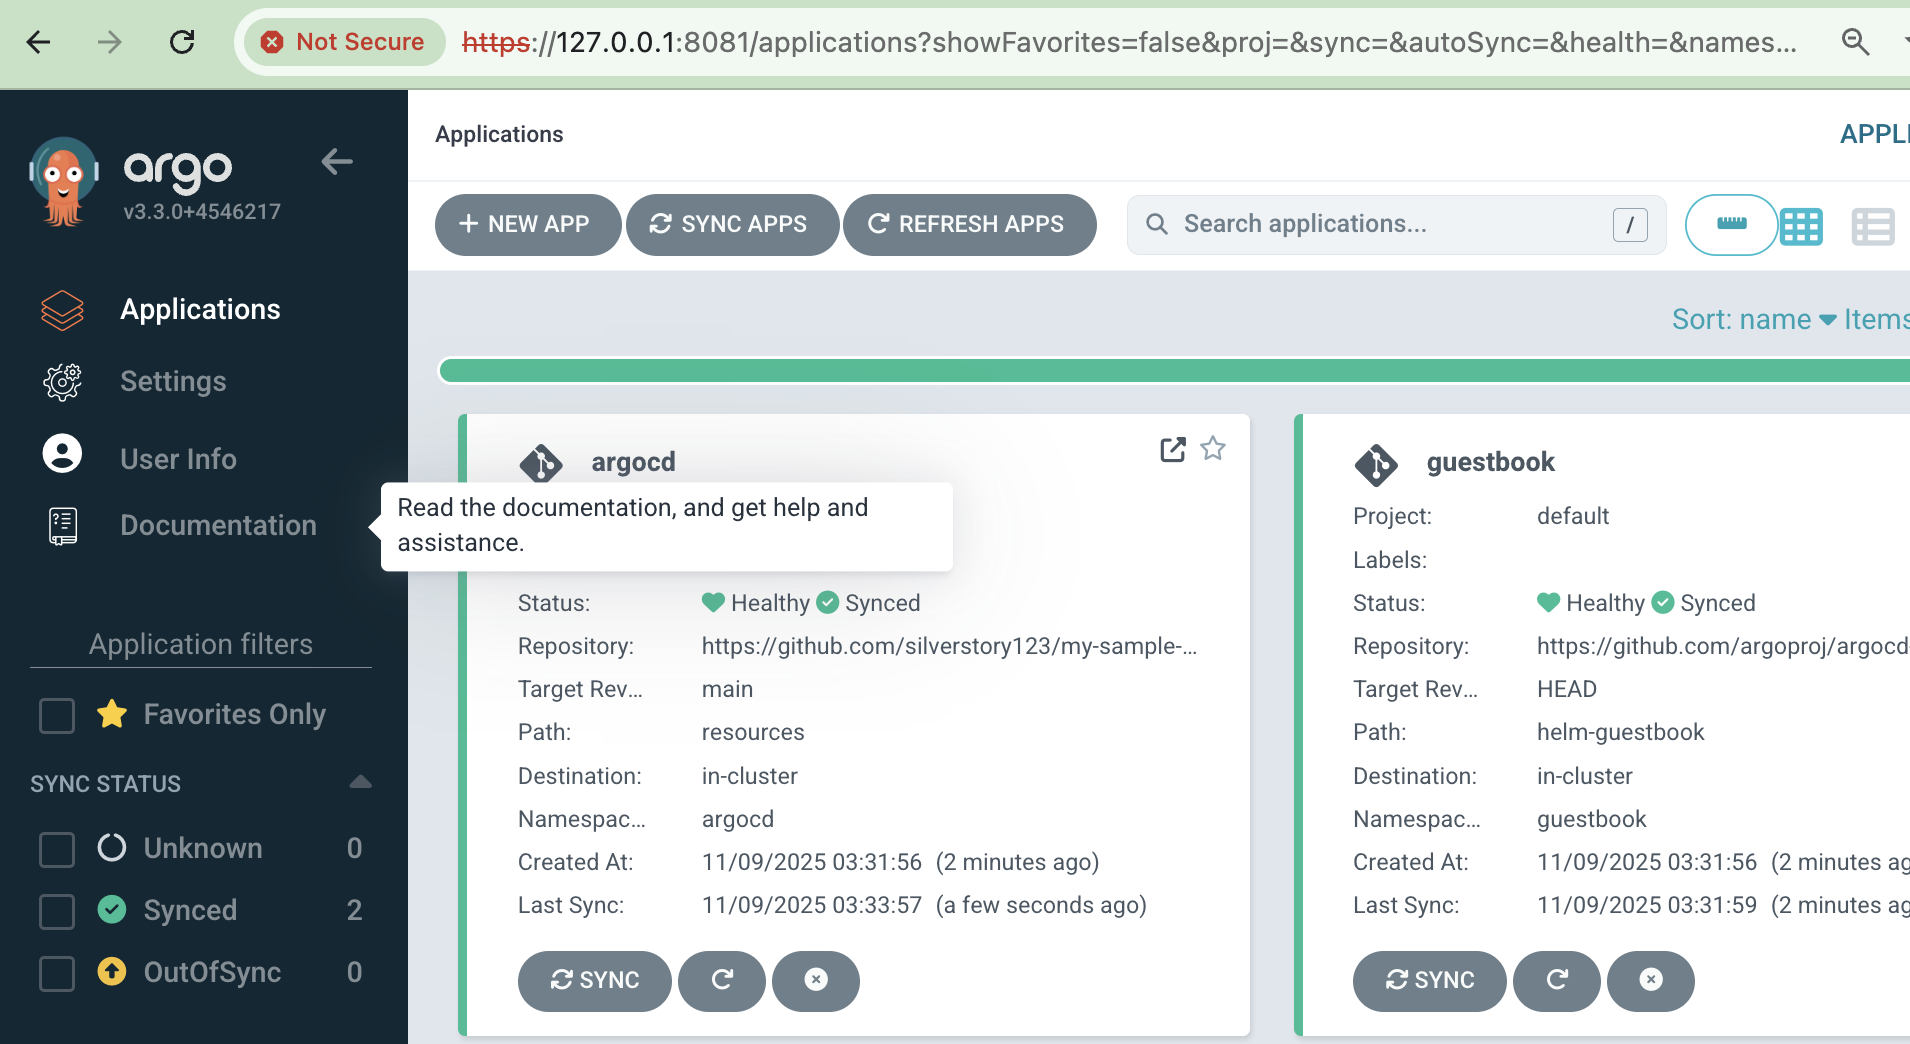
argocd cluster list
argocd app list
# 다른 클러스터에서 복원하기
argocd admin import -n argocd - < backup.yaml
# 신규 클러스터 pod 전체 조회
k8s2 get pod -A
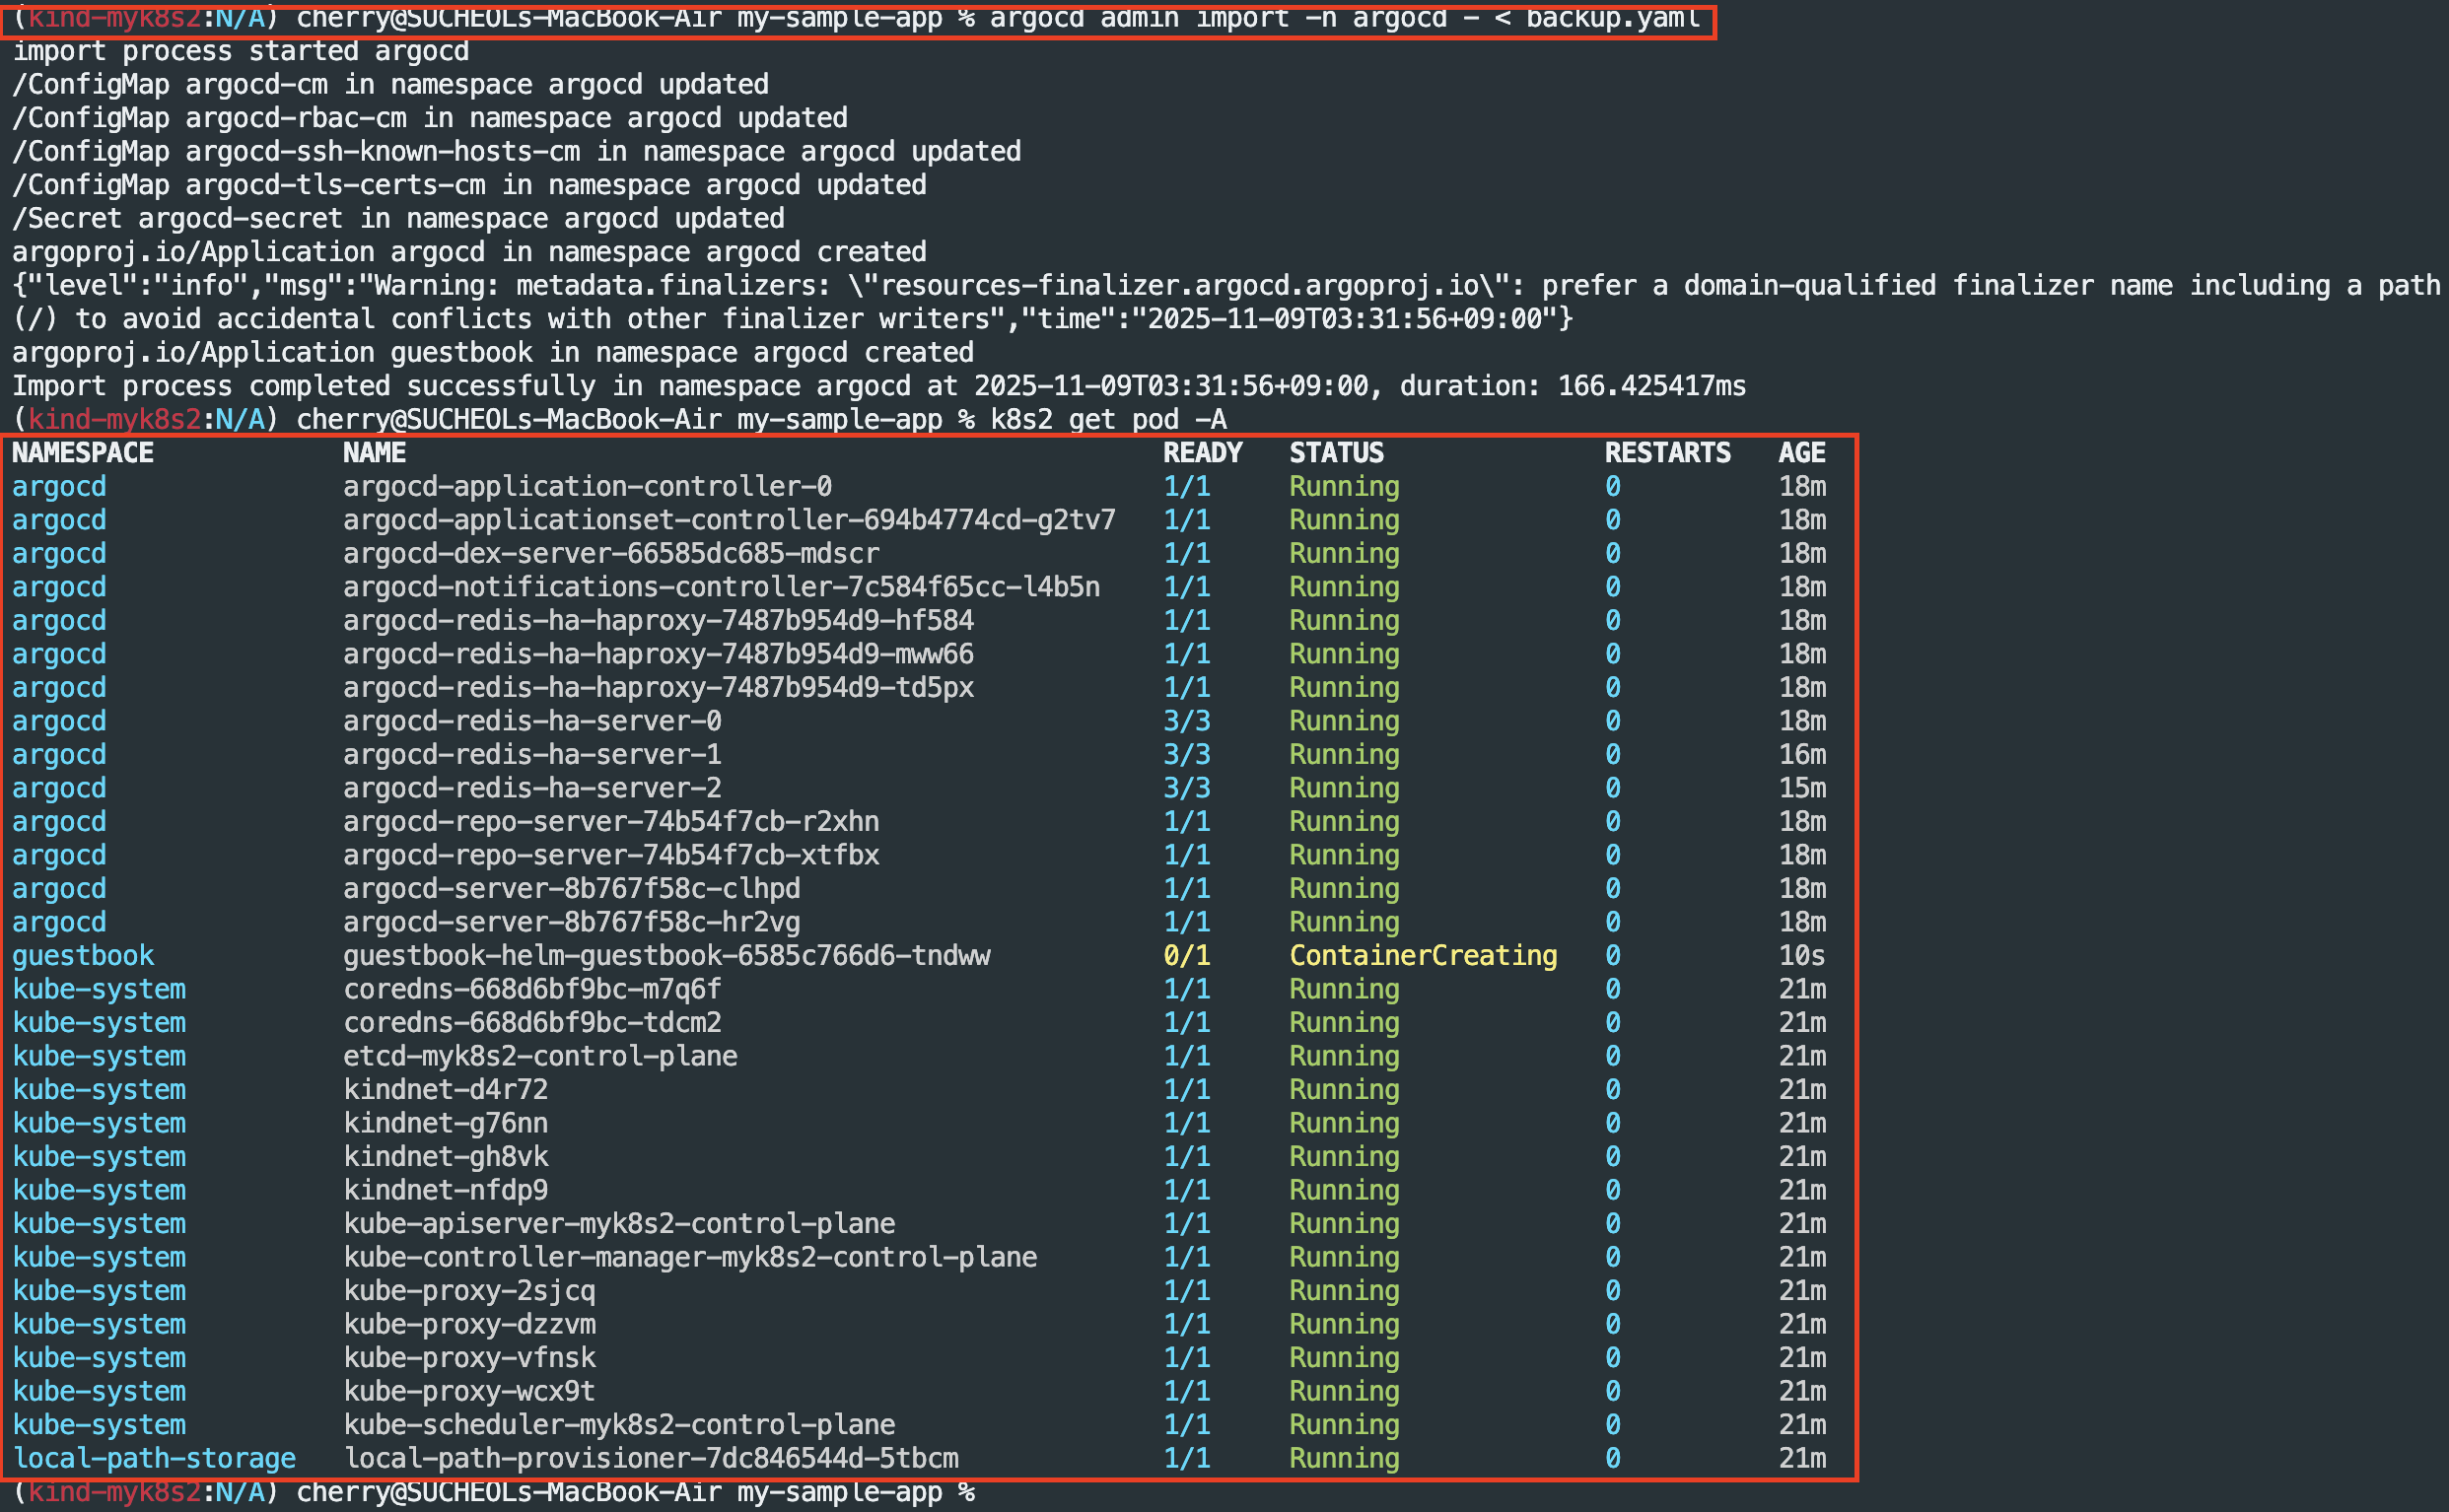
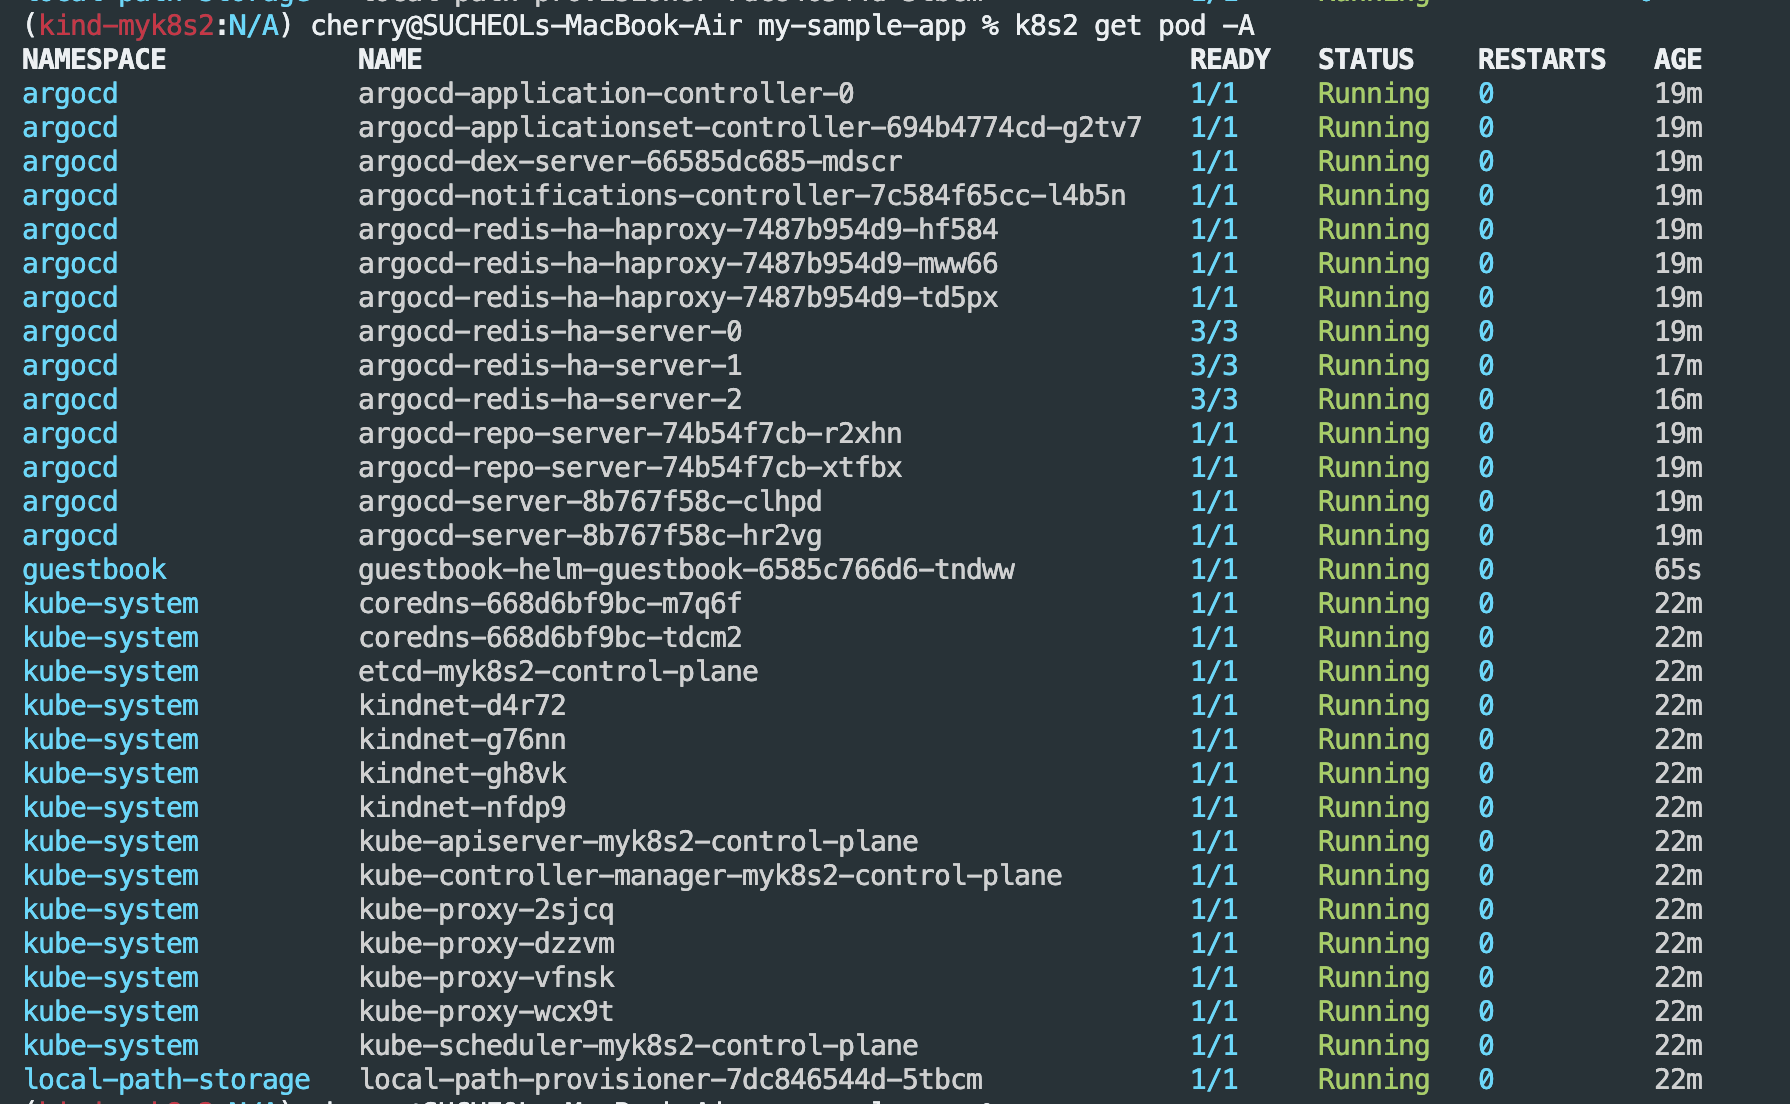
- 복구 확인
'CICD' 카테고리의 다른 글
| CI/CD 5주차(Argo CD)[2] - Argo Rollout (0) | 2025.11.15 |
|---|---|
| CI/CD 5주차(Argo CD) - 접근제어, SSO (0) | 2025.11.15 |
| CI/CD 3주차(Jenkins + ArgoCD + gogs[Repo]) (0) | 2025.11.01 |
| CI/CD 2주차 (0) | 2025.10.26 |
| CI/CD 1일차 (0) | 2025.10.18 |