
Notice
Recent Posts
Recent Comments
Link
| 일 | 월 | 화 | 수 | 목 | 금 | 토 |
|---|---|---|---|---|---|---|
| 1 | 2 | 3 | 4 | 5 | 6 | |
| 7 | 8 | 9 | 10 | 11 | 12 | 13 |
| 14 | 15 | 16 | 17 | 18 | 19 | 20 |
| 21 | 22 | 23 | 24 | 25 | 26 | 27 |
| 28 | 29 | 30 |
Tags
- aws vpc cni
- EKS Architecture
- pv/pvc
- Instance Store
- Fargate
- EmptyDir
- aws-node
- auto mode
- EKS vLLM
- nodeport
- 쿠버네티스 네트워크
- gateway api
- eks upgrade
- ipamd
- Node group
- soci
- ClusterIP
- EKS
- Terraform
- k8s scheduler
- kubernetes networking
- eksctl
- k8s authentication
- cni binary
- HostPath
- hashicorp
- serviceaccount
- externaldns
- CoreDNS
- kube-proxy
Archives
- Today
- Total
ksc0204 님의 블로그
AEWS 4기 3주차(3) - EKS Scaling(Fargate) 본문
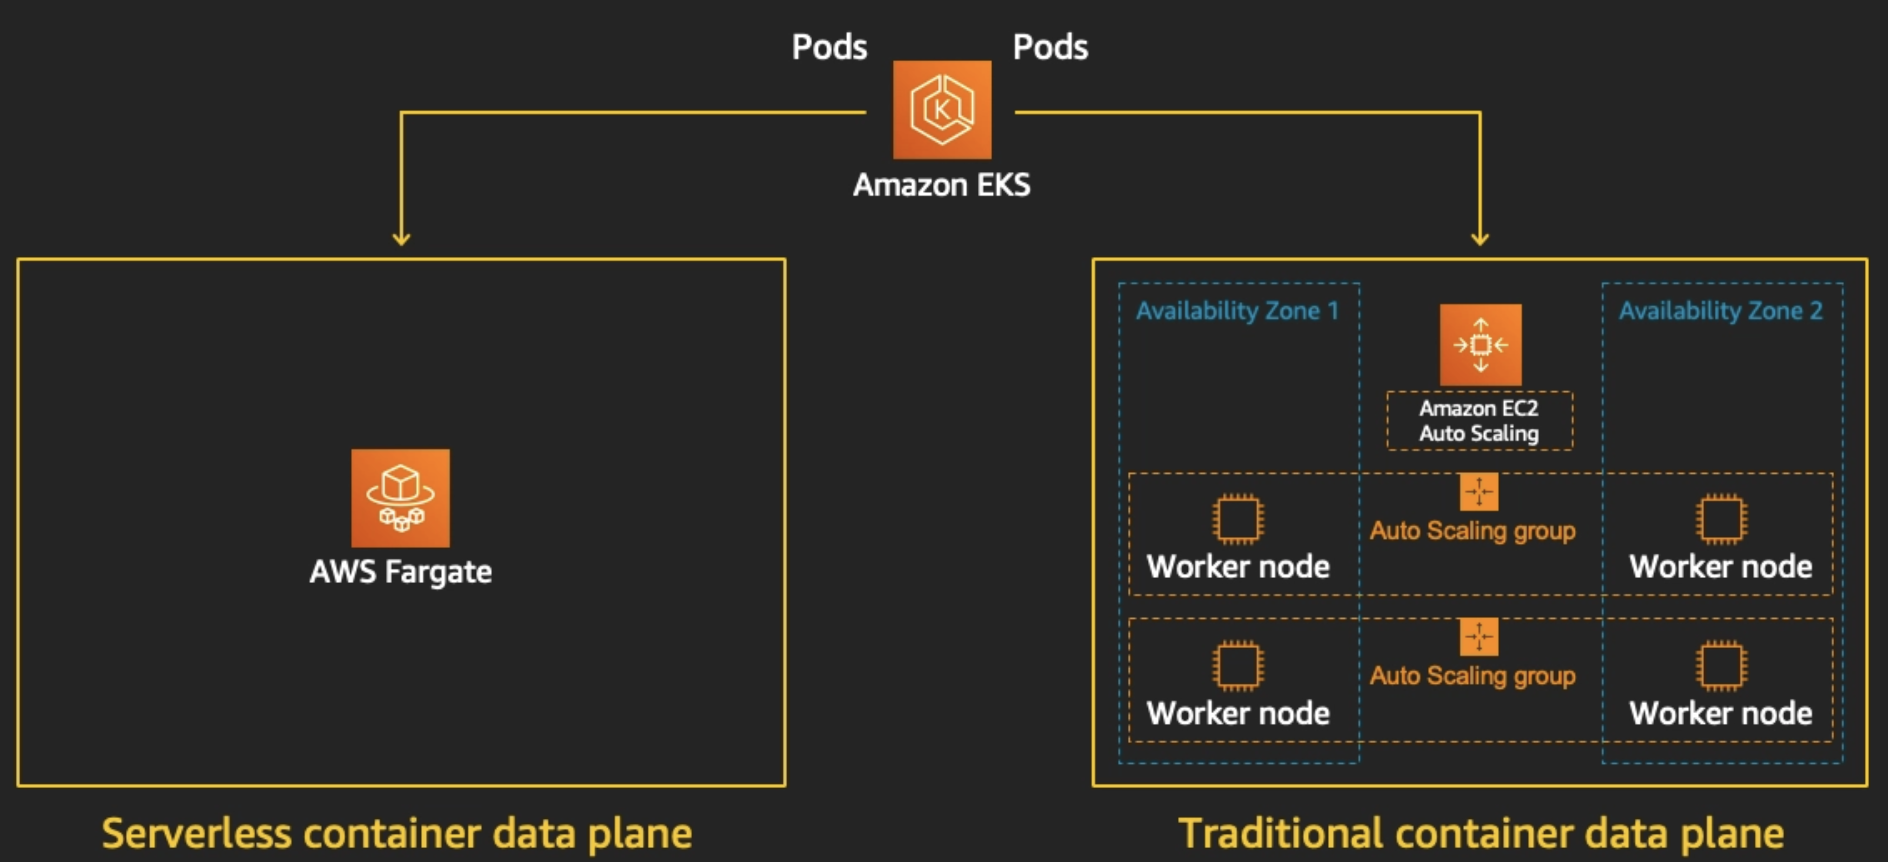
Fargate 소개
AWS Fargate는 Amazon ECS(Elastic Container Service) 및 EKS(Elastic Kubernetes Service)와 함께 작동하는 컨테이너용 서버리스(Serverless) 컴퓨팅 엔진입니다.
사용자가 가상 머신(EC2)의 클러스터를 직접 프로비저닝, 구성, 관리, 스케일링할 필요 없이 컨테이너를 곧바로 실행할 수 있게 해줍니다.
등장 배경
Fargate가 등장하기 전, AWS에서 컨테이너를 실행하려면 주로 EC2 인스턴스 위에 Docker를 설치하고 이를 묶어 클러스터로 관리해야 했습니다. 이 방식은 다음과 같은 문제점(Pain Points)들을 발생시켰습니다.
- 인프라 관리 부담: 사용자는 여전히 EC2 인스턴스의 OS 패치, 네트워크 관리, 보안 패치 등 유지보수 관리 포인트가 증가
- 오버프로비저닝과 비용 낭비: 파드를 띄우기 위해 크기가 큰 EC2를 띄웠지만 이로인하여 서버에 빈 공간이 생겨도(유휴 리소스) EC2 인스턴스 전체에 대한 비용을 지불해야 했습니다.(비용 비효율성)
- 스케일링의 복잡성: 트래픽이 몰릴 때, '파드(컨테이너)의 확장'과 'EC2 노드의 확장'이라는 두 가지 스케일링을 동시에 조율해야 하는 복잡성 발생
Fargate는 이러한 인프라 유지 관리를 AWS가 대신 관리해주고 사용자는 오직 애플리케이션과 컨테이너에만 집중할 수 있는 환경을 제공하기 위해 등장했습니다.
특징
| 주요 특징 |
상세 설명 및 장단점
|
| 완벽한 서버리스 (Serverless) |
EC2 인스턴스 프로비저닝, OS 패치, 클러스터 용량 관리가 전혀 필요 없습니다.• 개발자와 운영자는 오직 컨테이너와 애플리케이션 로직에만 집중할 수 있습니다.
|
| 사용량 기반 과금 (Pay-as-you-go) |
컨테이너가 실행되는 동안 요청한 vCPU와 메모리 크기에 대해서만 초 단위로 과금 발생되며,
EC2를 넉넉하게 띄워놓아 발생하는 잉여 자원(빈 공간)에 대한 비용 낭비가 없습니다. |
| 강력한 수준의 격리 (Isolation) |
각 파드는 AWS의 Firecracker 마이크로VM 위에서 완전히 독립적으로 실행됩니다.
EC2 노드를 공유하지 않으므로 컨테이너 간 리소스 경합이나 보안 취약점(컨테이너 탈출 등)이 원천 차단됩니다. |
| 인프라 제약 없는 스케일링 |
클러스터에 남은 노드 공간을 계산할 필요 없이, 트래픽 폭주 시 필요한 만큼의 파드를 즉각적으로 무한하게 확장할 수 있습니다.
|
| 권한 및 호스트 접근 불가 |
호스트 OS에 접근할 수 없어 privileged 모드 컨테이너 실행이 불가능합니다.• 커널 단의 조작이 필요한 보안/네트워크 에이전트는 사용할 수 없습니다.
|
| DaemonSet 지원 불가 (EKS) |
서버(노드) 개념이 없으므로 노드당 하나씩 띄우는 데몬셋을 사용할 수 없으며, 로깅/모니터링은 사이드카(Sidecar) 패턴을 써야 합니다.
|
| 지속 워크로드 비용 |
리소스를 항상 100% 가동하는 워크로드라면, 단순 컴퓨팅 단가 자체는 EC2(+Karpenter)를 사용하는 것이 Fargate보다 저렴할 수 있습니다.
|
제약사항 및 주의사항
- Damonset은 지원하지 않으며, 필요한 경우 파드 내부에서 사이드카로 실행 필요
- Privileged containers 지원 불가
- 현재 Fargate에서는 GPU를 사용할 수 없습니다.
- AWS BottleRocket 미지원
- ARM 프로세스 미지원
- 노드 SSH 접속 미지원
- Fargate에서 실행되는 Pod는 Pod Manifest에서 HostPort 또는 HostNetwork를 지정 불가
- Fargate에서 실행되는 Pod는 AWS 서비스에 대한 NAT 게이트웨이 액세스 권한이 있는 private 서브넷에서만 지원됨
- Pod에는 Amazon EC2 인스턴스 메타데이터 서비스(IMDS)를 사용할 수 없습니다
- 대체 CNI 플러그인을 사용할 수 없습니다.
- EFS 동적 영구 볼륨 프로비저닝을 사용할 수 없음.
- Fargate Spot을 지원하지 않음
- EBS 볼륨을 Fargate 포드에 마운트할 수 없음
- Fargate Kubernetes topologySpreadConstraints 미지원
- Amazon EC2 dedicated hosts 미지원
- Fargate Pods 우선순위를 보장하여 request로 선언된 cpu와 memory를 limit와 동일해야 합니다.
- Fargate는 필요한 Kubernetes 구성 요소(kubelet, kube-proxy, containerd)에 대해 각 Pod의 메모리 예약에 256MB를 추가합니다.
- 프로비저닝되면 Fargate에서 실행되는 각 Pod는 기본적으로 20 GiB의 임시 저장소를 받게 됩니다. 임시 저장소의 총 양을 최대 175 GiB까지 늘릴 수 있습니다.
- Fargate의 Amazon EKS는 Fluent Bit 기반의 내장 로그 라우터를 제공합니다. 즉, Fluent Bit 컨테이너를 사이드카로 명시적으로 실행하지 않고 Amazon에서 실행합니다
실습 환경 구성
git clone https://github.com/aws-ia/terraform-aws-eks-blueprints
tree terraform-aws-eks-blueprints/patterns
cd terraform-aws-eks-blueprints/patterns/fargate-serverless
main.tf 수정 - sample 파드 제거
provider "aws" {
  region = local.region
}

provider "kubernetes" {
  host                   = module.eks.cluster_endpoint
  cluster_ca_certificate = base64decode(module.eks.cluster_certificate_authority_data)

  exec {
    api_version = "client.authentication.k8s.io/v1beta1"
    command     = "aws"
    # This requires the awscli to be installed locally where Terraform is executed
    args = ["eks", "get-token", "--cluster-name", module.eks.cluster_name]
  }
}

provider "helm" {
  kubernetes {
    host                   = module.eks.cluster_endpoint
    cluster_ca_certificate = base64decode(module.eks.cluster_certificate_authority_data)

    exec {
      api_version = "client.authentication.k8s.io/v1beta1"
      command     = "aws"
      # This requires the awscli to be installed locally where Terraform is executed
      args = ["eks", "get-token", "--cluster-name", module.eks.cluster_name]
    }
  }
}

data "aws_availability_zones" "available" {
  # Do not include local zones
  filter {
    name   = "opt-in-status"
    values = ["opt-in-not-required"]
  }
}

locals {
  name     = basename(path.cwd)
  region   = "ap-northeast-2"

  vpc_cidr = "10.10.0.0/16"
  azs      = slice(data.aws_availability_zones.available.names, 0, 3)

  tags = {
    Blueprint  = local.name
    GithubRepo = "github.com/aws-ia/terraform-aws-eks-blueprints"
  }
}

################################################################################
# Cluster
################################################################################

module "eks" {
  source  = "terraform-aws-modules/eks/aws"
  version = "~> 20.11"

  cluster_name                   = local.name
  cluster_version                = "1.30"
  cluster_endpoint_public_access = true

  # Give the Terraform identity admin access to the cluster
  # which will allow resources to be deployed into the cluster
  enable_cluster_creator_admin_permissions = true

  vpc_id     = module.vpc.vpc_id
  subnet_ids = module.vpc.private_subnets

  # Fargate profiles use the cluster primary security group so these are not utilized
  create_cluster_security_group = false
  create_node_security_group    = false

  fargate_profiles = {
    study_wildcard = {
      selectors = [
        { namespace = "study-*" }
      ]
    }
    kube_system = {
      name = "kube-system"
      selectors = [
        { namespace = "kube-system" }
      ]
    }
  }

  fargate_profile_defaults = {
    iam_role_additional_policies = {
      additional = module.eks_blueprints_addons.fargate_fluentbit.iam_policy[0].arn
    }
  }

  tags = local.tags
}

################################################################################
# EKS Blueprints Addons
################################################################################

module "eks_blueprints_addons" {
  source  = "aws-ia/eks-blueprints-addons/aws"
  version = "~> 1.16"

  cluster_name      = module.eks.cluster_name
  cluster_endpoint  = module.eks.cluster_endpoint
  cluster_version   = module.eks.cluster_version
  oidc_provider_arn = module.eks.oidc_provider_arn

  # We want to wait for the Fargate profiles to be deployed first
  create_delay_dependencies = [for prof in module.eks.fargate_profiles : prof.fargate_profile_arn]

  # EKS Add-ons
  eks_addons = {
    coredns = {
      configuration_values = jsonencode({
        computeType = "Fargate"
        # Ensure that the we fully utilize the minimum amount of resources that are supplied by
        # Fargate https://docs.aws.amazon.com/eks/latest/userguide/fargate-pod-configuration.html
        # Fargate adds 256 MB to each pod's memory reservation for the required Kubernetes
        # components (kubelet, kube-proxy, and containerd). Fargate rounds up to the following
        # compute configuration that most closely matches the sum of vCPU and memory requests in
        # order to ensure pods always have the resources that they need to run.
        resources = {
          limits = {
            cpu = "0.25"
            # We are targeting the smallest Task size of 512Mb, so we subtract 256Mb from the
            # request/limit to ensure we can fit within that task
            memory = "256M"
          }
          requests = {
            cpu = "0.25"
            # We are targeting the smallest Task size of 512Mb, so we subtract 256Mb from the
            # request/limit to ensure we can fit within that task
            memory = "256M"
          }
        }
      })
    }
    vpc-cni    = {}
    kube-proxy = {}
  }

  # Enable Fargate logging this may generate a large ammount of logs, disable it if not explicitly required
  enable_fargate_fluentbit = true
  fargate_fluentbit = {
    flb_log_cw = true
  }

  enable_aws_load_balancer_controller = true
  aws_load_balancer_controller = {
    set = [
      {
        name  = "vpcId"
        value = module.vpc.vpc_id
      },
      {
        name  = "podDisruptionBudget.maxUnavailable"
        value = 1
      },
    ]
  }

  tags = local.tags
}

################################################################################
# Supporting Resources
################################################################################

module "vpc" {
  source  = "terraform-aws-modules/vpc/aws"
  version = "~> 5.0"

  name = local.name
  cidr = local.vpc_cidr

  azs             = local.azs
  private_subnets = [for k, v in local.azs : cidrsubnet(local.vpc_cidr, 4, k)]
  public_subnets  = [for k, v in local.azs : cidrsubnet(local.vpc_cidr, 8, k + 48)]

  enable_nat_gateway = true
  single_nat_gateway = true

  public_subnet_tags = {
    "kubernetes.io/role/elb" = 1
  }

  private_subnet_tags = {
    "kubernetes.io/role/internal-elb" = 1
  }

  tags = local.tags
}
terraform 실행
# init 초기화
terraform init
tree .terraform
cat .terraform/modules/modules.json | jq
tree .terraform/providers/registry.terraform.io/hashicorp -L 2

# plan
terraform plan

# 배포
terraform apply -auto-approve
terraform 정보 확인
terraform state list
module.eks.data.aws_caller_identity.current
...

terraform output
...

# EKS 자격증명
$(terraform output -raw configure_kubectl) # aws eks --region ap-northeast-2 update-kubeconfig --name fargate-serverless
cat ~/.kube/config

# kubectl context 변경
kubectl ctx
kubectl config rename-context "arn:aws:eks:ap-northeast-2:$(aws sts get-caller-identity --query 'Account' --output text):cluster/fargate-serverless" "fargate-lab"

# k8s 노드, 파드 정보 확인
kubectl ns default
kubectl cluster-info
kubectl get node
kubectl get pod -A

# 상세 정보 확인
terraform show
terraform state list
terraform state show 'module.eks.aws_eks_cluster.this[0]'
terraform state show 'module.eks.data.tls_certificate.this[0]'
terraform state show 'module.eks.aws_cloudwatch_log_group.this[0]'
terraform state show 'module.eks.aws_eks_access_entry.this["cluster_creator"]'
terraform state show 'module.eks.aws_iam_openid_connect_provider.oidc_provider[0]'
terraform state show 'module.eks.data.aws_partition.current'
terraform state show 'module.eks.aws_iam_policy.cluster_encryption[0]'
terraform state show 'module.eks.aws_iam_role.this[0]'

terraform state show 'module.eks.time_sleep.this[0]'
terraform state show 'module.eks.module.kms.aws_kms_key.this[0]'
terraform state show 'module.eks.module.fargate_profile["kube_system"].aws_eks_fargate_profile.this[0]'
쿠버네티스 - 정보 확인
# k8s api service 확인 : ENDPOINTS 의 IP는 EKS Owned-ENI 2개
kubectl get svc,ep

# node 확인 : 노드(Micro VM) 4대
kubectl get csr
kubectl get node -owide

kubectl describe node | grep eks.amazonaws.com/compute-type

# 파드 확인 : 파드의 IP와 노드의 IP가 같다!
kubectl get pdb -n kube-system
kubectl get pod -A -owide

# aws-load-balancer-webhook-service , eks-extension-metrics-api?
kubectl get svc,ep -n kube-system

# eks-extension-metrics-api?
kubectl get apiservices.apiregistration.k8s.io | grep eks

kubectl get --raw "/apis/metrics.eks.amazonaws.com" | jq
kubectl get --raw "/apis/metrics.eks.amazonaws.com/v1" | jq

# configmap 확인
kubectl get cm -n kube-system

# aws-auth 보다 우선해서 IAM access entry 가 있음을 참고.
# 기본 관리노드 보다 system:node-proxier 그룹이 추가되어 있음.
# fargate profile 이 2개인데, 그 profile 갯수만큼 있음.
kubectl get cm -n kube-system aws-auth -o yaml

#
kubectl rbac-tool lookup system:node-proxier

#
kubectl get cm -n kube-system amazon-vpc-cni -o yaml

# coredns 설정 내용
kubectl get cm -n kube-system coredns -o yaml

# 인증서 작성되어 있음 : client-ca-file , requestheader-client-ca-file
kubectl get cm -n kube-system extension-apiserver-authentication -o yaml

#
kubectl get cm -n kube-system kube-proxy -o yaml
kubectl get cm -n kube-system kube-proxy-config -o yaml
모니터링 - kube-ops-view 설치
# helm 배포
helm repo add geek-cookbook https://geek-cookbook.github.io/charts/
helm install kube-ops-view geek-cookbook/kube-ops-view --version 1.2.2 --set env.TZ="Asia/Seoul" --namespace kube-system

# 포트 포워딩
kubectl port-forward deployment/kube-ops-view -n kube-system 8080:8080 &

# 접속 주소 확인 : 각각 1배, 1.5배, 3배 크기
echo -e "KUBE-OPS-VIEW URL = http://localhost:8080/#scale=1.5"

open "http://127.0.0.1:8080/#scale=1.5" # macOS
kube-ops-view 상세 정보 확인
# node 확인 : 노드(Micro VM)
kubectl get csr
kubectl get node -owide
kubectl describe node | grep eks.amazonaws.com/compute-type

# kube-ops-view 디플로이먼트/파드 상세 정보 확인
kubectl get pod -n kube-system
kubectl get pod -n kube-system -o jsonpath='{.items[0].metadata.annotations.CapacityProvisioned}'
kubectl get pod -n kube-system -l app.kubernetes.io/instance=kube-ops-view -o jsonpath='{.items[0].metadata.annotations.CapacityProvisioned}'

# 디플로이먼트 상세 정보
kubectl get deploy -n kube-system kube-ops-view -o yaml

# 파드 상세 정보 : admission control 이 동작했음을 알 수 있음
kubectl get pod -n kube-system -l app.kubernetes.io/instance=kube-ops-view -o yaml

#
kubectl describe pod -n kube-system -l app.kubernetes.io/instance=kube-ops-view | grep Events: -A10

fargate - 네트워크 정보 확인
# 네임스페이스 생성
kubectl create ns study-aews

# 테스트용 파드 netshoot 디플로이먼트 생성 : 0.5vCPU 1GB 할당되어, 아래 Limit 값은 의미가 없음. 배포 시 대략 시간 측정해보자!
cat <<EOF | kubectl apply -f -
apiVersion: apps/v1
kind: Deployment
metadata:
  name: netshoot
  namespace: study-aews
spec:
  replicas: 1
  selector:
    matchLabels:
      app: netshoot
  template:
    metadata:
      labels:
        app: netshoot
    spec:
      containers:
      - name: netshoot
        image: nicolaka/netshoot
        command: ["tail"]
        args: ["-f", "/dev/null"]
        resources:
          requests:
            cpu: 500m
            memory: 500Mi
          limits:
            cpu: 2
            memory: 2Gi
      terminationGracePeriodSeconds: 0
EOF
kubectl get events -w --sort-by '.lastTimestamp'

# 확인 : 메모리 할당 측정은 어떻게 되었는지?
kubectl get pod -n study-aews -o wide
kubectl get pod -n study-aews -o jsonpath='{.items[0].metadata.annotations.CapacityProvisioned}'
0.5vCPU 1GB

# 디플로이먼트 상세 정보
kubectl get deploy -n study-aews netshoot -o yaml

# 파드 상세 정보 : admission control 이 동작했음을 알 수 있음
kubectl get pod -n study-aews -l app=netshoot -o yaml

#
kubectl describe pod -n study-aews -l app=netshoot | grep Events: -A10

#
kubectl get mutatingwebhookconfigurations.admissionregistration.k8s.io
kubectl describe mutatingwebhookconfigurations 0500-amazon-eks-fargate-mutation.amazonaws.com
kubectl get validatingwebhookconfigurations.admissionregistration.k8s.io

# 파드 내부에 zsh 접속 후 확인
kubectl exec -it deploy/netshoot -n study-aews -- zsh
ip -c a
cat /etc/resolv.conf
curl ipinfo.io/ip # 출력되는 IP는 어떤것? , 어떤 경로를 통해서 인터넷이 되는 걸까?
ping -c 1 <다른 파드 IP ex. coredns pod ip>
lsblk
df -hT /
cat /etc/fstab
exit
fargate - 파드 권한 및 호스트 네임스페이스 공유로 탈취 시도
kubectl apply -f - <<EOF
apiVersion: v1
kind: Pod
metadata:
  name: root-shell
  namespace: study-aews
spec:
  containers:
  - command:
    - /bin/cat
    image: alpine:3
    name: root-shell
    securityContext:
      privileged: true
    tty: true
    stdin: true
    volumeMounts:
    - mountPath: /host
      name: hostroot
  hostNetwork: true
  hostPID: true
  hostIPC: true
  tolerations:
  - effect: NoSchedule
    operator: Exists
  - effect: NoExecute
    operator: Exists
  volumes:
  - hostPath:
      path: /
    name: hostroot
EOF

#
kubectl get pod -n study-aews root-shell
kubectl describe pod -n study-aews root-shell | grep Events: -A 10
Events:
  Type     Reason            Age   From               Message
  ----     ------            ----  ----               -------
  Warning  FailedScheduling  48s   fargate-scheduler  Pod not supported on Fargate: fields not supported: HostNetwork, HostPID, HostIPC, volumes not supported: hostroot is of an unsupported volume Type, invalid SecurityContext fields: Privileged

# 출력 메시지
# Pod not supported on Fargate: fields not supported:
# HostNetwork, HostPID, HostIPC, volumes not supported:
# hostroot is of an unsupported volume Type, invalid SecurityContext fields: Privileged

# 삭제
kubectl delete pod -n study-aews root-shell
fargate - ALB(Ingress) 설치
# 게임 디플로이먼트와 Service, Ingress 배포
cat <<EOF | kubectl apply -f -
apiVersion: apps/v1
kind: Deployment
metadata:
namespace: study-aews
name: deployment-2048
spec:
selector:
matchLabels:
app.kubernetes.io/name: app-2048
replicas: 2
template:
metadata:
labels:
app.kubernetes.io/name: app-2048
spec:
containers:
- image: public.ecr.aws/l6m2t8p7/docker-2048:latest
imagePullPolicy: Always
name: app-2048
ports:
- containerPort: 80
---
apiVersion: v1
kind: Service
metadata:
namespace: study-aews
name: service-2048
spec:
ports:
- port: 80
targetPort: 80
protocol: TCP
type: ClusterIP
selector:
app.kubernetes.io/name: app-2048
---
apiVersion: networking.k8s.io/v1
kind: Ingress
metadata:
namespace: study-aews
name: ingress-2048
annotations:
alb.ingress.kubernetes.io/scheme: internet-facing
alb.ingress.kubernetes.io/target-type: ip
spec:
ingressClassName: alb
rules:
- http:
paths:
- path: /
pathType: Prefix
backend:
service:
name: service-2048
port:
number: 80
EOF
# 모니터링
watch -d kubectl get pod,ingress,svc,ep,endpointslices -n study-aews
# 생성 확인
kubectl get-all -n study-aews
kubectl get ingress,svc,ep,pod -n study-aews
kubectl get targetgroupbindings -n study-aews
# Ingress 확인
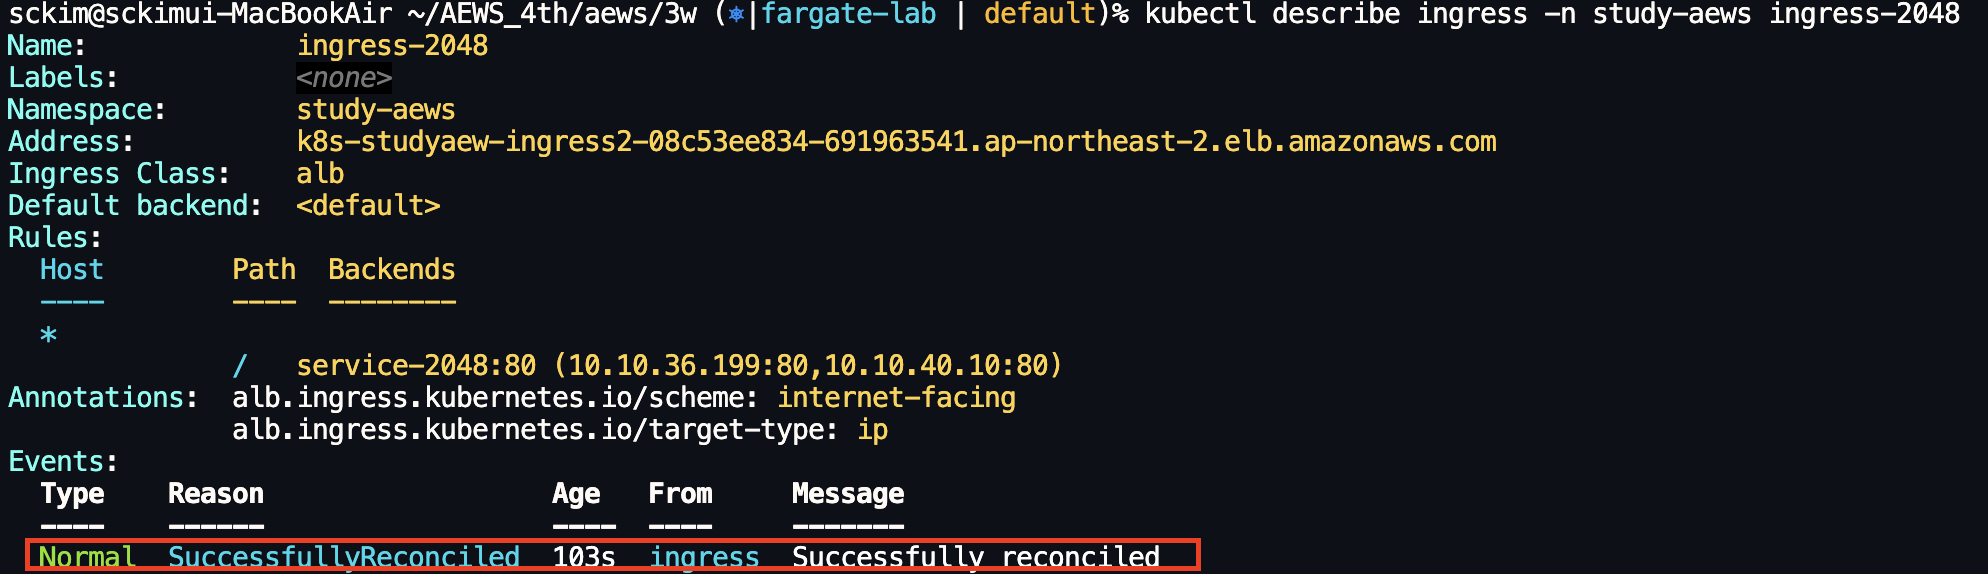
kubectl describe ingress -n study-aews ingress-2048
kubectl get ingress -n study-aews ingress-2048 -o jsonpath="{.status.loadBalancer.ingress[*].hostname}{'\n'}"
# 게임 접속 : ALB 주소로 웹 접속
kubectl get ingress -n study-aews ingress-2048 -o jsonpath='{.status.loadBalancer.ingress[0].hostname}' | awk '{ print "Game URL = http://"$1 }'
# 파드 IP 확인
kubectl get pod -n study-aews -owide
# 파드 증가
kubectl scale deployment -n study-aews deployment-2048 --replicas 4
# 게임 실습 리소스 삭제
kubectl delete ingress ingress-2048 -n study-aews
kubectl delete svc service-2048 -n study-aews && kubectl delete deploy deployment-2048 -n study-aews


fargate - job 실행
#
cat <<EOF | kubectl apply -f -
apiVersion: batch/v1
kind: Job
metadata:
  name: busybox1
  namespace: study-aews
spec:
  template:
    spec:
      containers:
      - name: busybox
        image: busybox
        command: ["/bin/sh", "-c", "sleep 10"]
      restartPolicy: Never
  ttlSecondsAfterFinished: 60 # <-- TTL controller
---
apiVersion: batch/v1
kind: Job
metadata:
  name: busybox2
  namespace: study-aews
spec:
  template:
    spec:
      containers:
      - name: busybox
        image: busybox
        command: ["/bin/sh", "-c", "sleep 10"]
      restartPolicy: Never
EOF

#
kubectl get job,pod -n study-aews
kubectl get job -n study-aews -w
kubectl get pod -n study-aews -w
kubectl get job,pod -n study-aews

# 삭제
kubectl delete job -n study-aews --all

Fargate - Logging
# Nginx 배포
cat <<EOF | kubectl apply -f -
apiVersion: apps/v1
kind: Deployment
metadata:
  name: sample-app
  namespace: study-aews
spec:
  replicas: 2
  selector:
    matchLabels:
      app: nginx
  template:
    metadata:
      labels:
        app: nginx
    spec:
      containers:
      - image: nginx:latest
        name: nginx
        ports:
        - containerPort: 80
          name: http
        resources:
          requests:
            cpu: 500m
            memory: 500Mi
          limits:
            cpu: 2
            memory: 2Gi
---
apiVersion: v1
kind: Service
metadata:
  name: sample-app
  namespace: study-aews
spec:
  selector:
    app: nginx
  ports:
  - port: 80
    targetPort: 80
    protocol: TCP
  type: ClusterIP
EOF
설정 정보 확인
# 확인
kubectl get pod -n study-aews -l app=nginx
kubectl describe pod -n study-aews -l app=nginx
# 반복 접속
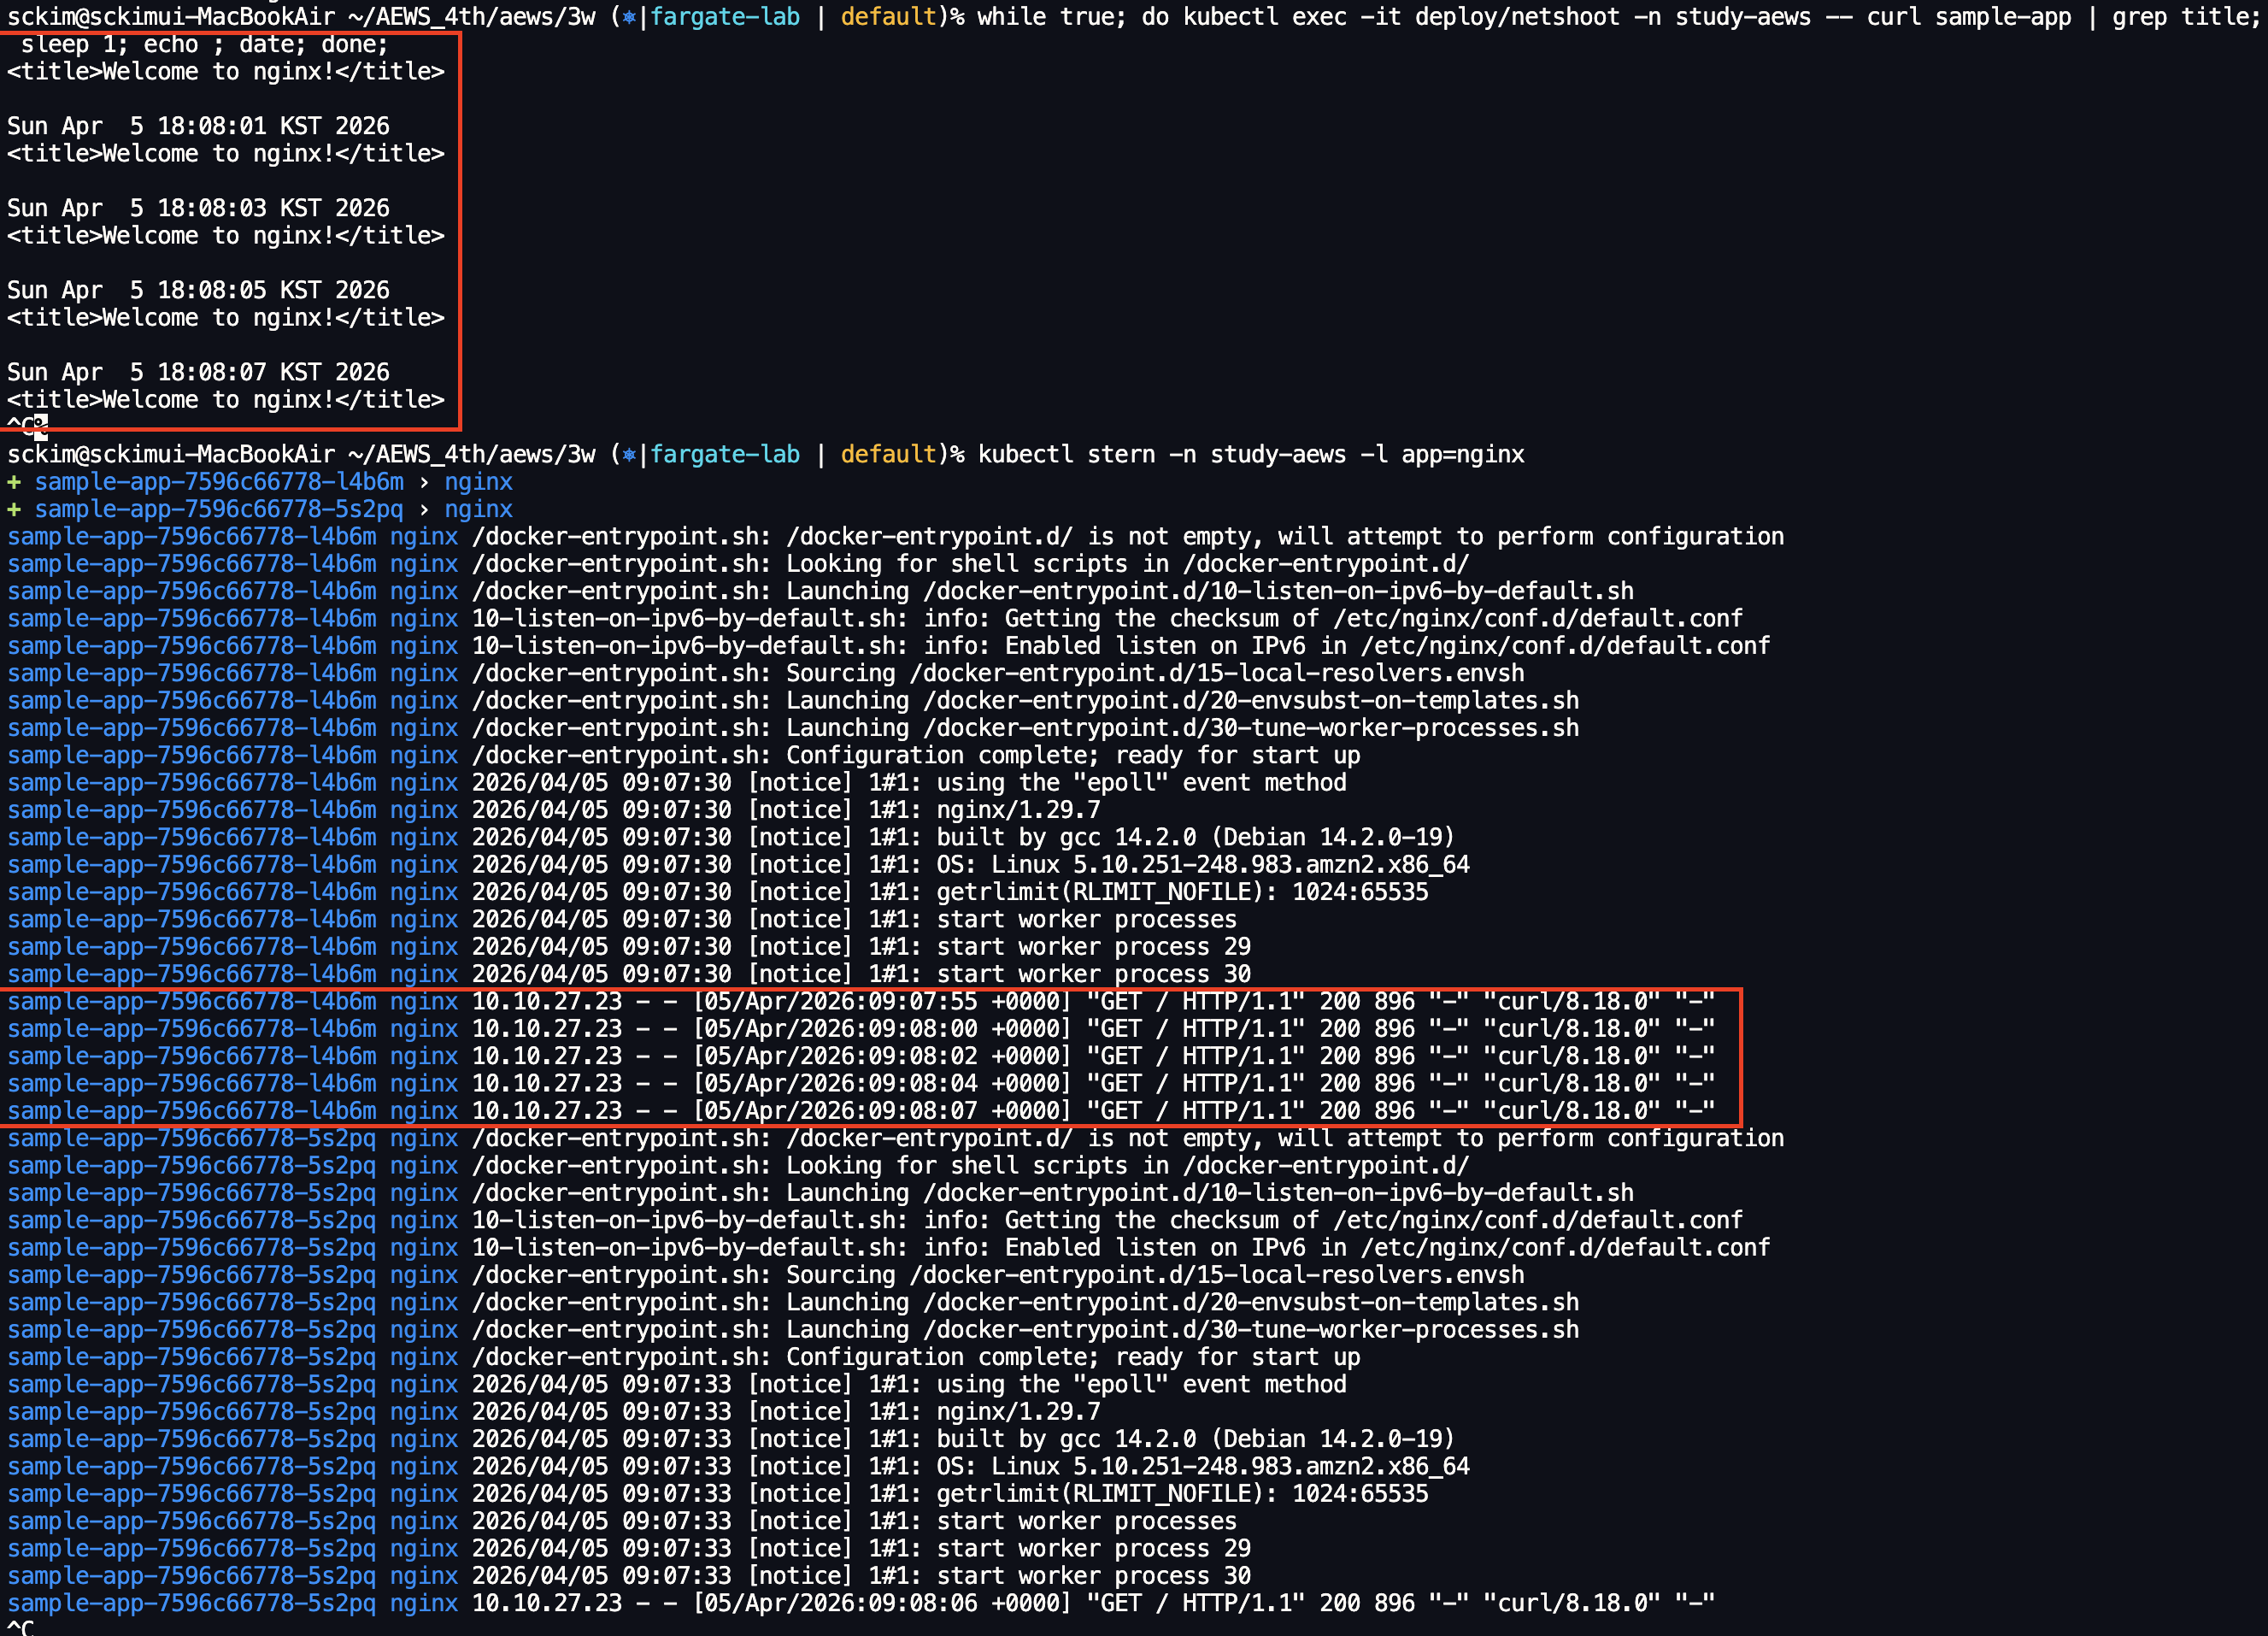
kubectl exec -it deploy/netshoot -n study-aews -- curl sample-app | grep title
while true; do kubectl exec -it deploy/netshoot -n study-aews -- curl sample-app | grep title; sleep 1; echo ; date; done;
# 로그 확인
kubectl stern -n study-aews -l app=nginx
'AWS 4기' 카테고리의 다른 글
| AEWS 4기 4주차(2) - EKS 인증/인가(kubectl 동작 방식) (0) | 2026.04.12 |
|---|---|
| AEWS 4기 4주차(1) - Kubernetes 인증/인가 (0) | 2026.04.11 |
| AEWS 4기 3주차(2) - EKS Scaling(Karpenter) (0) | 2026.04.04 |
| AEWS 4기 3주차(1) - EKS Scaling(HPA,VPA,CAS,KEDA,CPA) (0) | 2026.03.28 |
| AEWS 4기 2주차(3) - ExternalDNS, Gateway API, CoreDNS (0) | 2026.03.24 |
'AWS 4기' Related Articles
more

